Just as extensions allow users to customize the Chrome browser, the options page enables
customization of the extension. Use options to enable features and allow users to choose
what functionality is relevant to their needs.
## Locating the options page
Users can access the options page by [direct link](https://developer.chrome.com/docs/extensions/develop/ui/options-page#linking) or by right-clicking the extension icon in the toolbar and then selecting options. Additionally, users can navigate to the options page by, first, opening `chrome://extensions`, locating the desired extension, clicking **Details**, and then selecting the options link.
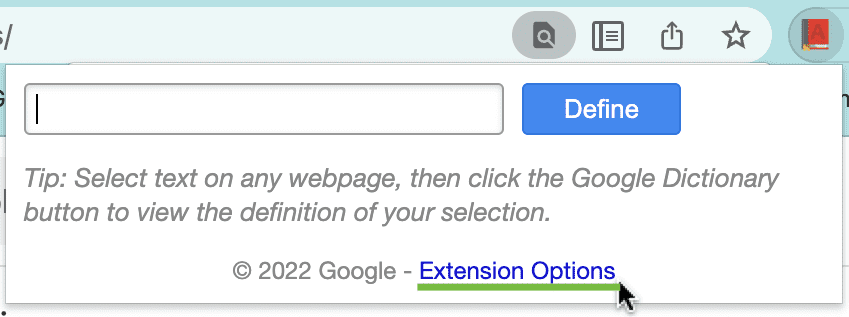 Link to the Options page.  Right-clicking on the extension's icon.
## Write the options page
The following is an example of an options page:
options.html:
My Test Extension Options
Below is an example options script. Save it in the same folder as `options.html`.
This saves the user's preferred options across devices using the [`storage.sync`](https://developer.chrome.com/docs/extensions/reference/api/storage#property-sync) API.
options.js:
// Saves options to browser.storage
const saveOptions = () => {
const color = document.getElementById('color').value;
const likesColor = document.getElementById('like').checked;
browser.storage.sync.set(
{ favoriteColor: color, likesColor: likesColor },
() => {
// Update status to let user know options were saved.
const status = document.getElementById('status');
status.textContent = 'Options saved.';
setTimeout(() => {
status.textContent = '';
}, 750);
}
);
};
// Restores select box and checkbox state using the preferences
// stored in browser.storage.
const restoreOptions = () => {
browser.storage.sync.get(
{ favoriteColor: 'red', likesColor: true },
(items) => {
document.getElementById('color').value = items.favoriteColor;
document.getElementById('like').checked = items.likesColor;
}
);
};
document.addEventListener('DOMContentLoaded', restoreOptions);
document.getElementById('save').addEventListener('click', saveOptions);
Finally, add the `"storage"` permission to the extension's [manifest](https://developer.chrome.com/docs/extensions/reference/manifest) file:
manifest.json:
{
"name": "My extension",
...
"permissions": [
"storage"
]
...
}
## Declare options page behavior
There are two types of extension options pages, [full page](https://developer.chrome.com/docs/extensions/develop/ui/options-page#full_page) and [embedded](https://developer.chrome.com/docs/extensions/develop/ui/options-page#embedded_options). The type
of options page is determined by how it is declared in the manifest.
### Full page options
A *full page* options page is displayed in a new tab. Register the options HTML file in the manifest in the `"options_page"` field.
manifest.json:
{
"name": "My extension",
...
"options_page": "options.html",
...
}
 Full page options in a new tab.
### Embedded options
An *embedded options* page allows users to adjust extension options without navigating away from the
extensions management page inside an embedded box. To declare embedded options, register the HTML
file under the `"options_ui"` field in the extension manifest, with the `"open_in_tab"` key set to `false`.
manifest.json:
{
"name": "My extension",
...
"options_ui": {
"page": "options.html",
"open_in_tab": false
},
...
}
 Embedded options.
`page` (string)
: Specifies the path to the options page, relative to the extension's root.
`open_in_tab` (boolean)
: Indicates whether the extension's options page will be opened in a new tab. If set to `false`, the extension's options page is embedded in `chrome://extensions` rather than opened in a new tab.
## Consider the differences
Options pages embedded inside `chrome://extensions` have subtle behavior differences from options pages in tabs.
### Link to the options page
An extension can link directly to the options page by calling
[`browser.runtime.openOptionsPage()`](https://developer.chrome.com/docs/extensions/reference/api/runtime#method-openOptionsPage). For example, it can be added to a popup:
popup.html:
popup.js:
document.querySelector('#go-to-options').addEventListener('click', function() {
if (browser.runtime.openOptionsPage) {
browser.runtime.openOptionsPage();
} else {
window.open(browser.runtime.getURL('options.html'));
}
});
### Tabs API
Because embedded options code is not hosted in a tab, the Tabs API cannot be used.
Use [`runtime.connect()`](https://developer.chrome.com/docs/extensions/reference/api/runtime#method-connect) and [`runtime.sendMessage()`](https://developer.chrome.com/docs/extensions/reference/api/runtime#method-sendMessage) instead,
if the options page does need to manipulate the containing tab.
### Messaging APIs
If an extension's options page sends a message using [`runtime.connect()`](https://developer.chrome.com/docs/extensions/reference/api/runtime#method-connect) or
[`runtime.sendMessage()`](https://developer.chrome.com/docs/extensions/reference/api/runtime#method-sendMessage), the [sender's tab](https://developer.chrome.com/docs/extensions/reference/api/runtime#property-MessageSender-tab) will not be set, and the [sender's URL](https://developer.chrome.com/docs/extensions/reference/api/runtime#property-MessageSender-url) will
be the options page URL.
### Sizing
The embedded options should automatically determine their own size based on the page content. However,
the embedded box may not find a good size for some types of content. This problem is most common for
options pages that adjust their content shape based on window size.
If this is an issue, provide fixed minimum dimensions for the options page to ensure that the
embedded page will find an appropriate size.