

发布时间:2024 年 5 月 10 日
CSS Anchor Positioning API 是 Web 开发领域的一项重大突破,因为它可让您以原生方式相对于其他元素(称为锚点)定位元素。此 API 简化了许多界面功能(例如菜单和子菜单、提示、选择器、标签、卡片、设置对话框等)的复杂布局要求。借助浏览器内置的锚点定位功能,您无需依赖第三方库即可构建分层用户界面,从而开启无限创意可能。
Chrome 125 及更高版本提供锚点定位功能。
' d='M96 183a64 64 0 0 1-23-23L17 64a128 128 0 0 0 111 192l55-96a64 64 0 0 1-87 23Z'/%3E%3Cpath fill='url(%23b)' d='M192 128a64 64 0 0 1-9 32l-55 96A128 128 0 0 0 239 64H128a64 64 0 0 1 64 64Z'/%3E%3Ccircle cx='128' cy='128' r='52' fill='%231a73e8'/%3E%3Cpath fill='url(%23c)' d='M96 73a64 64 0 0 1 32-9h111a128 128 0 0 0-222 0l56 96a64 64 0 0 1 23-87Z'/%3E%3C/svg%3E)
' xlink:href='%23A'%3E%3Cstop offset='.76' stop-opacity='0'/%3E%3Cstop offset='.95' stop-opacity='.5'/%3E%3Cstop offset='1'/%3E%3C/radialGradient%3E%3CradialGradient id='F' cx='2523' cy='4680' r='20243' gradientTransform='matrix(-.03715 .99931 -2.12836 -.07913 13579 3530)' xlink:href='%23A'%3E%3Cstop offset='0' stop-color='%2335c1f1'/%3E%3Cstop offset='.11' stop-color='%2334c1ed'/%3E%3Cstop offset='.23' stop-color='%232fc2df'/%3E%3Cstop offset='.31' stop-color='%232bc3d2'/%3E%3Cstop offset='.67' stop-color='%2336c752'/%3E%3C/radialGradient%3E%3CradialGradient id='G' cx='24247' cy='7758' r='9734' gradientTransform='matrix(.28109 .95968 -.78353 .22949 24510 -16292)' xlink:href='%23A'%3E%3Cstop offset='0' stop-color='%2366eb6e'/%3E%3Cstop offset='1' stop-color='%2366eb6e' stop-opacity='0'/%3E%3C/radialGradient%3E%3Cpath id='H' d='M24105 20053a9345 9345 0 01-1053 472 10202 10202 0 01-3590 646c-4732 0-8855-3255-8855-7432 0-1175 680-2193 1643-2729-4280 180-5380 4640-5380 7253 0 7387 6810 8137 8276 8137 791 0 1984-230 2704-456l130-44a12834 12834 0 006660-5282c220-350-168-757-535-565z'/%3E%3Cpath id='I' d='M11571 25141a7913 7913 0 01-2273-2137 8145 8145 0 01-1514-4740 8093 8093 0 013093-6395 8082 8082 0 011373-859c312-148 846-414 1554-404a3236 3236 0 012569 1297 3184 3184 0 01636 1866c0-21 2446-7960-8005-7960-4390 0-8004 4166-8004 7820 0 2319 538 4170 1212 5604a12833 12833 0 007684 6757 12795 12795 0 003908 610c1414 0 2774-233 4045-656a7575 7575 0 01-6278-803z'/%3E%3Cpath id='J' d='M16231 15886c-80 105-330 250-330 566 0 260 170 512 472 723 1438 1003 4149 868 4156 868a5954 5954 0 003027-839 6147 6147 0 001133-850 6180 6180 0 001910-4437c26-2242-796-3732-1133-4392-2120-4141-6694-6525-11668-6525-7011 0-12703 5635-12798 12620 47-3654 3679-6605 7996-6605 350 0 2346 34 4200 1007 1634 858 2490 1894 3086 2921 618 1067 728 2415 728 2952s-271 1333-780 1990z'/%3E%3Cuse fill='url(%23B)' xlink:href='%23H'/%3E%3Cuse fill='url(%23D)' opacity='.35' xlink:href='%23H'/%3E%3Cuse fill='url(%23C)' xlink:href='%23I'/%3E%3Cuse fill='url(%23E)' opacity='.4' xlink:href='%23I'/%3E%3Cuse fill='url(%23F)' xlink:href='%23J'/%3E%3Cuse fill='url(%23G)' xlink:href='%23J'/%3E%3C/svg%3E)
' gradientUnits='userSpaceOnUse'%3E%3Cstop offset='.2' stop-color='%239059ff' stop-opacity='0'/%3E%3Cstop offset='.3' stop-color='%238c4ff3' stop-opacity='.1'/%3E%3Cstop offset='.8' stop-color='%237716a8' stop-opacity='.5'/%3E%3Cstop offset='1' stop-color='%236e008b' stop-opacity='.6'/%3E%3C/radialGradient%3E%3CradialGradient id='ff-g' cx='239.1' cy='34.6' r='171.6' gradientUnits='userSpaceOnUse'%3E%3Cstop offset='0' stop-color='%23ffe226'/%3E%3Cstop offset='.1' stop-color='%23ffdb27'/%3E%3Cstop offset='.3' stop-color='%23ffc82a'/%3E%3Cstop offset='.5' stop-color='%23ffa930'/%3E%3Cstop offset='.7' stop-color='%23ff7e37'/%3E%3Cstop offset='.8' stop-color='%23ff7139'/%3E%3C/radialGradient%3E%3CradialGradient id='ff-h' cx='374' cy='-74.3' r='732.2' gradientUnits='userSpaceOnUse'%3E%3Cstop offset='.1' stop-color='%23fff44f'/%3E%3Cstop offset='.5' stop-color='%23ff980e'/%3E%3Cstop offset='.6' stop-color='%23ff5634'/%3E%3Cstop offset='.7' stop-color='%23ff3647'/%3E%3Cstop offset='.9' stop-color='%23e31587'/%3E%3C/radialGradient%3E%3CradialGradient id='ff-i' cx='304.6' cy='7.1' r='536.4' gradientTransform='rotate(84 303 4)' gradientUnits='userSpaceOnUse'%3E%3Cstop offset='0' stop-color='%23fff44f'/%3E%3Cstop offset='.1' stop-color='%23ffe847'/%3E%3Cstop offset='.2' stop-color='%23ffc830'/%3E%3Cstop offset='.3' stop-color='%23ff980e'/%3E%3Cstop offset='.4' stop-color='%23ff8b16'/%3E%3Cstop offset='.5' stop-color='%23ff672a'/%3E%3Cstop offset='.6' stop-color='%23ff3647'/%3E%3Cstop offset='.7' stop-color='%23e31587'/%3E%3C/radialGradient%3E%3CradialGradient id='ff-j' cx='235' cy='98.1' r='457.1' gradientUnits='userSpaceOnUse'%3E%3Cstop offset='.1' stop-color='%23fff44f'/%3E%3Cstop offset='.5' stop-color='%23ff980e'/%3E%3Cstop offset='.6' stop-color='%23ff5634'/%3E%3Cstop offset='.7' stop-color='%23ff3647'/%3E%3Cstop offset='.9' stop-color='%23e31587'/%3E%3C/radialGradient%3E%3CradialGradient id='ff-k' cx='355.7' cy='124.9' r='500.3' gradientUnits='userSpaceOnUse'%3E%3Cstop offset='.1' stop-color='%23fff44f'/%3E%3Cstop offset='.2' stop-color='%23ffe141'/%3E%3Cstop offset='.5' stop-color='%23ffaf1e'/%3E%3Cstop offset='.6' stop-color='%23ff980e'/%3E%3C/radialGradient%3E%3ClinearGradient id='ff-a' x1='446.9' y1='76.8' x2='47.9' y2='461.8' gradientUnits='userSpaceOnUse'%3E%3Cstop offset='.1' stop-color='%23fff44f'/%3E%3Cstop offset='.1' stop-color='%23ffe847'/%3E%3Cstop offset='.2' stop-color='%23ffc830'/%3E%3Cstop offset='.4' stop-color='%23ff980e'/%3E%3Cstop offset='.4' stop-color='%23ff8b16'/%3E%3Cstop offset='.5' stop-color='%23ff672a'/%3E%3Cstop offset='.5' stop-color='%23ff3647'/%3E%3Cstop offset='.7' stop-color='%23e31587'/%3E%3C/linearGradient%3E%3ClinearGradient id='ff-l' x1='442.1' y1='74.8' x2='102.6' y2='414.3' gradientUnits='userSpaceOnUse'%3E%3Cstop offset='.2' stop-color='%23fff44f' stop-opacity='.8'/%3E%3Cstop offset='.3' stop-color='%23fff44f' stop-opacity='.6'/%3E%3Cstop offset='.5' stop-color='%23fff44f' stop-opacity='.2'/%3E%3Cstop offset='.6' stop-color='%23fff44f' stop-opacity='0'/%3E%3C/linearGradient%3E%3C/defs%3E%3Cpath d='M479 166c-11-25-32-52-49-60a249 249 0 0 1 25 73c-27-68-73-95-111-155a255 255 0 0 1-8-14 44 44 0 0 1-4-9 1 1 0 0 0 0-1 1 1 0 0 0-1 0c-60 35-81 101-83 134a120 120 0 0 0-66 25 71 71 0 0 0-6-5 111 111 0 0 1-1-58c-25 11-44 29-58 44-9-12-9-52-8-60l-8 4a175 175 0 0 0-24 21 210 210 0 0 0-22 26 203 203 0 0 0-32 73l-1 2-2 15a229 229 0 0 0-4 34v1a240 240 0 0 0 477 40l1-9c5-41 0-84-15-121zM202 355l3 1-3-1zm55-145zm198-31z' fill='url(%23ff-a)'/%3E%3Cpath d='M479 166c-11-25-32-52-49-60 14 26 22 53 25 72v1a207 207 0 0 1-206 279c-113-3-212-87-231-197-3-17 0-26 2-40-2 11-3 14-4 34v1a240 240 0 0 0 477 40l1-9c5-41 0-84-15-121z' fill='url(%23ff-b)'/%3E%3Cpath d='M479 166c-11-25-32-52-49-60 14 26 22 53 25 72v1a207 207 0 0 1-206 279c-113-3-212-87-231-197-3-17 0-26 2-40-2 11-3 14-4 34v1a240 240 0 0 0 477 40l1-9c5-41 0-84-15-121z' fill='url(%23ff-c)'/%3E%3Cpath d='m362 195 1 1a130 130 0 0 0-22-29C266 92 322 5 331 0c-60 35-81 101-83 134l9-1c45 0 84 25 105 62z' fill='url(%23ff-d)'/%3E%3Cpath d='M257 210c-1 6-22 26-29 26-68 0-80 41-80 41 3 35 28 64 57 79l4 2 7 3a107 107 0 0 0 31 6c120 6 143-143 57-186 22-4 45 5 58 14-21-37-60-62-105-62l-9 1a120 120 0 0 0-66 25l17 16c16 16 58 33 58 35z' fill='url(%23ff-e)'/%3E%3Cpath d='M257 210c-1 6-22 26-29 26-68 0-80 41-80 41 3 35 28 64 57 79l4 2 7 3a107 107 0 0 0 31 6c120 6 143-143 57-186 22-4 45 5 58 14-21-37-60-62-105-62l-9 1a120 120 0 0 0-66 25l17 16c16 16 58 33 58 35z' fill='url(%23ff-f)'/%3E%3Cpath d='m171 151 5 3a111 111 0 0 1-1-58c-25 11-44 29-58 44 1 0 36 0 54 11z' fill='url(%23ff-g)'/%3E%3Cpath d='M18 261a242 242 0 0 0 231 197 207 207 0 0 0 206-279c8 56-20 110-64 146-86 71-169 43-186 31l-3-1c-50-24-71-70-67-110-42 0-57-35-57-35s38-28 89-4c46 22 90 4 90 4 0-2-42-19-58-35l-17-16a71 71 0 0 0-6-5l-5-3c-18-11-52-11-54-11-9-12-9-51-8-60l-8 4a175 175 0 0 0-24 21 210 210 0 0 0-22 26 203 203 0 0 0-32 73c0 1-9 38-5 57z' fill='url(%23ff-h)'/%3E%3Cpath d='M341 167a130 130 0 0 1 22 29 46 46 0 0 1 4 3c55 50 26 121 24 126 44-36 72-90 64-146-27-68-73-95-111-155a255 255 0 0 1-8-14 44 44 0 0 1-4-9 1 1 0 0 0 0-1 1 1 0 0 0-1 0c-9 5-65 92 10 167z' fill='url(%23ff-i)'/%3E%3Cpath d='M367 199a46 46 0 0 0-4-3l-1-1c-13-9-36-18-58-15 86 44 63 193-57 187a107 107 0 0 1-31-6 131 131 0 0 1-11-5c17 12 99 39 186-31 2-5 31-76-24-126z' fill='url(%23ff-j)'/%3E%3Cpath d='M148 277s12-41 80-41c7 0 28-20 29-26s-44 18-90-4c-51-24-89 4-89 4s15 35 57 35c-4 40 16 85 67 110l3 1c-29-15-54-44-57-79z' fill='url(%23ff-k)'/%3E%3Cpath d='M479 166c-11-25-32-52-49-60a249 249 0 0 1 25 73c-27-68-73-95-111-155a255 255 0 0 1-8-14 44 44 0 0 1-4-9 1 1 0 0 0 0-1 1 1 0 0 0-1 0c-60 35-81 101-83 134l9-1c45 0 84 25 105 62-13-9-36-18-58-14 86 43 63 192-57 186a107 107 0 0 1-31-6 131 131 0 0 1-11-5l-3-1 3 1c-29-15-54-44-57-79 0 0 12-41 80-41 7 0 28-20 29-26 0-2-42-19-58-35l-17-16a71 71 0 0 0-6-5 111 111 0 0 1-1-58c-25 11-44 29-58 44-9-12-9-52-8-60l-8 4a175 175 0 0 0-24 21 210 210 0 0 0-22 26 203 203 0 0 0-32 73l-1 2-2 15a279 279 0 0 0-4 34v1a240 240 0 0 0 477 40l1-9c5-41 0-84-15-121zm-24 13z' fill='url(%23ff-l)'/%3E%3C/svg%3E)
' xlink:href='%23s-b'%3E%3Cstop offset='0' stop-color='%2324a5f3' stop-opacity='0' /%3E%3Cstop offset='1' stop-color='%231e8ceb' /%3E%3C/radialGradient%3E%3CradialGradient id='s-j' cx='109.3' cy='13.8' r='93.1' gradientTransform='matrix(-.02 1.1 -1.04 -.02 137 -115)' xlink:href='%23s-b'%3E%3Cstop offset='0' stop-opacity='0' /%3E%3Cstop offset='1' stop-color='%235488d6' stop-opacity='0' /%3E%3Cstop offset='1' stop-color='%235d96eb' /%3E%3C/radialGradient%3E%3C/defs%3E%3Crect width='220' height='220' x='22' y='-107' fill='url(%23s-a)' ry='49' transform='matrix(.57 0 0 .57 187 256)' /%3E%3Cg transform='translate(194 190)'%3E%3Ccircle cx='67.8' cy='67.7' fill='url(%23s-c)' paint-order='stroke fill markers' r='54' /%3E%3Ccircle cx='-69.9' cy='69.3' fill='url(%23s-i)' transform='translate(138 -2)' r='54' /%3E%3C/g%3E%3Cellipse cx='120' cy='14.2' fill='url(%23s-j)' rx='93.1' ry='93.7' transform='matrix(.58 0 0 .58 192 250)' /%3E%3Cg transform='matrix(.58 0 0 .57 197 182)'%3E%3Cpath fill='%23cac7c8' d='M46 192h1l72-48-7-9-66 57Z' /%3E%3Cpath fill='%23fbfffc' d='M46 191v1l66-57-7-9-59 65Z' /%3E%3Cpath fill='url(%23s-d)' d='m119 144-7-9 66-57-59 66Z' /%3E%3Cpath fill='%23fb645c' d='m105 126 7 9 66-57-1-1-72 49Z' /%3E%3C/g%3E%3Cpath stroke='%23fff' stroke-linecap='round' stroke-miterlimit='1' stroke-width='1.3' d='m287 278 3-2m-12-17 8-2m-8-3h4m-4-13 8 2m-8 3h4m-1-13 7 3m-4-11 7 4m-2-11 6 6m0-12 6 7m1-11 4 6m4-10 3 7m5-9 2 7m15-7-1 7m10-5-3 7m11-4-4 7m11-2-5 6m16 7-7 4m10 4-7 3m10 6-8 1m8 16-8-2m5 10-7-3m4 11-7-4m2 11-6-5m0 11-5-6m-2 11-4-7m-4 11-3-8m-6 10-1-8m-16 8 2-8m-10 5 3-7m-11 4 4-7m-11 2 5-6m-8 3 3-3m4 8 2-3m5 8 2-4m6 7 1-4m8 5v-4m8 4v-4m9 3-1-4m9 1-2-4m9 0-2-4m9-2-3-3m8-4-3-2m8-5-4-2m7-6-4-1m5-8h-4m4-8h-4m3-9-4 1m1-9-4 2m-1-9-3 2m-2-9-3 3m-4-8-2 3m-5-8-2 4m-6-6-1 3m-8-5v4m-8-4v4m-9-2 1 3m-9 0 2 3m-9 1 2 3m-9 2 3 3m-8 4 3 2m-8 5 4 2m-7 6 4 1m-4 25 4-1m-2 5 7-3m-6 7 4-2m-2 6 7-4m-13-21h8m41-41v-8m0 99v-8m49-42h-8' transform='translate(-65 8)' /%3E%3C/svg%3E)
核心概念:锚点和定位元素
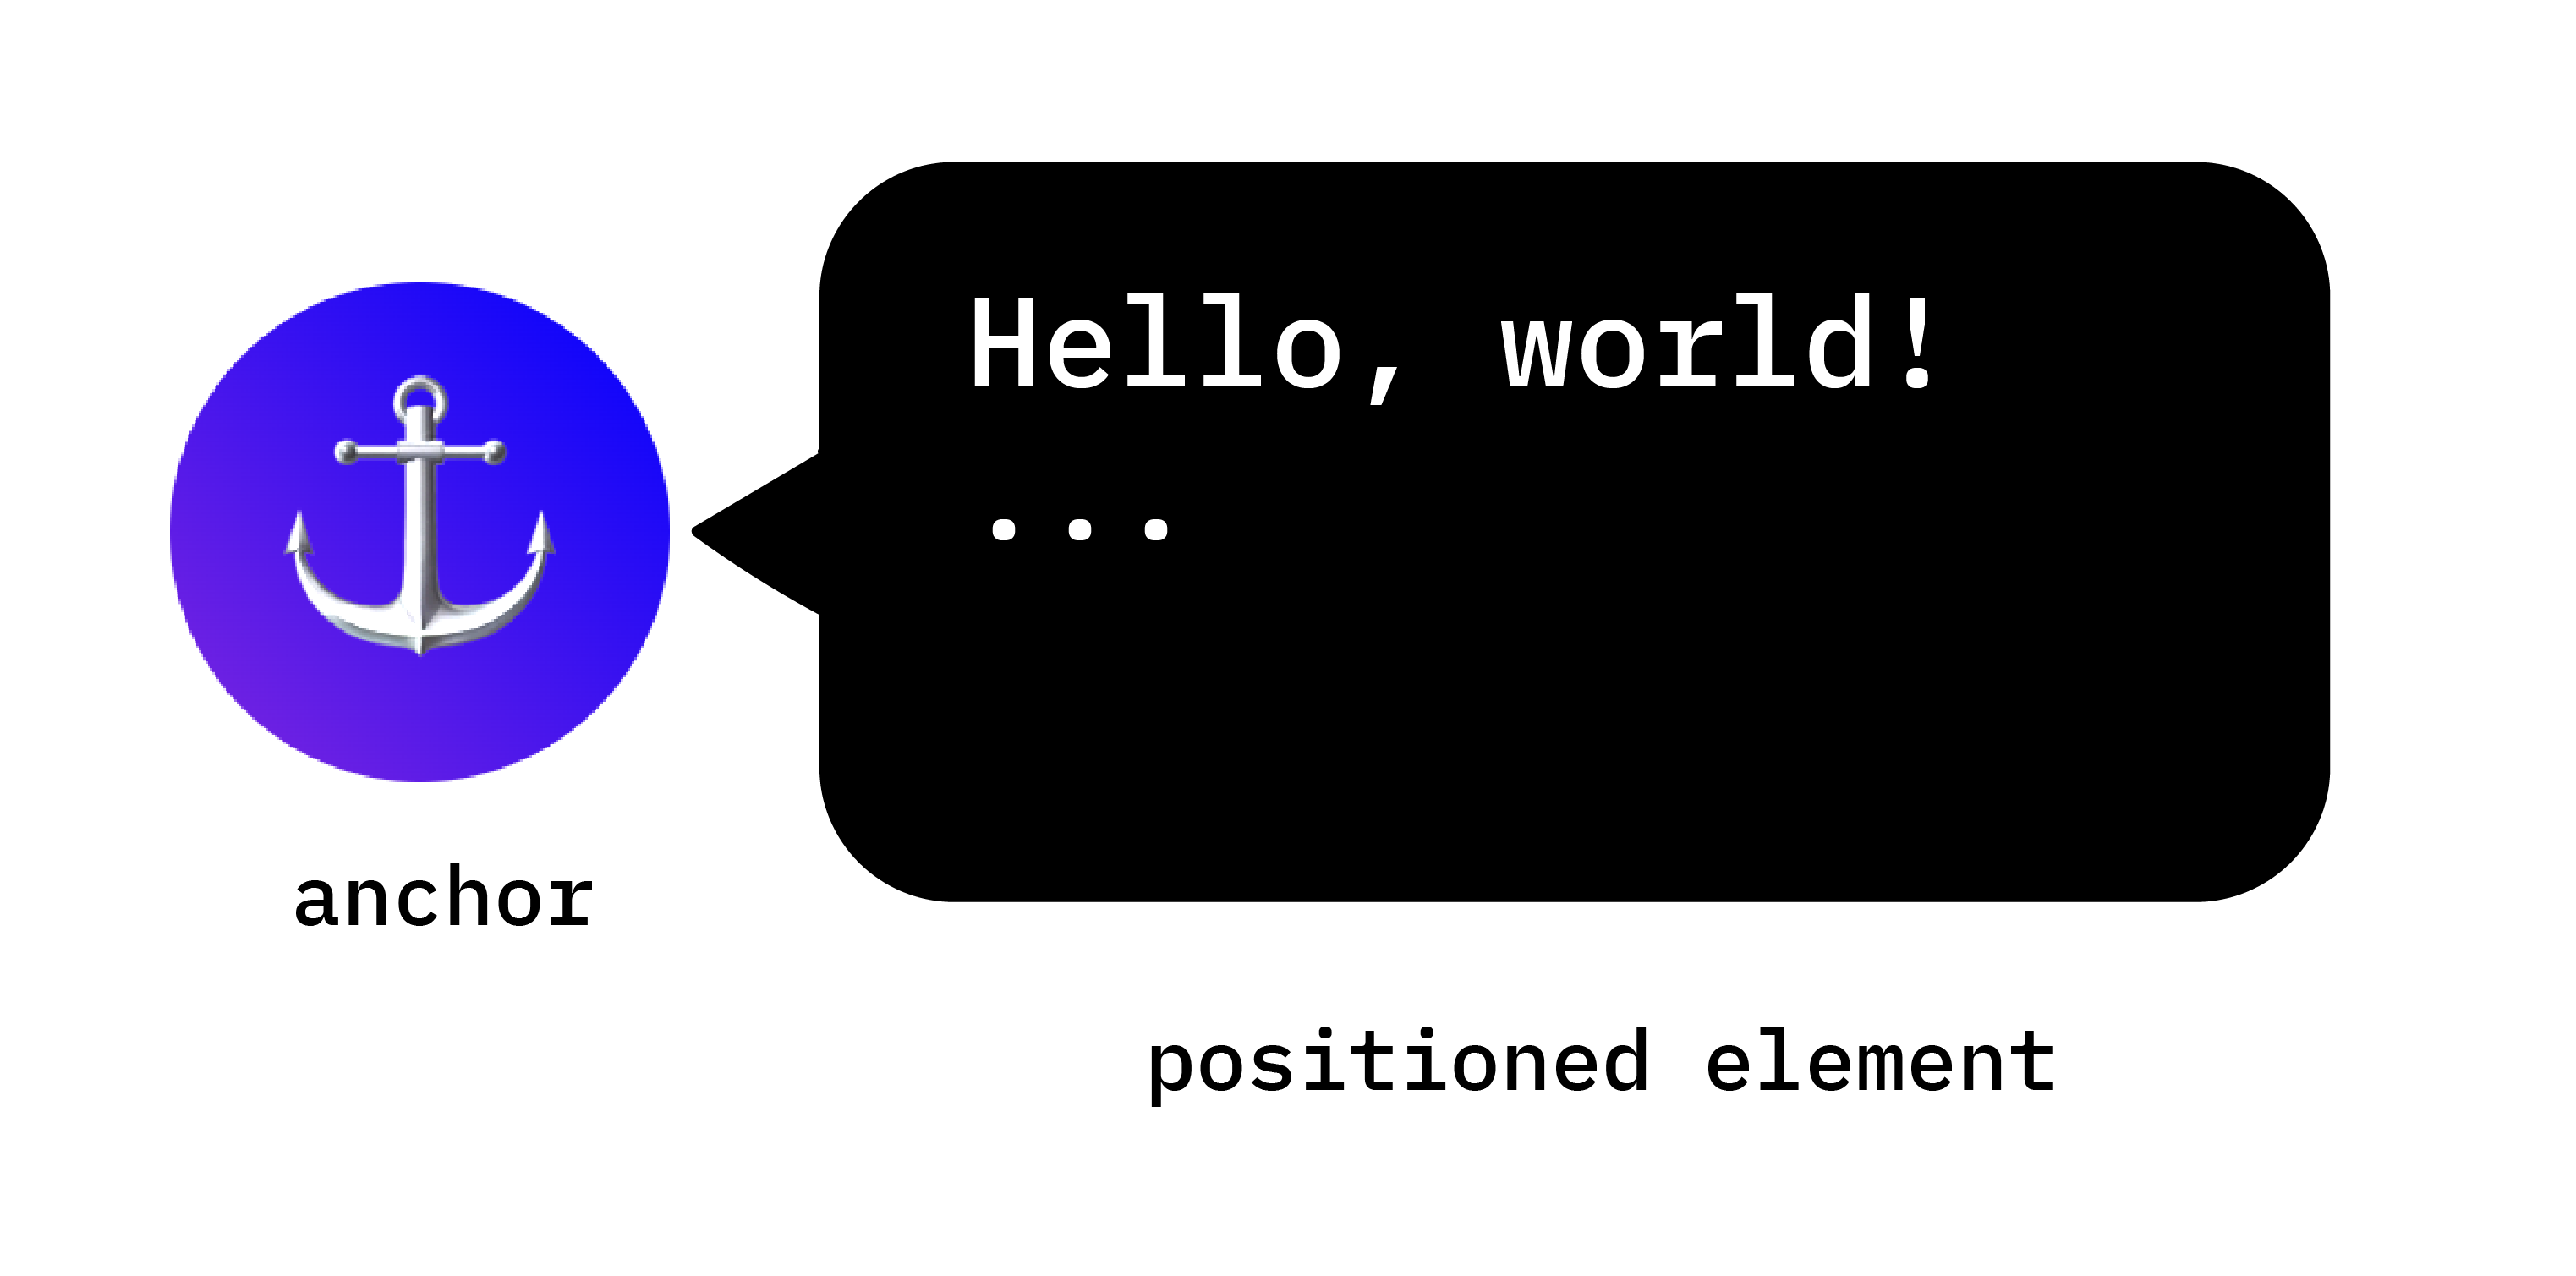
此 API 的核心是锚点与定位元素之间的关系。锚点是指使用 anchor-name 属性指定为参考点的元素。定位元素是指使用 position-anchor 属性相对于锚定元素放置的元素,或者在其定位逻辑中明确使用 anchor-name 的元素。
设置锚点
创建锚点非常简单。将 anchor-name 属性应用于所选元素,并为其分配一个唯一标识符。此唯一标识符必须以双短划线开头,与 CSS 变量类似。
.anchor-button {
    anchor-name: --anchor-el;
}
在分配锚点名称后,.anchor-button 会充当锚点,随时可以引导其他元素的放置。您可以通过以下两种方式之一将此锚点与其他元素相关联:
隐式锚点
将锚点连接到其他元素的第一个方法是使用隐式锚点,如以下代码示例所示。position-anchor 属性会添加到您要连接到锚点的元素中,并以锚点的名称(在本例中为 --anchor-el)作为值。
.positioned-notice {
    position-anchor: --anchor-el;
}
借助隐式锚定关系,您可以使用 anchor() 函数定位元素,而无需在其第一个实参中明确指定锚定名称。
.positioned-notice {
    position-anchor: --anchor-el;
    top: anchor(bottom);
}
显式锚点
或者,您也可以直接在锚点函数中使用锚点名称(例如 top: anchor(--anchor-el bottom)。这称为显式锚点,如果您想锚定到多个元素,这会非常方便(请继续阅读以查看示例)。
.positioned-notice {
    top: anchor(--anchor-el bottom);
}
相对于锚点定位元素
锚点定位以 CSS 绝对定位为基础。如需使用定位值,您需要向已定位的元素添加 position: absolute。然后,使用 anchor() 函数应用定位值。例如,如需将锚定元素定位在锚定元素的左上角,请使用以下定位方式:
.positioned-notice {
    position-anchor: --anchor-el;
    /* absolutely position the positioned element */
    position: absolute;
    /* position the right of the positioned element at the right edge of the anchor */
    right: anchor(right);
    /* position the bottom of the positioned element at the top edge of the anchor */
    bottom: anchor(top);
}
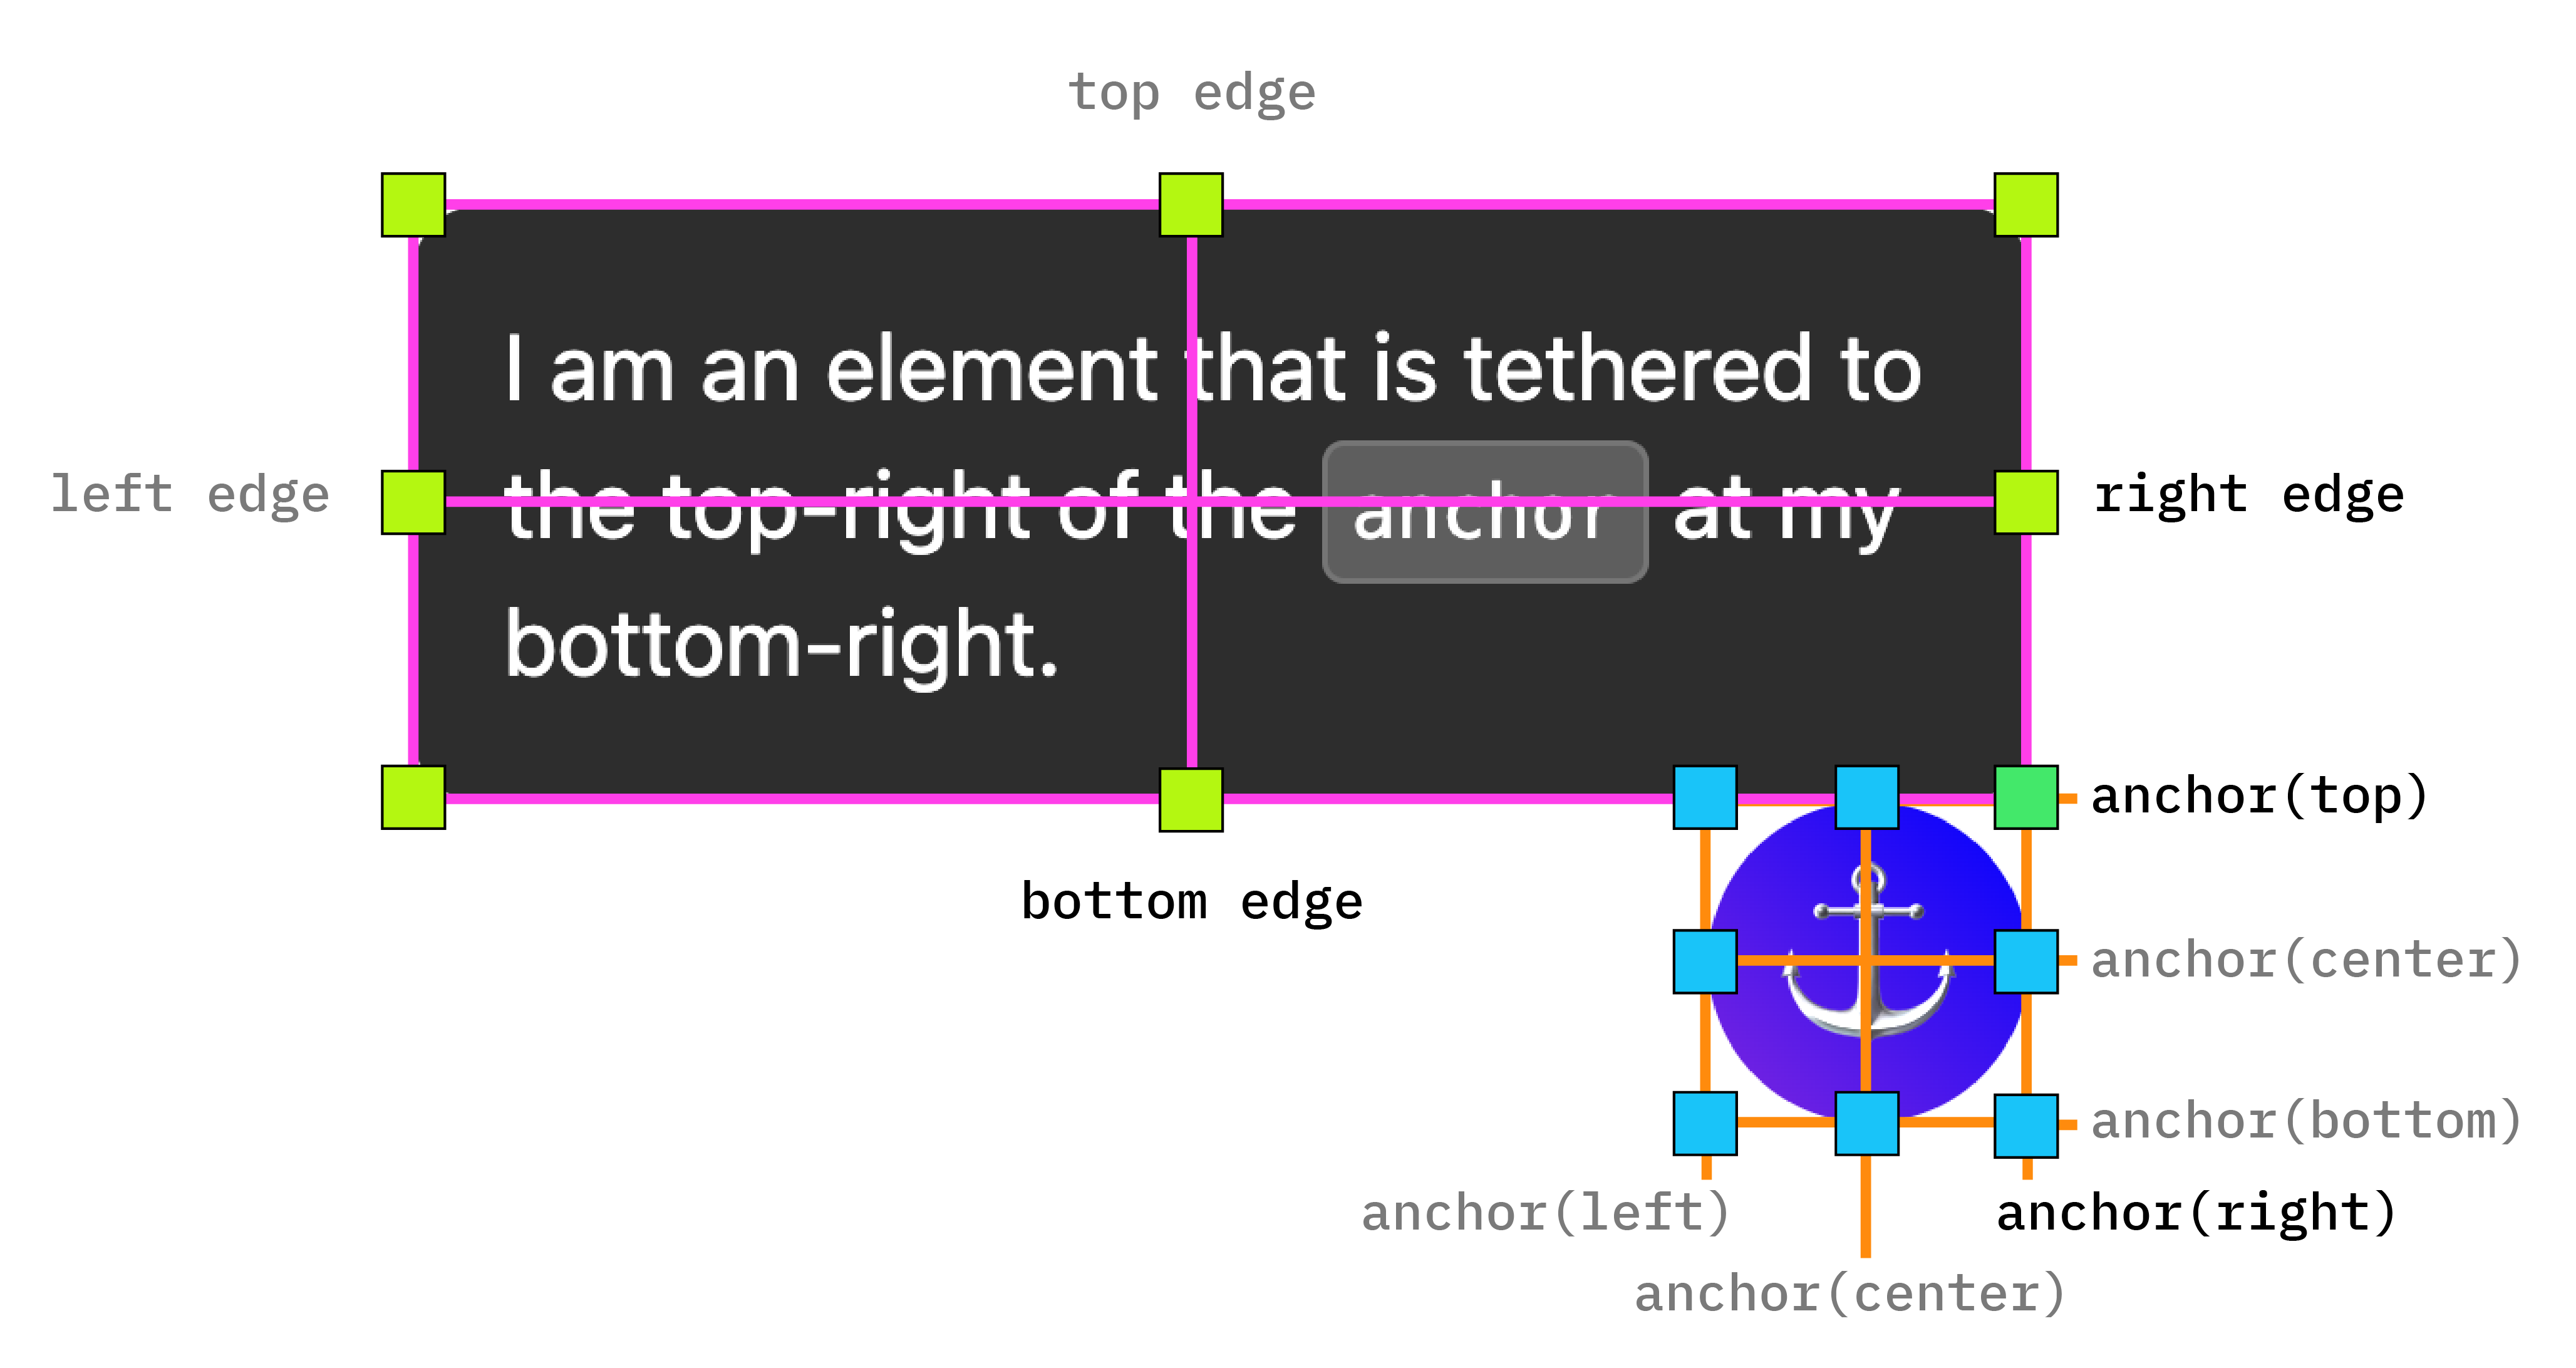
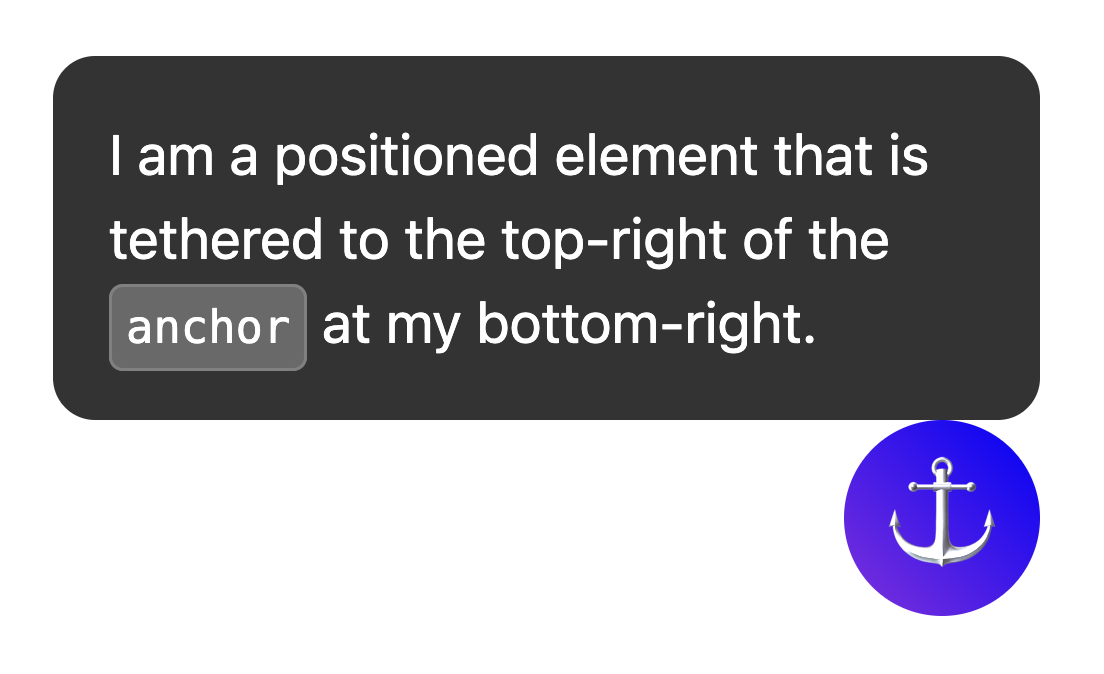
现在,您已将一个元素锚定到另一个元素,如下图所示。
若要对这些值使用逻辑定位,则等效值如下:
top=inset-block-startleft=inset-inline-startbottom=inset-block-endright=inset-inline-end
使用 anchor-center 将定位元素居中
为了更轻松地将锚定位置的元素相对于其锚点居中放置,我们新增了一个名为 anchor-center 的值,该值可与 justify-self、align-self、justify-items 和 align-items 属性搭配使用。
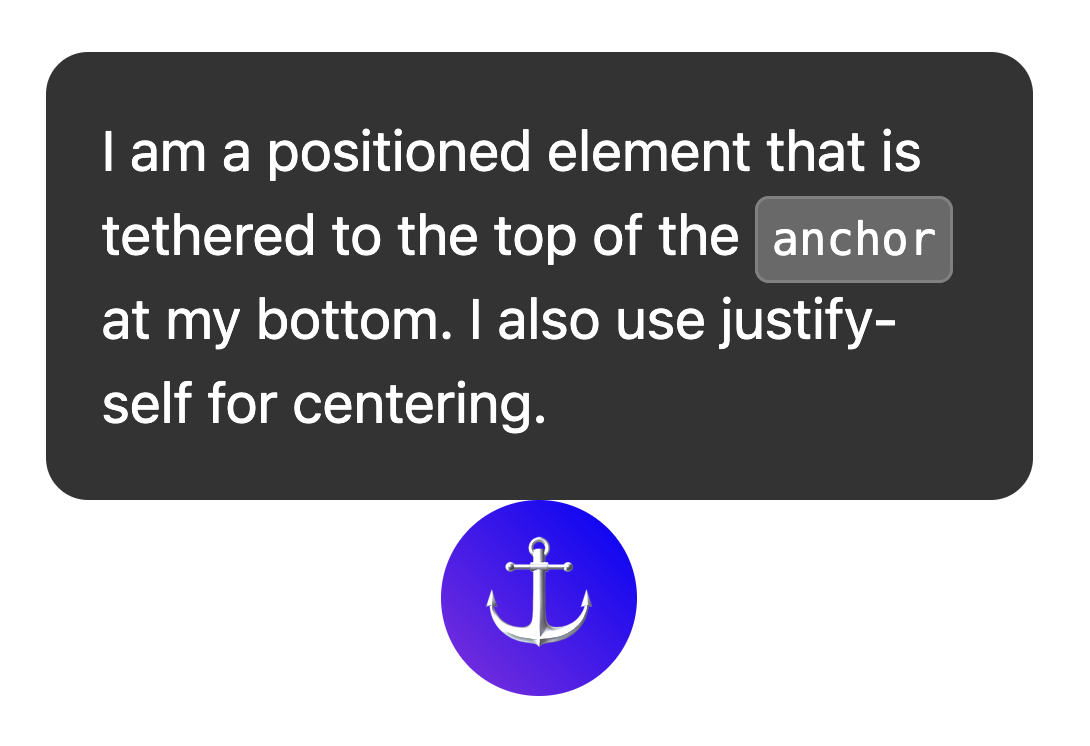
此示例通过使用 justify-self: anchor-center 将定位元素居中放置在其锚点之上,从而修改了上一个示例。
.positioned-notice {
  position: absolute;
  /*  Anchor reference  */
  position-anchor: --anchor-el;
  /*  Position bottom of positioned elem at top of anchor  */
  bottom: anchor(top);
  /*  Center justification to the anchor */
  justify-self: anchor-center;
}
多个锚点
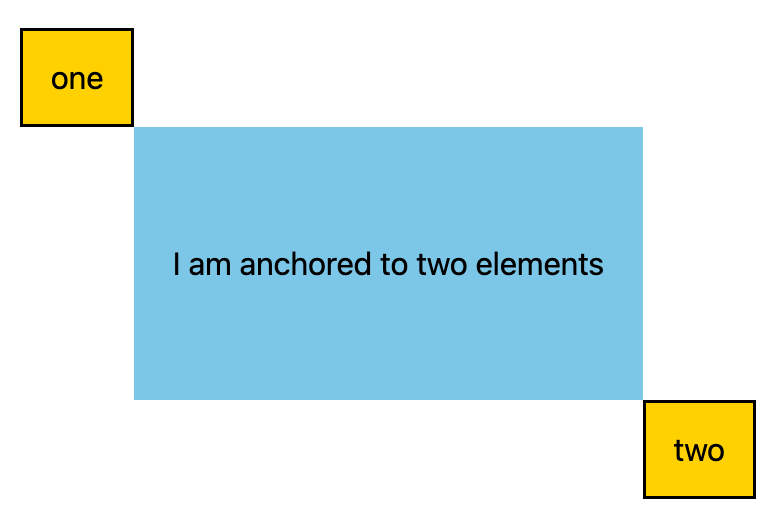
元素可以锚定到多个锚点。这意味着,您可能需要设置相对于多个锚点定位的位置值。为此,请使用 anchor() 函数,并在第一个实参中明确说明您要引用的锚点。在以下示例中,定位元素的左上角锚定到某个锚点的右下角,而定位元素的右下角锚定到第二个锚点的左上角:
.anchored {
  position: absolute;
  top: anchor(--one bottom);
  left: anchor(--one right);
  right: anchor(--two left);
  bottom: anchor(--two top);
}
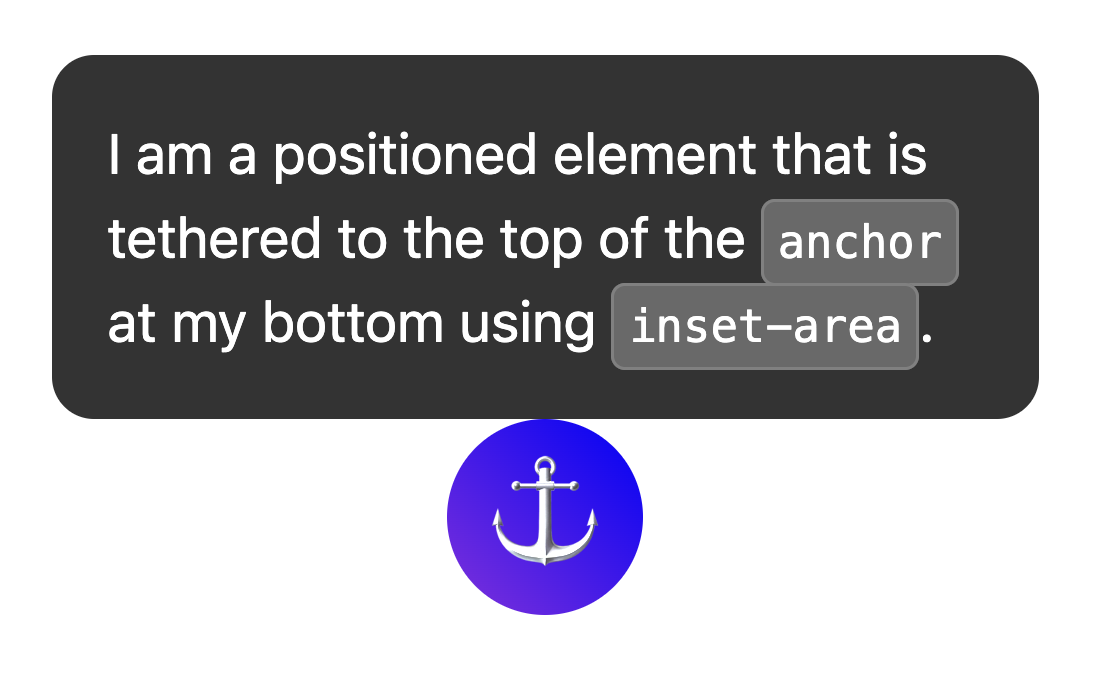
使用 inset-area 定位
除了绝对定位提供的默认方向定位之外,锚定 API 中还包含一种新的布局机制,称为“边衬区”。
通过插页区域,您可以轻松地将锚定位置的元素放置在其各自锚点的相对位置,并且可以在 9 单元格网格上使用,锚定元素位于中心。
9 宫格中显示了各种可能的插页区域定位选项
如需使用边衬区而非绝对定位,请使用 inset-area 属性,并指定物理值或逻辑值。例如:
- 顶部居中:
inset-area: top或inset-area: block-start - 左中:
inset-area: left或inset-area: inline-start - 底部中心:
inset-area: bottom或inset-area: block-end - 右中:
inset-area: right或inset-area: inline-end
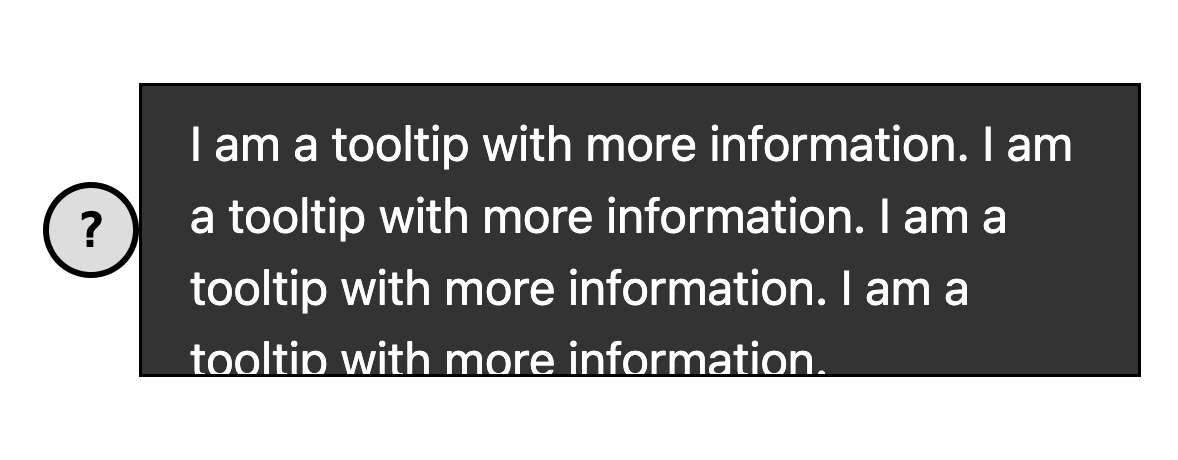
使用 anchor-size() 调整元素大小
anchor-size() 函数也是锚点定位 API 的一部分,可用于根据锚点的大小(宽度、高度或内联大小和块大小)调整或定位锚点定位元素的尺寸。
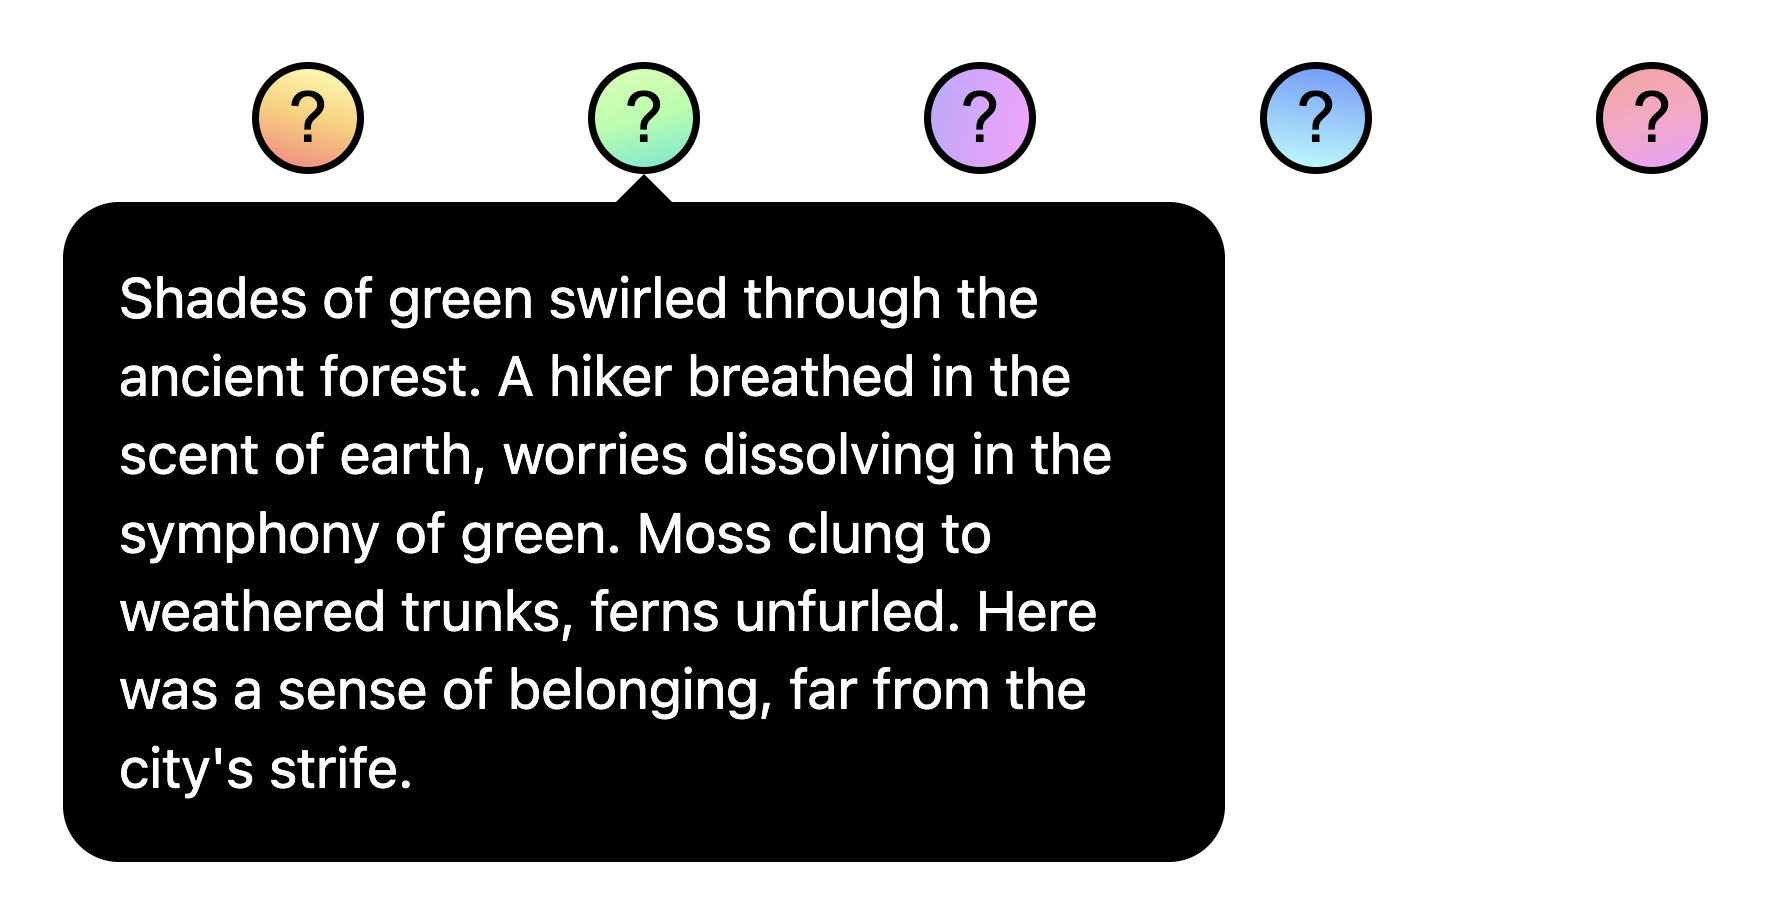
以下 CSS 展示了如何将此功能用于高度,即在 calc() 函数中使用 anchor-size(height) 将提示的最大高度设置为锚点高度的两倍。
.positioned-notice {
  position-anchor: --question-mark;

  /*  set max height of the tooltip to 2x height of the anchor  */
  max-height: calc(anchor-size(height) * 2);
}
将锚点与弹出式信息和对话框等顶层元素搭配使用
锚点定位功能与 popover 等顶层元素搭配使用时效果极佳。和 <dialog>。虽然这些元素放置在与 DOM 子树的其余部分不同的层中,但锚点定位功能可让您将它们重新绑定到不在顶层的元素,并随这些元素一起滚动。这对于分层界面来说是一大优势。
在以下示例中,一组工具提示弹出式窗口通过按钮触发打开。按钮是锚点,提示是定位元素。您可以像设置任何其他锚定元素的样式一样设置定位元素的样式。在此特定示例中,anchor-name 和 position-anchor 是按钮和提示的内嵌样式。由于每个锚点都需要一个唯一的锚点名称,因此在生成动态内容时,内嵌是最简单的方法。
使用 @position-try 调整锚点位置
获得初始锚点位置后,如果锚点到达其包含块的边缘,您可能需要调整该位置。如需创建替代锚点位置,您可以将 @position-try 指令与 position-try-options 属性搭配使用。
在以下示例中,子菜单显示在菜单的右侧。菜单和子菜单非常适合使用锚点定位 API 和 popover 属性,因为这些菜单通常会锚定到触发按钮。
对于此子菜单,如果水平空间不足,您可以将其移到菜单下方。为此,请先设置初始位置:
#submenu {
  position: absolute;
  position-anchor: --submenu;

  /* initial position */
  margin-left: var(--padding);
  inset-area: right span-bottom;
}
然后,使用 @position-try 设置后备锚定位置:
/* alternate position */
@position-try --bottom {
  margin: var(--padding) 0 0 var(--padding);
  inset-area: bottom;
}
最后,使用 position-try-options 将两者连接起来。总而言之,它看起来像这样:
#submenu {
  position: absolute;
  position-anchor: --submenu;
  /* initial position */
  margin-left: var(--padding);
  inset-area: right span-bottom;
  */ connect with position-try options */
  position-try-options: --bottom;
}

/* alternate position */
@position-try --bottom {
  margin: var(--padding) 0 0 var(--padding);
  inset-area: bottom;
}
锚点位置自动翻转关键字
如果您需要进行基本的调整,例如从上到下或从左到右(或同时)翻转,甚至可以跳过创建自定义 @position-try 声明的步骤,而使用内置的浏览器支持的翻转关键字(例如 flip-block 和 flip-inline)。这些变量可作为自定义 @position-try 声明的替代项,并且可以组合使用:
position-try-options: flip-block, flip-inline, flip-block flip-inline;
翻转关键字可以显著简化锚定代码。只需几行代码,您就可以创建一个具有替代位置的完整锚点:
#my-tooltip {
  position-anchor: --question-mark;
  inset-area: top;
  position-try-options: flip-block;
}
position-visibility(适用于子滚动器中的锚点)
在某些情况下,您可能希望将元素锚定在网页的子滚动器内。在这些情况下,您可以使用 position-visibility 控制锚点的可见性。锚点何时会保持在视图中?何时消失?借助此功能,您可以控制这些选项。当您希望定位的元素在锚点移出视图之前一直显示在视图中时,可以使用 position-visibility: anchors-visible:
#tooltip {
  position: fixed;
  position-anchor: --anchor-top-anchor;
  position-visibility: anchors-visible;
  bottom: anchor(top);
}
或者,您可以使用 position-visibility: no-overflow 来防止锚点溢出其容器。
#tooltip {
  position: absolute;
  position-anchor: --anchor-top-anchor;
  position-visibility: no-overflow;
  bottom: anchor(top);
}
功能检测和 Polyfill
由于目前浏览器支持有限,因此您可能需要谨慎使用此 API。首先,您可以使用 @supports 功能查询直接在 CSS 中检查支持情况。为此,请将锚点样式封装在以下代码中:
@supports (anchor-name: --myanchor) {

  /* Anchor styles here */

}
此外,您还可以使用 Oddbird 提供的 CSS 锚定位 Polyfill 来填充锚定位功能,该 Polyfill 适用于 Firefox 54、Chrome 51、Edge 79 和 Safari 10。此填充区支持大多数基本锚点位置功能,但当前实现并不完整,并且包含一些过时的语法。您可以使用 unpkg 链接,也可以直接在软件包管理器中导入。
无障碍功能说明
虽然锚定定位 API 允许元素相对于其他元素进行定位,但它本身并不会在这些元素之间创建任何有意义的语义关系。如果定位元素与锚元素之间确实存在语义关系(例如,定位元素是关于锚文本的边栏注释),一种方法是使用 aria-details 从锚元素指向定位元素。屏幕阅读器软件仍在学习如何处理 aria-details,但支持正在不断改进。
<div class="anchor" aria-details="sidebar-comment">Main content</div>
<div class="positioned" id="sidebar-comment">Sidebar content</div>
.anchor {
  anchor-name: --anchor;
}

.positioned {
  position: fixed;
  position-anchor: --anchor;
}
如果您使用 popover 属性或 <dialog> 元素进行锚定定位,浏览器将处理焦点导航修正,以确保无障碍性,因此您无需按 DOM 顺序排列弹出式窗口或对话框。如需了解详情,请参阅规范中有关无障碍功能的注释。
总结
这是一项全新功能,我们非常期待看到您利用它打造出什么样的应用。到目前为止,我们已经看到了一些非常出色的社区用例,例如图表中的动态标签、连接线、脚注和视觉交叉引用。在您尝试使用锚点定位功能时,我们很乐意听取您的反馈意见,如果您发现任何 bug,请告知我们。