

Published: July 8, 2026, Last updated: October 5, 2026
When collecting an email address as a part of a sign-up, sign-in, subscribe, checkout, account recovery, or other process, it's common practice to confirm that the email address is owned by the person entering it. Existing verification methods, like one-time passwords (OTPs) or email verification links (magic links), require the user to navigate away from your site. This disruptive process can increase the risk of the user, whether a human or an agent, abandoning their session entirely and never completing their authentication process.
The Email Verification API is a proposal that allows the browser to communicate directly with the email provider to verify that the user owns the email address. Users select an email from the browser's autofill or autocomplete suggestion, submit the form, and the site verifies the email address with the provider without sending an email or interrupting the user's flow.
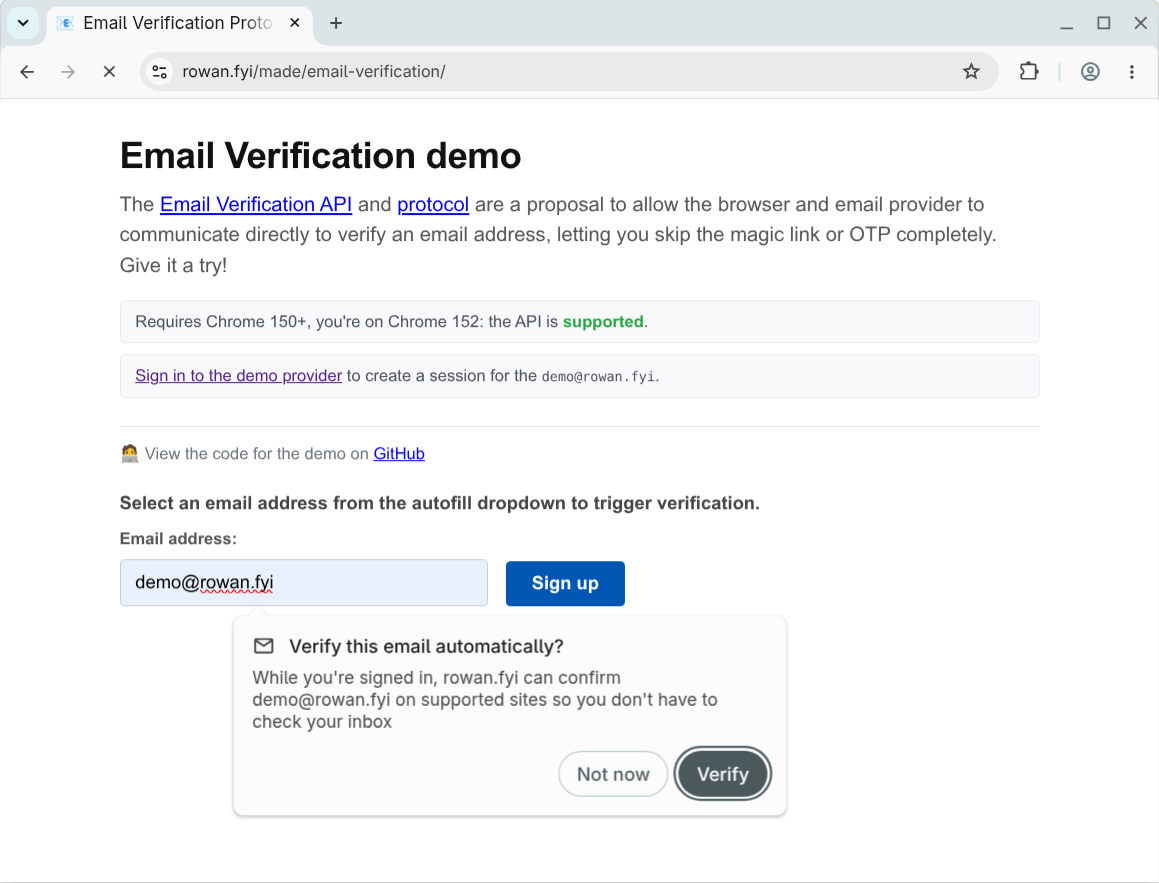
Email collection is a critical conversion point in a user's journey, and Chrome would like feedback on the proposal from sites that want to verify emails, email providers that can perform the verification, and users experiencing the process. You can sign up for the origin trial today and follow the implementation instructions here. For general origin trial configuration, refer to Getting started with origin trials.
You can try the flow with a demo account:
- Issuer demo gives you a mock email account and session
- Verifier demo will verify any participating provider
Email verification flow
The following sections explain what you and your users need to start the email verification flow, and the whole workflow when using the Email Verification Protocol.
Key terms
Key terms for the Email Verification API are as follows:
- Verifier: The site that collects the email address and wants to verify it. The verifier is also called the Relying Party.
- Email Provider: The service providing the user's email address, for
example
gmail.com. - Issuer: The service that manages the account for the user's email, for
example
accounts.google.com. The issuer is also called the Identity Provider.
In some cases, the email provider and the issuer may operate from the same domain. However, it's important to distinguish between having an email address and having an active session for the associated account.
Prerequisites
- The user must be signed in to their email provider or issuer on the same browser profile. For example, if they use Gmail, they must be signed into their Google Account.
- As a participating verifier site, you must sign up for the origin trial and provide the token on the same page as your email form.
The user must select their email address from the autofill or autocomplete drop-down.
- If the user has previously entered an email address in the field, it will be offered using autocomplete.
If the user has added their email address using Chrome settings "Autofill and password" (
chrome://settings/autofill) it will be offered using autofill.
The first time a user provides an email address for verification they will see a permission prompt. This only occurs once per email address.
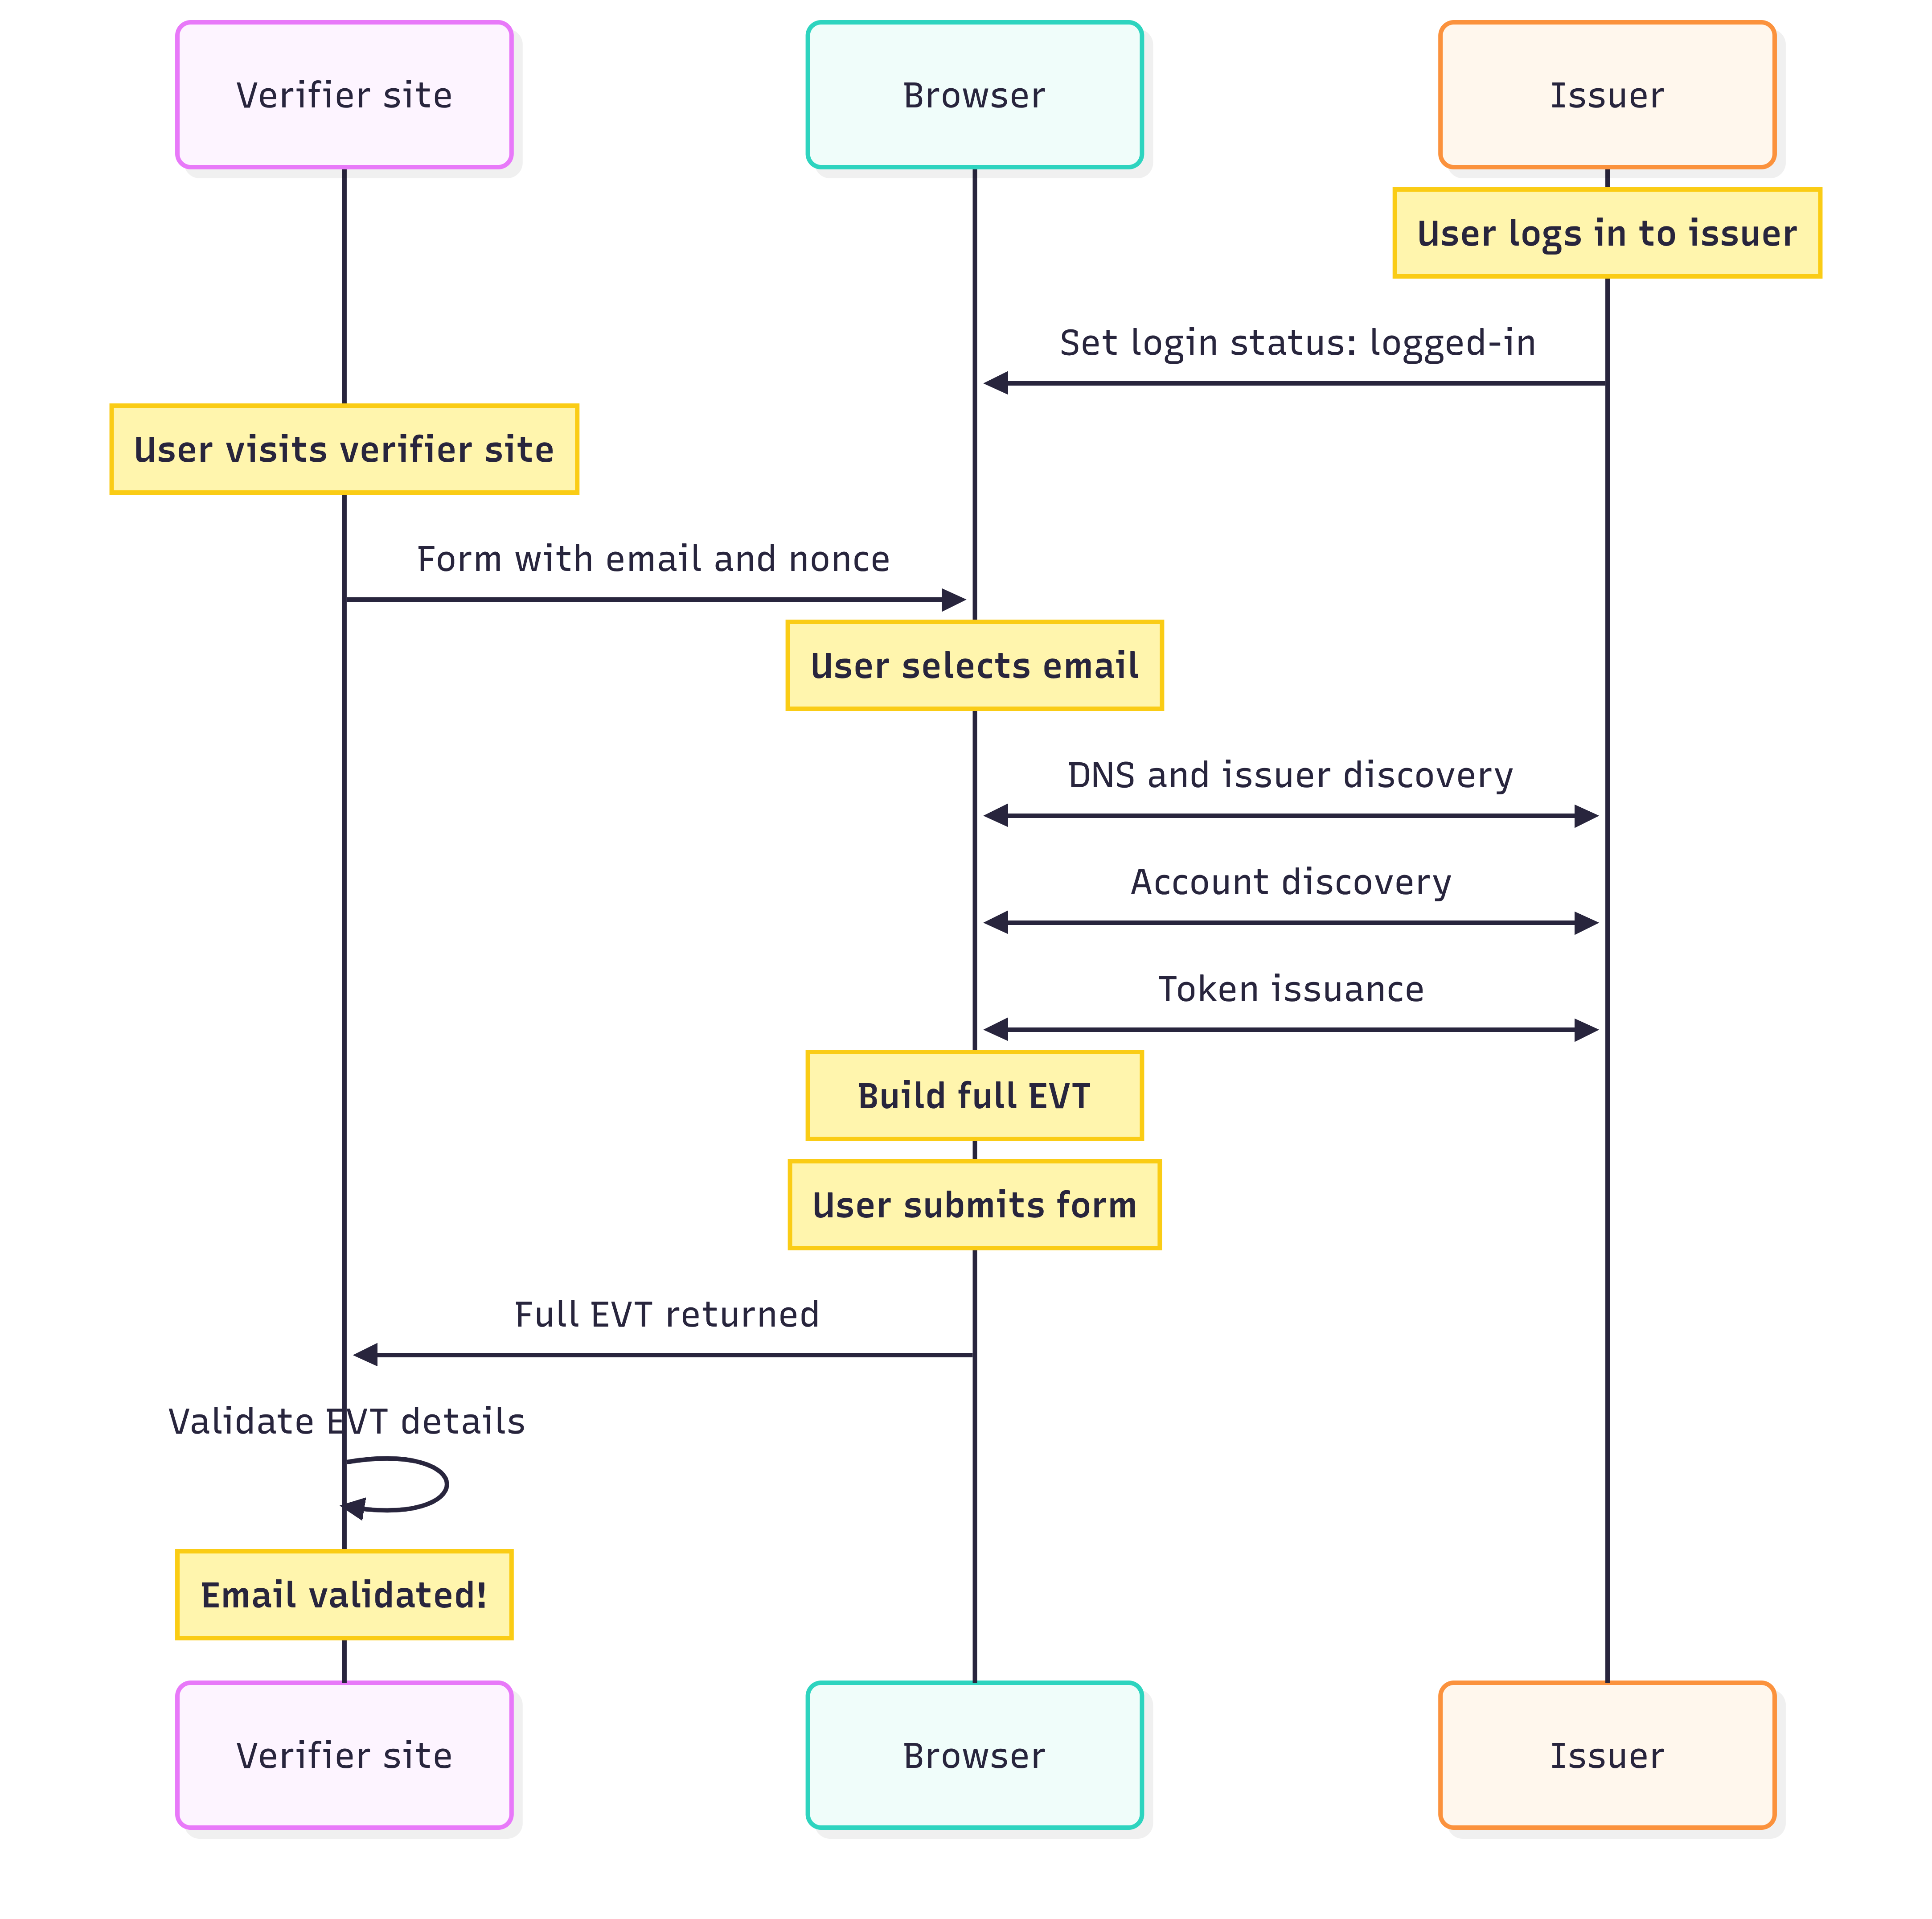
Once the user has that active session in their browser, they can start the process:
- On a form with an email field, the user selects their email address from the autocomplete drop-down. The verifier site provides a hidden field in the form with a per-instance nonce to validate this request.
The browser will then retrieve the email verification DNS record for the email domain. This points the browser to the issuer. The issuer will then confirm that they have an active session for that email address.
The issuer will then provide their Email Verification Token (EVT) for the address. The browser combines that into a key bound JWT with the EVT, the site origin, and the nonce from the input form.
When the form is submitted, the EVT package is added to the hidden field and sent to the site.
The verifier site then verifies each of those details: the expected email address, the nonce, and signatures from the browser and issuer.
The user sees a small notification informing them that their email provider verified their address.
This process provides the verifier site with confirmation that the email address is valid and belongs to the current user, which means the site can skip sending a verification email.
Users can manage their verified emails under Settings > Autofill and
passwords > Contact info > Verified Email (or open
chrome://settings/contactInfo).
Use case considerations
Email verification is a progressive enhancement to your existing flow that removes the need for a user to leave your site to retrieve an OTP or click a link. Sites can add the email verification fields to all relevant forms, like logins, newsletter sign ups, account creation, and password recovery. EVP triggers only if the browser supports it. If no code is received on submission or any of the validation steps fail, you can fall back to your default email confirmation flow. This also means there is no feature detection for the API; the verifier site treats the EVT as optional, processing it if it is present in the request.
Email verification confirms that the user has an active session with the provider of their email address. It does not verify that your email reached the user. You may still want to send existing welcome or onboarding emails and may want or need to prompt the user to check their spam settings.
Implement the verifier site
For additional detail, you can walk through the end-to-end demo code and refer to the validation steps in the Email Verification API and Email Verification Protocol proposals.
Configure form fields
Ensure your form fields have the correct attributes:
<input
  name="email-address"
  type="email"
  autocomplete="email">
<input
  type="hidden"
  name="token"
  nonce="rAnD0m-VaLuE"
  autocomplete="email-verification-token">
Set the type and autocomplete attributes of the email input to email to
let the browser offer autocomplete for the email address.
The new hidden field will be populated with the email verification token on
submission of the form. The necessary attributes are:
- Set
type="hidden"because this field does not require user input. - Set
nonce="rAnD0m-VaLuE". The site must provide a unique session-bound nonce to verify the form submission. - Set
autocomplete="email-verification-token". The browser uses this attribute to identify the field to populate.
Validate your form elements by checking the Network panel in DevTools. When you select an email address, you see the browser trigger the DNS and subsequent account look-up queries for the email provider and issuer. These are internal browser requests; your site receives nothing until form submission.
Validate the EVT
There are five steps to validate each component of the EVT package.
- Parse the token.
- Validate expected values.
- Validate key binding.
- Validate DNS record.
- discover the issuer and verify the EVT signature.
1. Parse the token
The raw data from the form submission contains the EVT and signed claims in a
Selective Disclosure JSON Web Token
(SD-JWT+KB) separated by a tilde
(~ character). You will need to separate these and decode the Javascript
Object Signing and Encryption (JOSE) headers and payloads (for example by using
jose for Node.js).
If example.com verifies demo@gmail.com, the decoded payload looks similar to
the following example:
{
  "evtJwtDecodedPayload": {
    "cnf": {
      "jwk": {
        "crv": "Ed25519",
        "kty": "OKP",
        "x": "pUbLiCkEy123pUbLiCkEy123pUbLiCkEy123"
      }
    },
    "email": "demo@gmail.com",
    "email_verified": true,
    "iat": 1782911685,
    "iss": "https://accounts.google.com"
  },
  "kbJwtDecodedPayload": {
    "aud": "https://example.com",
    "iat": 1782911685,
    "nonce": "rAnDoM123rAnDoM123rAnDoM123rAnDoM123",
    "sd_hash": "hAsH456hAsH456hAsH456hAsH456hAsH456"
  }
}
2. Validate expected values
Check that the basic values in the payload match your provided values:
- Verify that
email_verifiedis set totrue. - Verify that
emailmatches the email address provided in your form. - Verify that
noncematches the nonce provided in your form. - Verify that
audmatches your site's origin. - Verify that
iathas a relatively recent timestamp, for example, after the form was rendered.
3. Validate key binding
The browser creates a temporary, ephemeral key for the transaction to confirm
that it signed the token. Extract this key from the cnf (confirmation) claim
in the EVT and then use it to verify the key-bound JWT.
Then, calculate the expected hash and compare it with the sd_hash claim. The
following Node.js example shows how to perform this calculation:
const calculatedHash = createHash("sha256")
        .update(evtJwt + "~")
        .digest("base64url");
4. Validate DNS record
Verify the _email-verification DNS record for the email address domain. For
example, for demo@gmail.com, query the _email-verification.gmail.com TXT
record. For this provider, the query returns the location of the account
provider, that is accounts.google.com.
$ dig +short TXT _email-verification.gmail.com
"iss=accounts.google.com"
5. Discover the issuer and verify the EVT signature
Ensure the issuer serves the /.well-known/email-verification resource, which
provides the endpoints for issuing the token, the JSON Web Key (JWK) for the
site, and the supported signing algorithms.
$ curl https://accounts.google.com/.well-known/email-verification
{
  "issuance_endpoint": "https://accounts.google.com/gsi/email-verification/issue",
  "jwks_uri": "https://verifiablecredentials-pa.googleapis.com/.well-known/vc-public-jwks",
  "signing_alg_values_supported": ["EdDSA"]
}
Use the JWKs to verify the EVT JWT you extracted from the token. Most JOSE libraries provide functions to handle this verification.
If all five steps succeed, you have verified the email address against the provider. If not, fall back to sending a confirmation email to the user as per your normal flow.
Implement the email provider and issuer service
For additional detail, you can walk through the mock email provider demo code and refer to the issuer steps in the Email Verification API and Email Verification Protocol proposals.
As an issuer, you do not need to sign up for the origin trial or provide a token as the browser behavior is triggered by the relying party site. You just need to ensure the expected endpoints are in place to respond to those requests.
Configure issuer discovery
To allow browsers to automatically discover your verification endpoints when an
email address belonging to your domain is selected, expose your configuration
using DNS and a .well-known HTTP endpoint.
Configure DNS delegate record
Configure a DNS TXT record on your email domain that delegates verification
authority to your issuer identifier. These identifiers can use the same domain
depending on your infrastructure.
Record Format: _email-verification.<email-domain>
Example Zone File:
_email-verification.example.com IN TXT "iss=accounts.issuer.example"
Host a .well-known/email-verification endpoint
Host a JSON metadata file on your issuer domain under the /.well-known/ path.
This file outlines your issuance capabilities and the cryptographic signing
algorithms your infrastructure supports.
Endpoint: https://<issuer-domain>/.well-known/email-verification
Example response:
{
  "issuance_endpoint": "https://accounts.issuer.example/email-verification/issuance",
  "jwks_uri": "https://accounts.issuer.example/.well-known/vc-public-jwks",
  "signing_alg_values_supported": ["EdDSA", "ES256"]
}
Host a .well-known/web-identity endpoint
An additional .well-known JSON resource you may have already implemented as
part of the Federated Credentials (FedCM)
API.
This provides links to your accounts endpoint and login URL.
Endpoint: https://<domain>/.well-known/web-identity
Example response:
{
  "accounts_endpoint": "https://accounts.issuer.example/accounts",
  "login_url": "https://accounts.issuer.example/login"
}
Use an accounts endpoint
The accounts endpoint from the FedCM API provides a list of signed-in accounts at the moment. The following example shows a minimal response. For more details, refer to the identity provider implementation guide.
Endpoint: as specified in .well-known/web-identity
The following is an example response:
{
  "accounts": [
    {
      "id": "demo-example",
      "name": "Demo User",
      "email": "demo@example.com",
      "given_name": "Demo"
    }
  ]
}
Integrate with the Login Status API
The user needs to have an active session with the provider and you must signal that to the browser with the Login Status API.
When a user successfully signs in or signs out, serve the matching HTTP response header:
Set-Login: logged-in
Set-Login: logged-out
Alternatively, update the status using JavaScript in your web application context:
navigator.login.setStatus("logged-in");
navigator.login.setStatus("logged-out");
Handle issuance requests
Your issuance_endpoint receives an application/x-www-form-urlencoded POST
request that contains the request_token.
The following sections show the full process of handling issuance requests.
1. Validate the issuance request
Parse and validate incoming browser payloads:
- Method:
POST - Session Verification: Validate the user's first-party
session/authenticationcookies transmitted alongside the request to ensure an active, authorized identity context exists. - Parameter Verification: Extract the
request_tokenparameter (a signed JWT generated by the browser). Verify that it contains the expected ephemeral public key, the target email, the correct audience, and a valid timestamp.
The decoded token should look something like:
{
  "decodedHeader": {
    "alg": "ES256",
    "typ": "JWT",
    "jwk": {
      "kty": "EC",
      "crv": "P-256",
      "x": "pUbLiCKeY123pUbLiCKeY123pUbLiCKeY123",
      "y": "pUbLiCKeY456pUbLiCKeY456pUbLiCKeY456"
    }
  },
  "decodedPayload": {
    "iss": "https://accounts.issuer.example",
    "sub": "demo@example.com",
    "email": "demo@example.com",
    "iat": 1780272000,
    "exp": 1780272300
  },
  "signature": "SIGnatURE-123_SIGnatURE-123_SIGnatURE-123"
}
2. Respond with a token
Upon successful validation of the session and request token, generate a signed Selective Disclosure JWT (SD-JWT) using the payload:
{
  "iss": "https://accounts.issuer.example",
  "iat": 1780272000,
  "exp": 1780272300,
  "cnf": {
    "jwk": {
      "kty": "EC",
      "crv": "P-256",
      "x": "pUbLiCKeY123pUbLiCKeY123pUbLiCKeY123",
      "y": "pUbLiCKeY456pUbLiCKeY456pUbLiCKeY456"
    }
  },
  "email": "demo@example.com",
  "email_verified": true
}
Sign the payload using your private key and supported algorithm. For example, using jose in Node.js:
const evtJwt = await new SignJWT(evtPayload)
   .setProtectedHeader({
     alg: "EdDSA",
     kid: PRIVATE_KEY_JWK.kid, // Key ID corresponding to our JWKS keys
     typ: "evt+jwt", // Standard Token Type for EVTs
   })
   .sign(privateKey);

 // Standard SD-JWT compatibility requires appending a trailing tilde "~"
 // to separate the signed token from the key binding section.
 const issuanceToken = `${evtJwt}~`;
Example Success Response (HTTP 200):
{
  "issuance_token": "tOkEn123tOkEn123tOkEn123...~"
}
Origin trial considerations
Origin trials are experiments to collect feedback, so your input is critical if you participate as a relying party or an identity provider. To report issues, use the following GitHub repositories:
- Browser Email Verification API: WICG/email-verification
- Email Verification Protocol: dickhardt/email-verification
If you encounter bugs in the Chrome implementation, raise a bug against the component:
Enabling the origin trial functionality is controlled on a per-response basis by your inclusion of the OT token. This means you have fine-grained control if you prefer to restrict the functionality to a portion of your users. For example, if you already have an A/B testing framework, you can integrate the origin trial there for a controlled experiment population. Alternatively, if you have a beta testing or early preview group of users, you may want or need to enable the feature for them. In this case, check against the provided email address before either issuing or validating the token.
Origin trials also have traffic limits to minimize sites relying on the feature before launch. The issuer API is under development, and you should expect backwards-incompatible changes along with updates to the Chrome UX.
We will post further updates on the blog here and on the evp-announce@chromium.org mailing list as development progresses.