
요약
다음 앱에서는 scroll 이벤트가 필요하지 않을 수도 있습니다. IntersectionObserver를 사용하여 position:sticky 요소가 고정되거나 고정되지 않을 때 맞춤 이벤트를 실행하는 방법을 보여줍니다. 스크롤 리스너를 사용하지 않고도 모두 가능합니다. 이를 증명하는 멋진 데모도 있습니다.
sticky-change 이벤트 소개
CSS 고정 위치를 사용할 때의 실용적인 한계 중 하나는 속성이 활성화되었는지 알 수 있는 플랫폼 신호를 제공하지 않는다는 점입니다. 즉, 요소가 고정되는 시점이나 고정되지 않는 시점을 알 수 있는 이벤트가 없습니다.
다음 예를 살펴보세요. 이 예에서는 <div class="sticky">를 상위 컨테이너 상단에서 10픽셀 고정합니다.
.sticky {
  position: sticky;
  top: 10px;
}
요소가 해당 지점에 도달하면 브라우저에서 알려주면 얼마나 좋을까요?
저만 그렇게 생각하는 것은 아닌 것 같습니다. position:sticky 신호를 사용하면 다음과 같은 다양한 사용 사례를 활용할 수 있습니다.
- 배너가 고정될 때 배너에 그림자를 적용합니다.
- 사용자가 콘텐츠를 읽을 때 애널리틱스 조회를 기록하여 진행 상황을 파악합니다.
- 사용자가 페이지를 스크롤할 때 플로팅 목차 위젯을 현재 섹션으로 업데이트합니다.
이러한 사용 사례를 염두에 두고 최종 목표를 설정했습니다. position:sticky 요소가 고정될 때 실행되는 이벤트를 만드는 것입니다. 이 이벤트를 sticky-change 이벤트라고 하겠습니다.
document.addEventListener('sticky-change', e => {
  const header = e.detail.target;  // header became sticky or stopped sticking.
  const sticking = e.detail.stuck; // true when header is sticky.
  header.classList.toggle('shadow', sticking); // add drop shadow when sticking.

  document.querySelector('.who-is-sticking').textContent = header.textContent;
});
데모에서는 이 이벤트를 사용하여 고정된 경우 헤더에 음영을 적용합니다. 페이지 상단의 새 제목도 업데이트됩니다.
스크롤 이벤트 없이 스크롤 효과
게시물의 나머지 부분에서 이러한 이름을 참조할 수 있도록 몇 가지 용어를 알아보겠습니다.
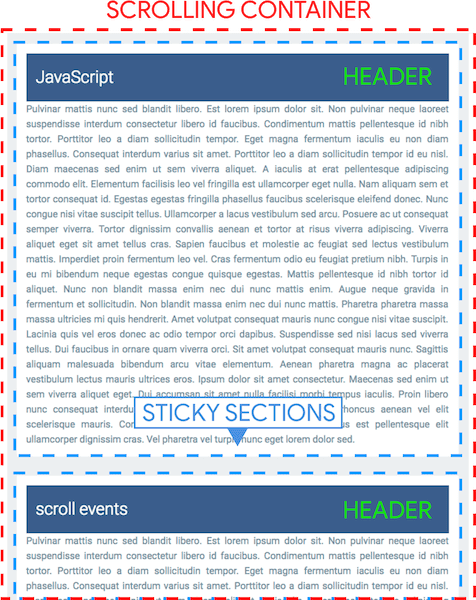
- 스크롤 컨테이너: '블로그 게시물' 목록이 포함된 콘텐츠 영역 (표시되는 표시 영역)입니다.
- 헤더 -
position:sticky가 있는 각 섹션의 파란색 제목입니다. - 고정 섹션: 각 콘텐츠 섹션 고정 헤더 아래에서 스크롤되는 텍스트입니다.
- '고정 모드' -
position:sticky가 요소에 적용되는 경우
어떤 헤더가 '고정 모드'로 전환되는지 알려면 스크롤 컨테이너의 스크롤 오프셋을 결정하는 방법이 필요합니다. 이렇게 하면 현재 표시되는 헤더를 계산할 수 있습니다. 하지만 scroll 이벤트 없이는 꽤 까다롭습니다. 다른 문제는 position:sticky가 고정되면 레이아웃에서 요소를 삭제한다는 점입니다.
따라서 스크롤 이벤트가 없으면 헤더에서 레이아웃 관련 계산을 실행할 수 없게 되었습니다.
스크롤 위치를 결정하기 위해 더미 DOM 추가
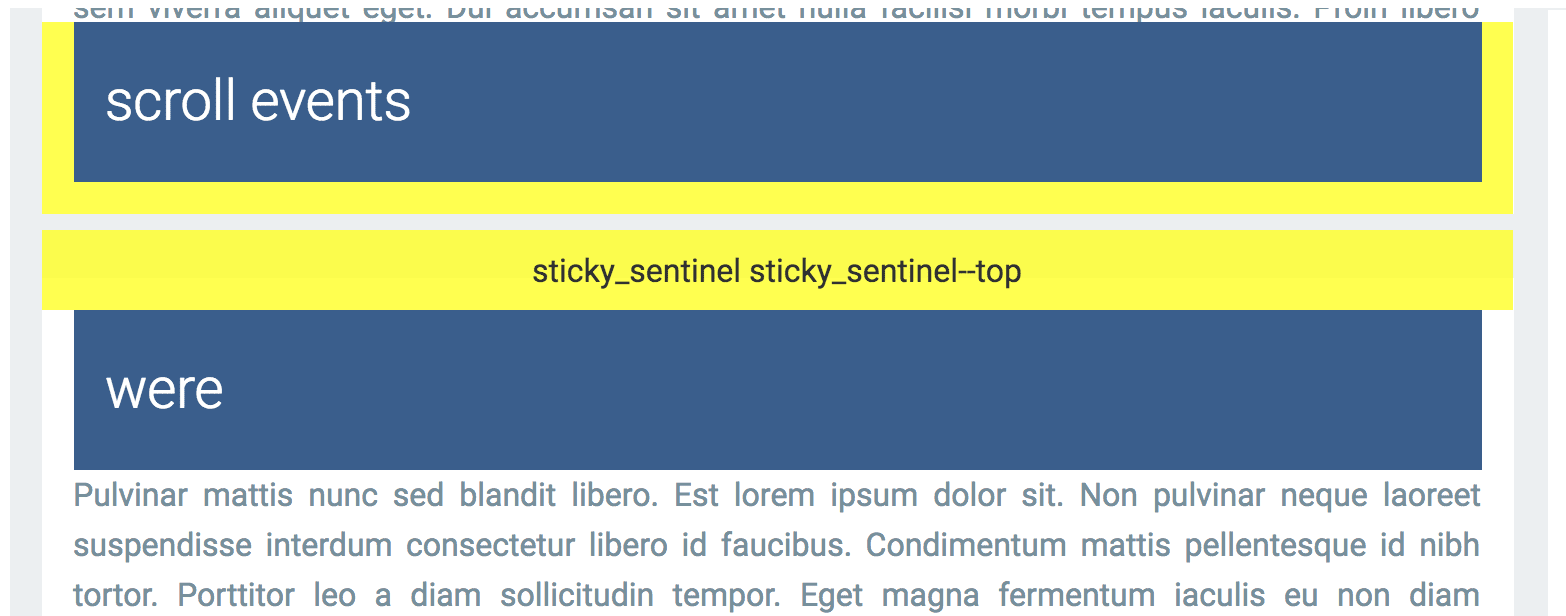
scroll 이벤트 대신 IntersectionObserver를 사용하여 헤더가 고정 모드를 시작하고 종료하는 시점을 결정합니다. 각 고정 섹션에 노드(센티널이라고도 함) 두 개를 추가하면 하나는 상단에, 하나는 하단에 배치되어 스크롤 위치를 파악하기 위한 웨이포인트 역할을 합니다. 이러한 마커가 컨테이너에 들어오고 나갈 때 표시 상태가 변경되고 교차 관찰자가 콜백을 실행합니다.
위아래로 스크롤하는 4가지 사례를 처리하려면 센티넬이 2개 필요합니다.
- 아래로 스크롤 - header의 상단 감시자가 컨테이너 상단을 지나면 고정됩니다.
- 아래로 스크롤 - header가 섹션 하단에 도달하고 하단 센티널이 컨테이너 상단을 지나면 고정 모드를 종료합니다.
- 위로 스크롤 - header의 상단 감시자가 위에서 다시 표시되도록 스크롤하면 고정 모드가 종료됩니다.
- 위로 스크롤 - 하단 감시자가 위에서 다시 표시 영역으로 다시 지나가면 헤더가 고정됩니다.
1~4를 발생 순서대로 보여주는 스크린캐스트를 보는 것이 좋습니다.
CSS
전초 기지는 각 섹션의 상단과 하단에 배치됩니다.
.sticky_sentinel--top는 헤더 상단에 있고 .sticky_sentinel--bottom는 섹션 하단에 있습니다.
:root {
  --default-padding: 16px;
  --header-height: 80px;
}
.sticky {
  position: sticky;
  top: 10px; /* adjust sentinel height/positioning based on this position. */
  height: var(--header-height);
  padding: 0 var(--default-padding);
}
.sticky_sentinel {
  position: absolute;
  left: 0;
  right: 0; /* needs dimensions */
  visibility: hidden;
}
.sticky_sentinel--top {
  /* Adjust the height and top values based on your on your sticky top position.
  e.g. make the height bigger and adjust the top so observeHeaders()'s
  IntersectionObserver fires as soon as the bottom of the sentinel crosses the
  top of the intersection container. */
  height: 40px;
  top: -24px;
}
.sticky_sentinel--bottom {
  /* Height should match the top of the header when it's at the bottom of the
  intersection container. */
  height: calc(var(--header-height) + var(--default-padding));
  bottom: 0;
}
교차 관찰자 설정
교차 관찰자는 타겟 요소와 문서 뷰포트 또는 상위 컨테이너의 교차점에서 발생하는 변경사항을 비동기식으로 관찰합니다. 이 경우 상위 컨테이너와의 교차를 관찰합니다.
비법은 IntersectionObserver입니다. 각 감시자는 IntersectionObserver를 가져와 스크롤 컨테이너 내에서 교차 가시성을 관찰합니다. 센티널이 표시되는 표시 영역으로 스크롤하면 헤더가 고정되거나 고정되지 않음을 알 수 있습니다. 마찬가지로, 센티널이 표시 영역을 종료할 때도 마찬가지입니다.
먼저 머리글 및 바닥글 경계 기호의 관찰자를 설정합니다.
/**
 * Notifies when elements w/ the `sticky` class begin to stick or stop sticking.
 * Note: the elements should be children of `container`.
 * @param {!Element} container
 */
function observeStickyHeaderChanges(container) {
  observeHeaders(container);
  observeFooters(container);
}

observeStickyHeaderChanges(document.querySelector('#scroll-container'));
그런 다음 .sticky_sentinel--top 요소가 스크롤 컨테이너 상단을 통과할 때 (양방향) 실행되는 관찰자를 추가했습니다.
observeHeaders 함수는 상위 센티널을 만들고 각 섹션에 추가합니다. 관찰자는 센티널과 컨테이너 상단의 교차점을 계산하고 뷰포트에 진입하거나 종료하는지 결정합니다. 이 정보에 따라 섹션 헤더가 고정되는지 여부가 결정됩니다.
/**
 * Sets up an intersection observer to notify when elements with the class
 * `.sticky_sentinel--top` become visible/invisible at the top of the container.
 * @param {!Element} container
 */
function observeHeaders(container) {
  const observer = new IntersectionObserver((records, observer) => {
    for (const record of records) {
      const targetInfo = record.boundingClientRect;
      const stickyTarget = record.target.parentElement.querySelector('.sticky');
      const rootBoundsInfo = record.rootBounds;

      // Started sticking.
      if (targetInfo.bottom < rootBoundsInfo.top) {
        fireEvent(true, stickyTarget);
      }

      // Stopped sticking.
      if (targetInfo.bottom >= rootBoundsInfo.top &&
          targetInfo.bottom < rootBoundsInfo.bottom) {
       fireEvent(false, stickyTarget);
      }
    }
  }, {threshold: [0], root: container});

  // Add the top sentinels to each section and attach an observer.
  const sentinels = addSentinels(container, 'sticky_sentinel--top');
  sentinels.forEach(el => observer.observe(el));
}
관찰자는 threshold: [0]로 구성되므로 감시자가 표시되는 즉시 콜백이 실행됩니다.
하단 감시자 (.sticky_sentinel--bottom)의 경우도 프로세스가 비슷합니다. 두 번째 관찰자는 바닥글이 스크롤 컨테이너의 하단을 통과할 때 실행되도록 만들어집니다. observeFooters 함수는 센티널 노드를 만들고 각 섹션에 연결합니다. 관찰자는 감시자가 컨테이너 하단과 교차하는 지점을 계산하고 들어가는지 또는 나가는지를 결정합니다. 이 정보에 따라 섹션 헤더가 고정되는지 여부가 결정됩니다.
/**
 * Sets up an intersection observer to notify when elements with the class
 * `.sticky_sentinel--bottom` become visible/invisible at the bottom of the
 * container.
 * @param {!Element} container
 */
function observeFooters(container) {
  const observer = new IntersectionObserver((records, observer) => {
    for (const record of records) {
      const targetInfo = record.boundingClientRect;
      const stickyTarget = record.target.parentElement.querySelector('.sticky');
      const rootBoundsInfo = record.rootBounds;
      const ratio = record.intersectionRatio;

      // Started sticking.
      if (targetInfo.bottom > rootBoundsInfo.top && ratio === 1) {
        fireEvent(true, stickyTarget);
      }

      // Stopped sticking.
      if (targetInfo.top < rootBoundsInfo.top &&
          targetInfo.bottom < rootBoundsInfo.bottom) {
        fireEvent(false, stickyTarget);
      }
    }
  }, {threshold: [1], root: container});

  // Add the bottom sentinels to each section and attach an observer.
  const sentinels = addSentinels(container, 'sticky_sentinel--bottom');
  sentinels.forEach(el => observer.observe(el));
}
관찰자는 threshold: [1]로 구성되므로 전체 노드가 뷰 내에 있을 때 콜백이 실행됩니다.
마지막으로 sticky-change 맞춤 이벤트를 실행하고 센티널을 생성하는 두 가지 유틸리티가 있습니다.
/**
 * @param {!Element} container
 * @param {string} className
 */
function addSentinels(container, className) {
  return Array.from(container.querySelectorAll('.sticky')).map(el => {
    const sentinel = document.createElement('div');
    sentinel.classList.add('sticky_sentinel', className);
    return el.parentElement.appendChild(sentinel);
  });
}

/**
 * Dispatches the `sticky-event` custom event on the target element.
 * @param {boolean} stuck True if `target` is sticky.
 * @param {!Element} target Element to fire the event on.
 */
function fireEvent(stuck, target) {
  const e = new CustomEvent('sticky-change', {detail: {stuck, target}});
  document.dispatchEvent(e);
}
작업이 끝났습니다.
최종 데모
position:sticky가 있는 요소가 고정될 때 커스텀 이벤트를 만들고 scroll 이벤트를 사용하지 않고 스크롤 효과를 추가했습니다.
결론
오랫동안 개발된 scroll 이벤트 기반 UI 패턴 중 일부를 대체하는 데 IntersectionObserver가 유용한 도구가 될지 자주 생각해 왔습니다. 답은 '예'와 '아니요'입니다. IntersectionObserver API의 시맨틱스는 모든 용도에 사용하기 어렵습니다. 하지만 여기에서 보여드린 것처럼 흥미로운 기법에 사용할 수 있습니다.
스타일 변경을 감지하는 다른 방법이 있나요?
아니요 DOM 요소의 스타일 변경사항을 관찰하는 방법이 필요했습니다. 안타깝게도 웹 플랫폼 API에는 스타일 변경사항을 볼 수 있는 기능이 없습니다.
MutationObserver가 논리적으로 첫 번째 선택이지만 대부분의 경우에는 작동하지 않습니다. 예를 들어 데모에서는 sticky 클래스가 요소에 추가될 때 콜백을 수신하지만 요소의 계산된 스타일이 변경될 때는 수신하지 않습니다.
sticky 클래스는 페이지 로드 시 이미 선언되었습니다.
향후 Mutation Observer의 'Style Mutation Observer' 확장 프로그램은 요소의 계산된 스타일 변경사항을 관찰하는 데 유용할 수 있습니다.
position: sticky.