
TL;DR
以下是個秘訣:您可能不需要在下一個應用程式中使用 scroll 事件。我將使用 IntersectionObserver,說明如何在 position:sticky 元素固定或停止固定時觸發自訂事件。而且不需要使用捲動事件監聽器。我們甚至有精彩的示範影片可供您參考:
介紹 sticky-change 事件
使用 CSS 固定位置的實際限制之一,是不會提供平台信號,讓您得知何時屬性處於活動狀態。換句話說,沒有任何事件可用來瞭解元素何時會變成固定或停止固定。
請參考下列範例,該範例會將 <div class="sticky"> 固定在其父項容器頂端 10 個像素的位置:
.sticky {
  position: sticky;
  top: 10px;
}
如果瀏覽器能告知元素何時達到該標記,那該有多好?顯然不只我這麼認為。position:sticky 的信號可解鎖多項用途:
- 在橫幅貼上時套用投射陰影。
- 當使用者閱讀您的內容時,記錄 Analytics 命中次數,以便瞭解使用者進度。
- 使用者捲動網頁時,將浮動 TOC 小工具更新為目前的部分。
考量這些用途後,我們設定了最終目標:建立事件,在 position:sticky 元素固定時觸發。我們將其稱為 sticky-change 事件:
document.addEventListener('sticky-change', e => {
  const header = e.detail.target;  // header became sticky or stopped sticking.
  const sticking = e.detail.stuck; // true when header is sticky.
  header.classList.toggle('shadow', sticking); // add drop shadow when sticking.

  document.querySelector('.who-is-sticking').textContent = header.textContent;
});
示範會在標題固定時,使用這個事件為標題加上陰影。並更新頁面頂端的新標題。
捲動效果是否需要捲動事件?
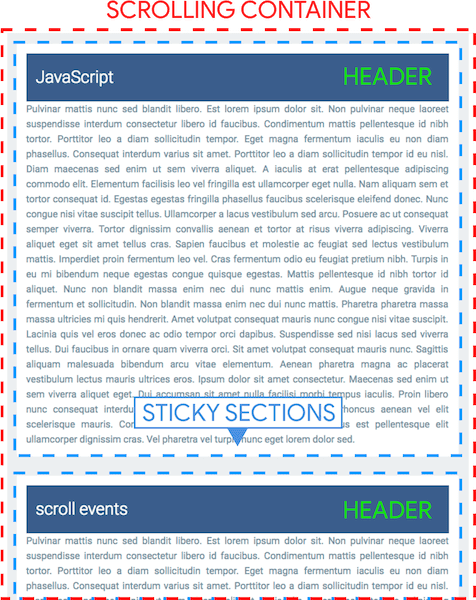
讓我們先來瞭解一些術語,這樣我才能在接下來的文章中提到這些名稱:
- 捲動容器:包含「網誌文章」清單的內容區域 (可視區域)。
- 標題:每個部分中含有
position:sticky的藍色標題。 - 固定版面:每個內容版面。會在固定標頭下方捲動的文字。
- 「固定模式」:當
position:sticky套用至元素時。
如要瞭解哪個標頭會進入「黏性模式」,我們需要設法判斷捲動容器的捲動偏移量。這樣一來,我們就能計算目前顯示的標頭。不過,如果沒有 scroll 事件,這麼做就會變得相當棘手 :) 另一個問題是,position:sticky 會在元素固定時將其從版面配置中移除。
因此,如果沒有捲動事件,我們就無法在標頭上執行與版面配置相關的計算。
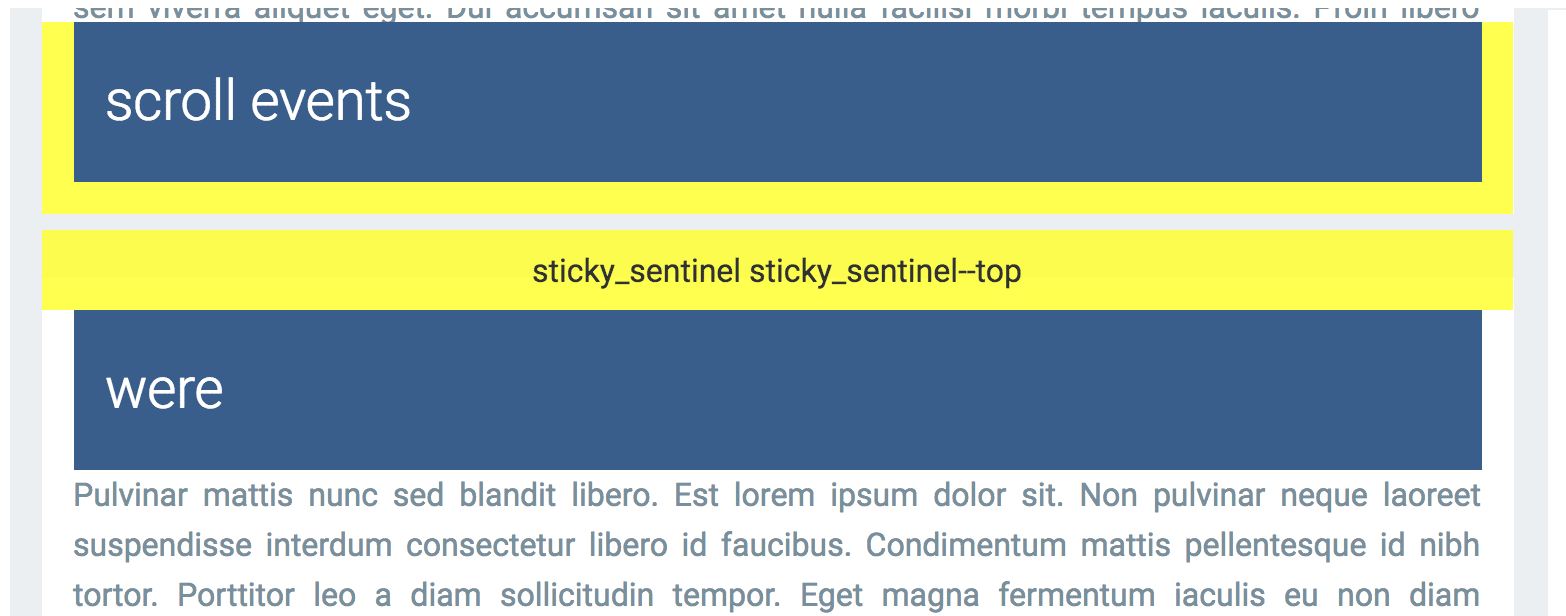
新增模擬 DOM 以判斷捲動位置
我們將使用 IntersectionObserver 而非 scroll 事件,判斷標頭何時進入和離開固定模式。在每個固定區段中新增兩個節點 (又稱為哨兵),一個位於頂端,另一個位於底端,可做為找出捲動位置的途經點。當這些標記進入和離開容器時,其可見度會變更,Intersection Observer 就會觸發回呼。
我們需要兩個哨兵,涵蓋四種向上和向下捲動的情況:
- 向下捲動:當頂端哨兵跨越容器頂端時,標頭會變成固定。
- 向下捲動:header 會在到達區段底部時離開固定模式,且其底部哨兵會穿過容器頂端。
- 向上捲動 - 當頂端哨兵從頂端捲動回檢視畫面時,標頭會離開固定模式。
- 向上捲動:header 會變成固定,因為底部哨兵會從頂端返回畫面。
請依照發生順序,查看 1 到 4 個螢幕側錄:
CSS
哨兵會位於每個區段的頂端和底部。.sticky_sentinel--top 位於標題頂端,.sticky_sentinel--bottom 則位於區段底部:
:root {
  --default-padding: 16px;
  --header-height: 80px;
}
.sticky {
  position: sticky;
  top: 10px; /* adjust sentinel height/positioning based on this position. */
  height: var(--header-height);
  padding: 0 var(--default-padding);
}
.sticky_sentinel {
  position: absolute;
  left: 0;
  right: 0; /* needs dimensions */
  visibility: hidden;
}
.sticky_sentinel--top {
  /* Adjust the height and top values based on your on your sticky top position.
  e.g. make the height bigger and adjust the top so observeHeaders()'s
  IntersectionObserver fires as soon as the bottom of the sentinel crosses the
  top of the intersection container. */
  height: 40px;
  top: -24px;
}
.sticky_sentinel--bottom {
  /* Height should match the top of the header when it's at the bottom of the
  intersection container. */
  height: calc(var(--header-height) + var(--default-padding));
  bottom: 0;
}
設定交集觀察器
交集觀察器會以非同步方式觀察目標元素與文件檢視區或父項容器的交集變化。在本例中,我們會觀察與父項容器的交集。
魔法醬汁是 IntersectionObserver。每個哨兵都會取得 IntersectionObserver,以便觀察其在捲動容器中的交叉可見度。當哨兵捲動至可見的檢視區時,我們就會知道標頭已固定或停止固定。同樣地,當哨兵離開可視區域時。
首先,我為標頭和頁尾哨兵設定觀察器:
/**
 * Notifies when elements w/ the `sticky` class begin to stick or stop sticking.
 * Note: the elements should be children of `container`.
 * @param {!Element} container
 */
function observeStickyHeaderChanges(container) {
  observeHeaders(container);
  observeFooters(container);
}

observeStickyHeaderChanges(document.querySelector('#scroll-container'));
接著,我新增了觀察器,在 .sticky_sentinel--top 元素經過捲動容器頂端 (無論方向為何) 時觸發。observeHeaders 函式會建立頂層哨兵,並將哨兵新增至各個區段。觀察器會計算哨兵與容器頂端的交集,並決定哨兵是否進入或離開檢視區。系統會根據這項資訊決定是否要固定顯示章節標題。
/**
 * Sets up an intersection observer to notify when elements with the class
 * `.sticky_sentinel--top` become visible/invisible at the top of the container.
 * @param {!Element} container
 */
function observeHeaders(container) {
  const observer = new IntersectionObserver((records, observer) => {
    for (const record of records) {
      const targetInfo = record.boundingClientRect;
      const stickyTarget = record.target.parentElement.querySelector('.sticky');
      const rootBoundsInfo = record.rootBounds;

      // Started sticking.
      if (targetInfo.bottom < rootBoundsInfo.top) {
        fireEvent(true, stickyTarget);
      }

      // Stopped sticking.
      if (targetInfo.bottom >= rootBoundsInfo.top &&
          targetInfo.bottom < rootBoundsInfo.bottom) {
       fireEvent(false, stickyTarget);
      }
    }
  }, {threshold: [0], root: container});

  // Add the top sentinels to each section and attach an observer.
  const sentinels = addSentinels(container, 'sticky_sentinel--top');
  sentinels.forEach(el => observer.observe(el));
}
觀察器會使用 threshold: [0] 進行設定,因此只要哨兵可見,就會觸發回呼。
底部哨兵 (.sticky_sentinel--bottom) 的程序也類似。當頁尾通過捲動容器的底部時,系統會觸發第二個觀察器。observeFooters 函式會建立哨兵節點,並將這些節點附加至各個區段。觀察器會計算哨兵與容器底部的交集,並決定哨兵是進入還是離開。這項資訊會決定是否顯示固定的章節標題。
/**
 * Sets up an intersection observer to notify when elements with the class
 * `.sticky_sentinel--bottom` become visible/invisible at the bottom of the
 * container.
 * @param {!Element} container
 */
function observeFooters(container) {
  const observer = new IntersectionObserver((records, observer) => {
    for (const record of records) {
      const targetInfo = record.boundingClientRect;
      const stickyTarget = record.target.parentElement.querySelector('.sticky');
      const rootBoundsInfo = record.rootBounds;
      const ratio = record.intersectionRatio;

      // Started sticking.
      if (targetInfo.bottom > rootBoundsInfo.top && ratio === 1) {
        fireEvent(true, stickyTarget);
      }

      // Stopped sticking.
      if (targetInfo.top < rootBoundsInfo.top &&
          targetInfo.bottom < rootBoundsInfo.bottom) {
        fireEvent(false, stickyTarget);
      }
    }
  }, {threshold: [1], root: container});

  // Add the bottom sentinels to each section and attach an observer.
  const sentinels = addSentinels(container, 'sticky_sentinel--bottom');
  sentinels.forEach(el => observer.observe(el));
}
觀察器會使用 threshold: [1] 進行設定,因此當整個節點位於檢視範圍內時,回呼就會觸發。
最後,我有兩個公用程式可用來觸發 sticky-change 自訂事件並產生哨兵:
/**
 * @param {!Element} container
 * @param {string} className
 */
function addSentinels(container, className) {
  return Array.from(container.querySelectorAll('.sticky')).map(el => {
    const sentinel = document.createElement('div');
    sentinel.classList.add('sticky_sentinel', className);
    return el.parentElement.appendChild(sentinel);
  });
}

/**
 * Dispatches the `sticky-event` custom event on the target element.
 * @param {boolean} stuck True if `target` is sticky.
 * @param {!Element} target Element to fire the event on.
 */
function fireEvent(stuck, target) {
  const e = new CustomEvent('sticky-change', {detail: {stuck, target}});
  document.dispatchEvent(e);
}
就是這麼簡單!
最終示範
當含有 position:sticky 的元素變成固定且未使用 scroll 事件新增捲動效果時,我們會建立自訂事件。
結論
我常常會想,IntersectionObserver 是否能成為有用的工具,用來取代過去幾年開發的部分 scroll 事件式 UI 模式。答案是肯定的,但也否定的。IntersectionObserver API 的語意會讓您難以在所有情況下使用。但如同我在這裡展示的,您可以用它來實作一些有趣的技術。
是否有其他方式可偵測風格變更?
算不上是。我們需要的是觀察 DOM 元素樣式變更的方法。很抱歉,網頁平台 API 中沒有任何可讓您觀看樣式變更的功能。
MutationObserver 是第一個合理的選擇,但在大多數情況下都無法運作。舉例來說,在示範中,當 sticky 類別新增至元素時,我們會收到回呼,但元素的計算樣式變更時,我們不會收到回呼。請注意,sticky 類別已在網頁載入時宣告。
日後,如果要觀察元素計算樣式的變更,可能就需要使用「樣式變異觀察器」擴充功能。position: sticky。