


Standard web applications are typically restricted to specific communication protocols like HTTP and APIs like WebSocket and WebRTC. While these are powerful, they are designed to be tightly constrained to prevent abuse. They cannot establish raw TCP or UDP connections, which limits the ability of web apps to communicate with legacy systems or hardware devices that use their own non-web protocols. For example, you might want to build a web-based SSH client, connect to a local printer, or manage a fleet of IoT devices. Historically, this required browser plugins or native helper applications.
The Direct Sockets API addresses this limitation by enabling Isolated Web Apps (IWAs) to establish direct TCP and UDP connections without a relay server. With IWAs, thanks to additional security measures—such as strict Content Security Policy (CSP) and cross-origin isolation— this API can be safely exposed.
Use cases
When should you use Direct Sockets over standard WebSockets?
- IoT and smart devices: Communicating with hardware that uses raw TCP/UDP rather than HTTP.
- Legacy systems: Connecting to older mail servers (SMTP/IMAP), IRC chat servers, or printers.
- Remote desktop and terminals: Implementing SSH, Telnet, or RDP clients.
- P2P systems: Implementing Distributed Hash Tables (DHT) or resilient collaboration tools (like IPFS).
- Media broadcasting: Leveraging UDP to stream content to multiple endpoints at once (multicasting), enabling use cases like coordinated video playback across a network of retail kiosks.
- Server and listener capabilities: Configuring the IWA to act as a
receiving endpoint for incoming TCP connections or UDP datagrams using
TCPServerSocketor boundUDPSocket.
Prerequisites for Direct Sockets
Before using Direct Sockets, you'll need to set up a functional IWA. You can then integrate Direct Sockets into your pages.
Add permission policy
To use Direct Sockets, you must configure the permissions_policy object in
your IWA manifest. You need to add the direct-sockets key to explicitly enable
the API. Additionally, you must include the cross-origin-isolated key. This
key is not specific to Direct Sockets, but is required for all IWAs and
determines whether the document can access APIs that require cross-origin
isolation.
{
  "permissions_policy": {
    "direct-sockets": ["self"],
    "cross-origin-isolated": ["self"]
  }
}
The direct-sockets key determines whether calls to new TCPSocket(...), new
TCPServerSocket(...) or new UDPSocket(...) are allowed. If this policy is not
set, these constructors will immediately reject with a NotAllowedError.
Implement TCPSocket
Applications can request a TCP connection by creating a TCPSocket instance.
Open a connection
To open a connection, use the new operator and await the opened promise.
The TCPSocket constructor initiates the connection using the specified
remoteAddress and remotePort.
const remoteAddress = 'example.com';
const remotePort = 7;

// Configure options like keepAlive or buffering
const options = {
  keepAlive: true,
  keepAliveDelay: 720000
};

let tcpSocket = new TCPSocket(remoteAddress, remotePort, options);

// Wait for the connection to be established
let { readable, writable } = await tcpSocket.opened;
The optional configuration object allows for fine-grained network control; in
this specific case, keepAliveDelay is set to 720000 milliseconds to maintain
the connection during periods of inactivity. Developers can also configure other
properties here, such as noDelay, which disables Nagle's algorithm to stop the
system from batching small packets—potentially reducing latency—or
sendBufferSize and receiveBufferSize to manage throughput.
In the last part of the preceding snippet, the code awaits the opened promise,
which only resolves once the handshake is complete, returning a
TCPSocketOpenInfo object containing the readable and writable streams required
for data transmission.
Read and write
Once the socket is open, interact with it using standard Streams API interfaces.
- Writing: The writable stream accepts a
BufferSource(like anArrayBuffer). - Reading: The readable stream yields
Uint8Arraydata.
// Writing data
const writer = writable.getWriter();
const encoder = new TextEncoder();
await writer.write(encoder.encode("Hello Server"));

// Call when done
writer.releaseLock();

// Reading data
const reader = readable.getReader();
const { value, done } = await reader.read();
if (!done) {
    const decoder = new TextDecoder();
    console.log("Received:", decoder.decode(value));
}

// Call when done
reader.releaseLock();
Optimized reading with BYOB
For high-performance applications where managing memory allocation is critical, the API supports "Bring Your Own Buffer" (BYOB) reading. Instead of letting the browser allocate a new buffer for every chunk of data received, you can pass a pre-allocated buffer to the reader. This reduces garbage collection overhead by writing data directly into your existing memory.
// 1. Get a BYOB reader explicitly
const reader = readable.getReader({ mode: 'byob' });

// 2. Allocate a reusable buffer (e.g., 4KB)
let buffer = new Uint8Array(4096);

// 3. Read directly into the existing buffer
const { value, done } = await reader.read(buffer);

if (!done) {
  // 'value' is a view of the data written directly into your buffer
  console.log("Bytes received:", value.byteLength);
}

reader.releaseLock();
Implement UDPSocket
The UDPSocket class allows for UDP communication. It operates in two distinct
modes depending on how you configure the options.
Connected mode
In this mode, the socket communicates with a single specific destination. This is useful for standard client-server tasks.
// Connect to a specific remote host
let udpSocket = new UDPSocket({
    remoteAddress: 'example.com',
    remotePort: 7 });

let { readable, writable } = await udpSocket.opened;
Bound mode
In this mode, the socket is bound to a local IP endpoint. It can receive datagrams from arbitrary sources and send them to arbitrary destinations. This is often used for local discovery protocols or server-like behavior.
// Bind to all interfaces (IPv6)
let udpSocket = new UDPSocket({
    localAddress: '::'
    // omitting localPort lets the OS pick one
});

// localPort will tell you the OS-selected port.
let { readable, writable, localPort } = await udpSocket.opened;
Handle UDP messages
Unlike the TCP stream of bytes, UDP streams deal in UDPMessage objects, which
contain the data and the remote address info. The following code demonstrates
how to handle Input/Output operations when using a UDPSocket in "bound mode."
// Writing (Bound Mode requires specifying destination)
const writer = writable.getWriter();
await writer.write({
    data: new TextEncoder().encode("Ping"),
    remoteAddress: '192.168.1.50',
    remotePort: 8080
});

// Reading
const reader = readable.getReader();
const { value } = await reader.read();
// value contains: { data, remoteAddress, remotePort }
console.log(`Received from ${value.remoteAddress}:`, value.data);
Unlike "connected mode," where the socket is locked to a specific peer, bound
mode allows the socket to communicate with arbitrary destinations. Consequently,
when writing data to the writable stream, you must pass a UDPMessage object
that explicitly specifies the remoteAddress and remotePort for each packet,
instructing the socket exactly where to route that specific datagram. Similarly,
when reading from the readable stream, the returned value includes not just the
data payload but also the sender's remoteAddress and remotePort, enabling
your application to identify the origin of every incoming packet.
Note: When using UDPSocket in "connected mode," the socket is effectively
locked to a specific peer, simplifying the I/O process. In this mode, the
remoteAddress and remotePort properties are effectively no-ops when writing,
as the destination is already fixed. Similarly, when reading messages, these
properties will return null, since the source is guaranteed to be the connected
peer.
Multicast support
For use cases like synchronizing video playback across multiple kiosks or implementing local device discovery (for example, mDNS), Direct Sockets supports Multicast UDP. This allows messages to be sent to a "group" address and received by all subscribers on the network, rather than a single specific peer.
Multicast permissions
To use multicast capabilities, you must add the specific
direct-sockets-multicast permission to your IWA manifest. This is distinct
from the standard direct-sockets permission and it's necessary because multicast
is used only in private networks.
{
  "permissions_policy": {
    "direct-sockets": ["self"],
    "direct-sockets-multicast": ["self"],
    "direct-sockets-private": ["self"],
    "cross-origin-isolated": ["self"]
  }
}
Send multicast datagrams
Sending to a multicast group is very similar to standard UDP "connected mode," with the addition of specific options to control packet behavior.
const MULTICAST_GROUP = '239.0.0.1';
const PORT = 12345;

const socket = new UDPSocket({
  remoteAddress: MULTICAST_GROUP,
  remotePort: PORT,
  // Time To Live: How many router hops the packet can survive (default: 1)
  multicastTimeToLive: 5,
  // Loopback: Whether to receive your own packets (default: true)
  multicastLoopback: true
});

const { writable } = await socket.opened;
// Write to the stream as usual...
Receive multicast datagrams
To receive multicast traffic, you must open a UDPSocket in "bound mode"
(typically binding to 0.0.0.0 or ::) and then join a specific group using
the MulticastController. You may also use the multicastAllowAddressSharing
option (similar to SO_REUSEADDR on Unix), which is essential for device
discovery protocols where multiple applications on the same device need to
listen to the same port.
const socket = new UDPSocket({
  localAddress: '0.0.0.0', // Listen on all interfaces
  localPort: 12345,
  multicastAllowAddressSharing: true // Allow multiple applications to bind to the same address / port pair.
});

// The open info contains the MulticastController
const { readable, multicastController } = await socket.opened;

// Join the group to start receiving packets
await multicastController.joinGroup('239.0.0.1');

const reader = readable.getReader();

// Read the stream...
const { value } = await reader.read();
console.log(`Received multicast from ${value.remoteAddress}`);

// When finished, you can leave the group (this is an optional, but recommended practice)
await multicastController.leaveGroup('239.0.0.1');
Create a server
The API also supports TCPServerSocket for accepting incoming TCP connections,
effectively allowing your IWA to act as a local server. The following code
illustrates how to establish a TCP server using the TCPServerSocket interface.
// Listen on all interfaces (IPv6)
let tcpServerSocket = new TCPServerSocket('::');

// Accept connections via the readable stream
let { readable } = await tcpServerSocket.opened;
let reader = readable.getReader();

// Wait for a client to connect
let { value: clientSocket } = await reader.read();

// 'clientSocket' is a standard TCPSocket you can now read/write to
By instantiating the class with the '::' address, the server binds to all
available IPv6 network interfaces to listen for incoming attempts. Unlike
traditional callback-based server APIs, this API utilizes the web's Streams API
pattern: incoming connections are delivered as a ReadableStream. When you call
reader.read(), the application waits for and accepts the next connection from
the queue, resolving to a value that is a fully functional TCPSocket instance
ready for two-way communication with that specific client.
Debug Direct Sockets with Chrome DevTools
From Chrome 138, you can debug Direct Sockets traffic directly within the
Network panel in Chrome DevTools, eliminating the need for external packet
sniffers. This tooling lets you monitor TCPSocket connections as well as
UDPSocket traffic (in both bound and connected modes) alongside your standard
HTTP requests.
To inspect your app's network activity:
- Open the Network panel in Chrome DevTools.
- Locate and select the socket connection in the request table.
- Open the Messages tab to view a log of all transmitted and received data.
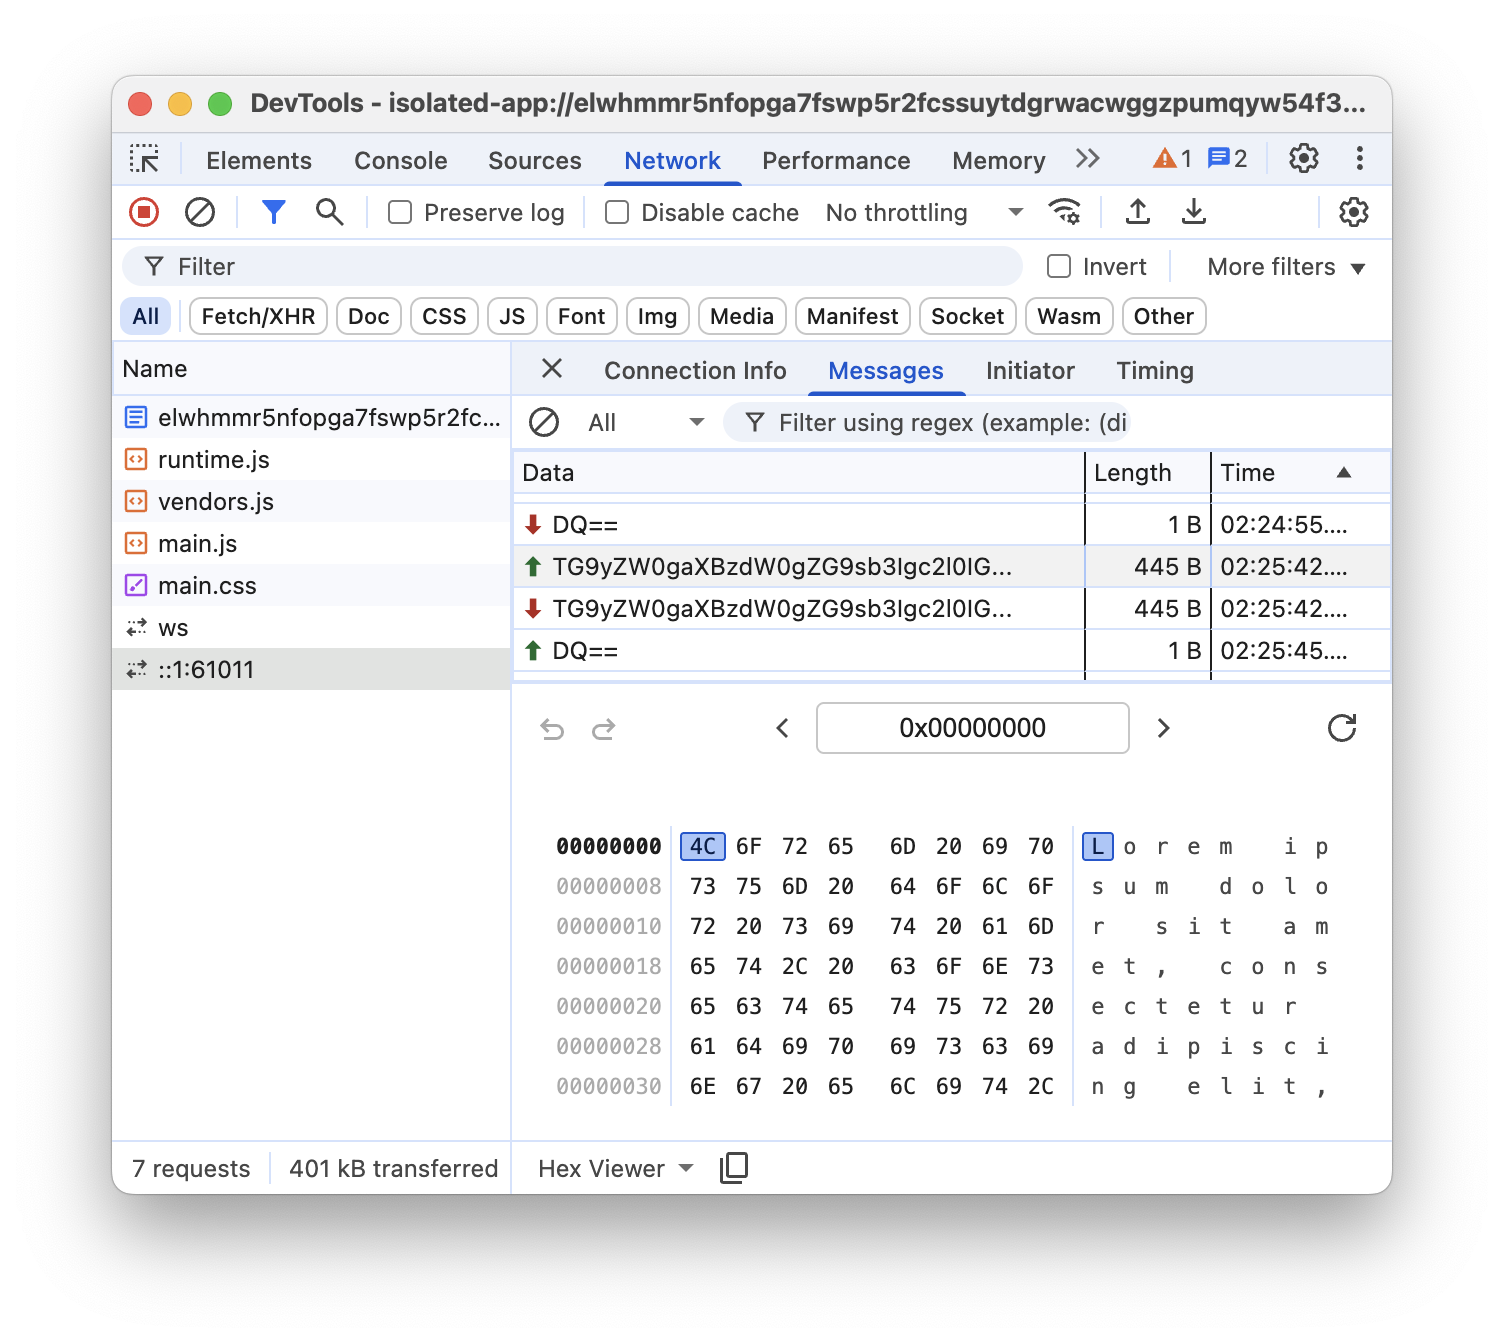
This view provides a Hex Viewer, allowing you to inspect the raw binary payload of your TCP and UDP messages, ensuring your protocol implementation is byte-perfect.
Demo
IWA Kitchen Sink features an app with multiple tabs, each demonstrating a different IWA API such as Direct Sockets, Controlled Frame and more.
Alternatively, the telnet client demo contains an Isolated Web App that allows the user to connect to a TCP/IP server through an interactive terminal. In other words, a Telnet client.
Conclusion
The Direct Sockets API closes a critical functionality gap by enabling web
applications to handle raw network protocols that were previously impossible to
support without native wrappers. It goes beyond simple client connectivity; with
TCPServerSocket, applications can listen for incoming connections, while
UDPSocket offers flexible modes for both peer-to-peer communication and local
network discovery.
By exposing these raw TCP and UDP capabilities through the modern Streams API, you can now build full-featured implementations of legacy protocols—like SSH, RDP, or custom IoT standards—directly in JavaScript. Because this API grants low-level network access, it carries significant security implications. Therefore, it is restricted to Isolated Web Apps (IWAs), ensuring that such power is only granted to trusted, explicitly installed applications that enforce strict security policies. This balance lets you build powerful, device-centric applications while maintaining the safety users expect from the web platform.