
With SQLite Wasm backed by the origin private file system, there is a versatile replacement for the deprecated Web SQL database technology. This article is a guide to migrating your data from Web SQL to SQLite Wasm.

Required background
The post Deprecating and removing Web SQL announced the deprecation of the Web SQL database technology. While the technology itself may be deprecated, the use cases addressed by the technology very much are not, so the follow-up post SQLite Wasm in the browser backed by the Origin Private File System, outlines a replacement set of technologies based on the SQLite database, compiled to Web Assembly (Wasm), and backed by the origin private file system. To close the circle, this article shows how to migrate databases over from Web SQL to SQLite Wasm.
Migrating your databases
The following four steps demonstrate the conceptual idea of migrating a Web SQL database over to SQLite Wasm, with the SQLite database backed by the origin private file system. This can serve as the foundation for your own code customized to your Web SQL migration needs.
The to-be-migrated Web SQL database(s)
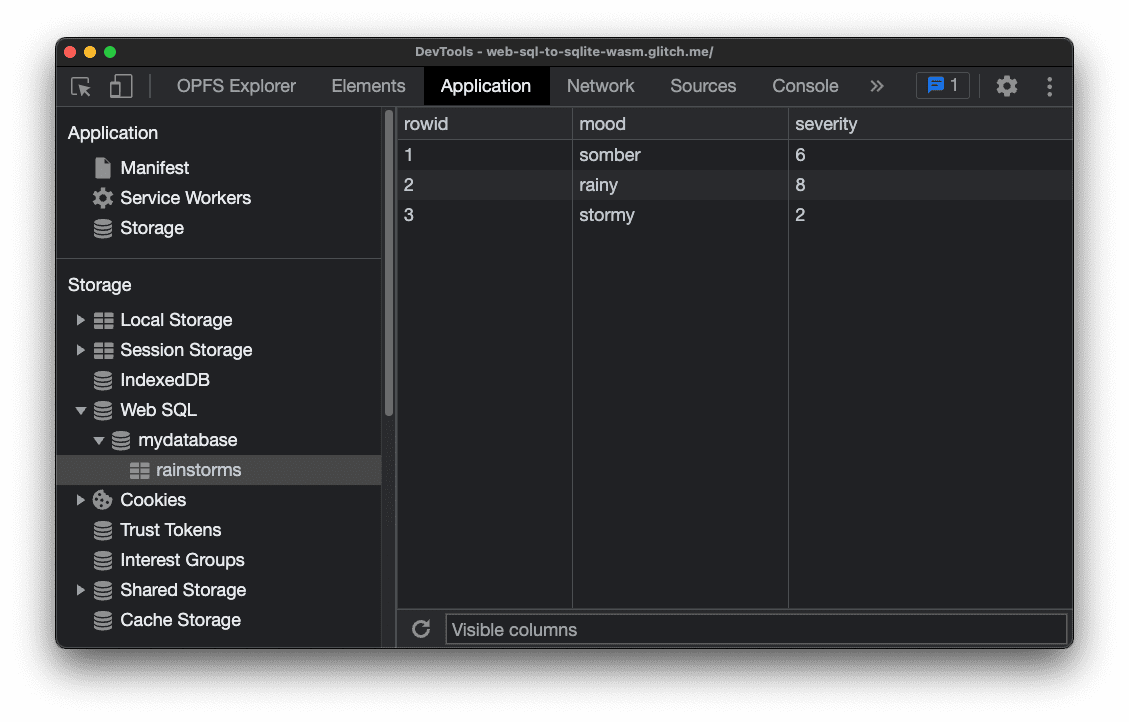
The baseline assumption of this migration guide is that you have one (or several) existing Web SQL databases that hold data relevant to your app. In the screenshot below, you see an example database called mydatabase with a rainstorms table that maps moods to severities. Chrome DevTools allow you to view Web SQL databases for debugging, as shown in the following screenshot.
Translating the Web SQL database to SQL statements
To migrate the data in a way that is transparent to the user, that is, without requiring them to perform any of the migration steps on their own, the pieces of data in the database need to be translated back to the original SQL statements that created them in the first place. This challenge has come up before, and the migration script used in this article—mywebsqldump.js—is based on a community library called websqldump.js, with some minor adjustments. The following code sample shows the code required to translate the Web SQL database mydatabase to a set of SQL statements.
websqldump.export({
  database: 'mydatabase',
  version: '1.0',
  success: function(sql) {
    // The SQL statements.
  },
  error: function(err) {
    // Handle the error.
  }
});
Running this code results in the SQL statements string below.
CREATE TABLE IF NOT EXISTS rainstorms (mood text, severity int);
INSERT INTO rainstorms(mood,severity) VALUES ('somber','6');
INSERT INTO rainstorms(mood,severity) VALUES ('rainy','8');
INSERT INTO rainstorms(mood,severity) VALUES ('stormy','2');
Importing the data into SQLite Wasm
All that remains is executing these SQL commands in the context of SQLite Wasm. For all details regarding setting SQLite Wasm up, I refer you to the article SQLite Wasm in the browser backed by the Origin Private File System, but the gist is again below. Remember that this code needs to run in a Worker (that the library automatically creates for you), with the required HTTP headers set correctly. You can install the @sqlite.org/sqlite-wasm package from npm.
import { sqlite3Worker1Promiser } from '@sqlite.org/sqlite-wasm';

(async () => {
  try {
    const promiser = await new Promise((resolve) => {
      const _promiser = sqlite3Worker1Promiser({
        onready: () => {
          resolve(_promiser);
        },
      });
    });

    let response;

    response = await promiser('open', {
      filename: 'file:mydatabase.db?vfs=opfs',
    });
    const { dbId } = response;

    const sql = `
      CREATE TABLE IF NOT EXISTS rainstorms (mood text, severity int);
      INSERT INTO rainstorms(mood,severity) VALUES ('somber','6');
      INSERT INTO rainstorms(mood,severity) VALUES ('rainy','8');
      INSERT INTO rainstorms(mood,severity) VALUES ('stormy','2');`
    await promiser('exec', { dbId, sql });

    await promiser('close', { dbId });
  } catch (err) {
    if (!(err instanceof Error)) {
      err = new Error(err.result.message);
    }
    console.error(err.name, err.message);
  }
})();
After running this code, inspect the imported database file with the OPFS Explorer Chrome DevTools extension. There are two files now, one with the actual database, and one with journaling information. Note that these two files live in the origin private file system, so you need to use the OPFS Explorer extension to see them.

To actually verify that the imported data is the same as the initial Web SQL data, click the file mydatabase.db and the OPFS Explorer extension will show a Save File dialog to let you save the file in the user-visible file system. With the database file saved, use a SQLite viewer app to explore the data. The Project Fugu API Showcase features several apps for working with SQLite in the browser. For example, Sqlime — SQLite Playground lets you open a SQLite database file from your hard disk and run queries on the database. As you see in the screenshot below, the rainstorm table has been correctly imported into SQLite.

Freeing Web SQL storage
While it's (maybe surprisingly) impossible to delete a Web SQL database, you should still free some storage by dropping the now obsolete Web SQL tables after you have migrated the data into SQLite Wasm. To list all tables in a Web SQL database and drop them using JavaScript, use code as in the following snippet:
const dropAllTables = () => {
  try {
    db.transaction(function (tx) {
      tx.executeSql(
        "SELECT name FROM sqlite_master WHERE type='table' AND name !='__WebKitDatabaseInfoTable__'",
        [],
        function (tx, result) {
          const len = result.rows.length;
          const tableNames = [];
          for (let i = 0; i < len; i++) {
            const tableName = result.rows.item(i).name;
            tableNames.push(`'${tableName}'`);
            db.transaction(function (tx) {
              tx.executeSql('DROP TABLE ' + tableName);
            });
          }
          console.log(`Dropped table${tableNames.length > 1 ? 's' : ''}: ${tableNames.join(', ')}.`);
        }
      );
    });
  } catch (err) {
    console.error(err.name, err.message);
  }
};
Working with the data after the migration
After you have migrated the data, work with the data as outlined in this Getting started code sample. See the SQLite Wasm API reference for details. Again a reminder that you need to access SQLite Wasm from a Worker if you use the origin private file system as your storage backend.
Conclusions
Migrating your Web SQL databases to SQLite Wasm backed by the origin private file system is possible in a way transparent to your users. They will not notice that their data is now hosted in the origin private file system in a SQLite database, and no longer lives in Web SQL. Overall, migrating from Web SQL to SQLite is a necessary step for web developers who want to ensure the long-term stability and scalability of their applications. While the process may require some initial effort, the benefits of a more robust, flexible, and, above all, future-proof database solution make it well worth the investment.