
이 가이드에서는 탭, 창 또는 앱에서 오디오와 동영상을 녹음하는 여러 가지 방법을 설명합니다.
chrome.tabCapture 또는
getDisplayMedia()
화면 녹화
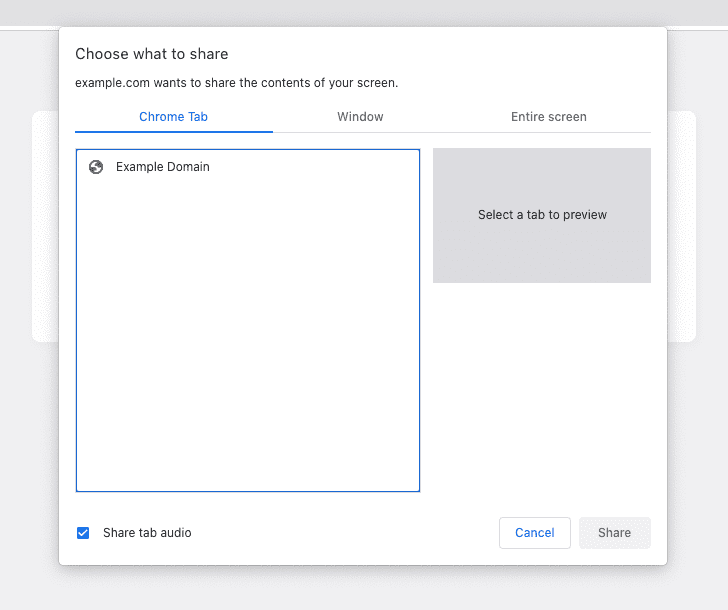
화면 녹화의 경우 대화상자를 트리거하는 getDisplayMedia()를 호출합니다.
확인할 수 있습니다. 이를 통해 사용자는 원하는 탭, 창 또는 화면을 선택할 수 있습니다.
녹화가 진행 중임을 명확하게 표시합니다.
다음 예에서는 오디오와 동영상을 모두 녹화할 수 있는 액세스 권한을 요청합니다.
const stream = await navigator.mediaDevices.getDisplayMedia({ audio: true, video: true });
콘텐츠 스크립트 내에서 호출하는 경우 사용자가 새로운
있습니다. 백그라운드 및 탐색 시 녹화를 하려면
오프스크린 문서를 DISPLAY_MEDIA 이유를 포함합니다.
사용자 동작 기반 탭 캡처
getDisplayMedia()를 호출하면 브라우저에
사용자가 공유하고자 하는 것이 무엇인지 생각해 봐야 합니다. 그러나 경우에 따라 사용자가
작업 버튼을 사용하여 특정 탭의 확장 프로그램을 호출하고
이 메시지 없이 즉시 탭 캡처를 시작합니다.
백그라운드에서 오디오 및 동영상 녹화
Chrome 116부터 서비스 워커에서 chrome.tabCapture API를 호출할 수 있습니다.
사용자 동작에 따라 스트림 ID를 가져올 수 있습니다. 그런 다음 화면 밖 문서로 전달되어
녹화를 시작합니다.
서비스 워커에서 다음을 수행합니다.
chrome.action.onClicked.addListener(async (tab) => {
  const existingContexts = await chrome.runtime.getContexts({});

  const offscreenDocument = existingContexts.find(
    (c) => c.contextType === 'OFFSCREEN_DOCUMENT'
  );

  // If an offscreen document is not already open, create one.
  if (!offscreenDocument) {
    // Create an offscreen document.
    await chrome.offscreen.createDocument({
      url: 'offscreen.html',
      reasons: ['USER_MEDIA'],
      justification: 'Recording from chrome.tabCapture API',
    });
  }

  // Get a MediaStream for the active tab.
  const streamId = await chrome.tabCapture.getMediaStreamId({
    targetTabId: tab.id
  });

  // Send the stream ID to the offscreen document to start recording.
  chrome.runtime.sendMessage({
    type: 'start-recording',
    target: 'offscreen',
    data: streamId
  });
});
그런 다음 오프스크린 문서에서 다음을 수행합니다.
chrome.runtime.onMessage.addListener(async (message) => {
  if (message.target !== 'offscreen') return;

  if (message.type === 'start-recording') {
    const media = await navigator.mediaDevices.getUserMedia({
      audio: {
        mandatory: {
          chromeMediaSource: "tab",
          chromeMediaSourceId: message.data,
        },
      },
      video: {
        mandatory: {
          chromeMediaSource: "tab",
          chromeMediaSourceId: message.data,
        },
      },
    });

    // Continue to play the captured audio to the user.
    const output = new AudioContext();
    const source = output.createMediaStreamSource(media);
    source.connect(output.destination);

    // TODO: Do something to record the MediaStream.
  }
});
전체 예는 탭 캡처 - 녹음기 샘플을 참고하세요.
새 탭에서 오디오 및 동영상 녹화
Chrome 116 이전에는 chrome.tabCapture API를
서비스 워커를 사용하거나 이 API에 의해 생성된 스트림 ID를 화면 밖 문서에서 소비할 수 있습니다. 둘 다
위 접근 방식의 요구사항입니다.
대신 새 탭이나 창에서 확장 프로그램 페이지를 열어 스트림을 직접 가져올 수 있습니다. 설정
targetTabId 속성을 사용하여 올바른 탭을 캡처해야 합니다.
확장 프로그램 페이지를 열어 시작합니다 (팝업 또는 서비스 워커일 수 있음).
chrome.windows.create({ url: chrome.runtime.getURL("recorder.html") });
그런 다음 확장 프로그램 페이지에서 다음을 수행합니다.
chrome.tabCapture.getMediaStreamId({ targetTabId: tabId }, async (id) => {
  const media = await navigator.mediaDevices.getUserMedia({
    audio: {
      mandatory: {
        chromeMediaSource: "tab",
        chromeMediaSourceId: id,
      },
    },
    video: {
      mandatory: {
        chromeMediaSource: "tab",
        chromeMediaSourceId: id,
      },
    },
  });

  // Continue to play the captured audio to the user.
  const output = new AudioContext();
  const source = output.createMediaStreamSource(media);
  source.connect(output.destination);
});
또는 다음과 같은 작업을 할 수 있는 화면 녹화 방식을 사용해 보세요. 오프스크린 문서를 사용하여 백그라운드에서 녹화하지만 사용자에게 탭을 선택하는 대화상자를 표시합니다. 녹화할 창 또는 화면이 있습니다.
팝업에서 오디오 녹음
오디오만 녹음해야 하는 경우 확장 프로그램 팝업에서 chrome.tabCapture.capture에서 찾을 수 있습니다. 팝업이 닫히면 녹화가 중지됩니다.
chrome.tabCapture.capture({ audio: true }, (stream) => {
  // Continue to play the captured audio to the user.
  const output = new AudioContext();
  const source = output.createMediaStreamSource(stream);
  source.connect(output.destination);

  // TODO: Do something with the stream (e.g record it)
});
여러 탐색 중에 계속 녹화를 하려면 설명된 방식을 사용해 보세요. 이전 섹션에 나와 있습니다.
기타 고려사항
스트림을 녹화하는 방법에 관한 자세한 내용은 MediaRecorder API를 참고하세요.