


Watch the video and complete these interactive tutorials to learn the basics of viewing and changing a page's DOM with Chrome DevTools.
This tutorial assumes that you know the difference between the DOM and HTML. Get a referesher in the appendix: HTML versus the DOM.
View DOM nodes
The DOM Tree of the Elements panel is where you do all DOM-related activities in DevTools.
Inspect a node
When you're interested in a particular DOM node, Inspect is a fast way to open DevTools and investigate that node.
In the following list, right-click Michelangelo. From the menu, select Inspect.
- Michelangelo
- Raphael
The Elements panel of DevTools opens.
<li>Michelangelo</li>is highlighted in the DOM Tree.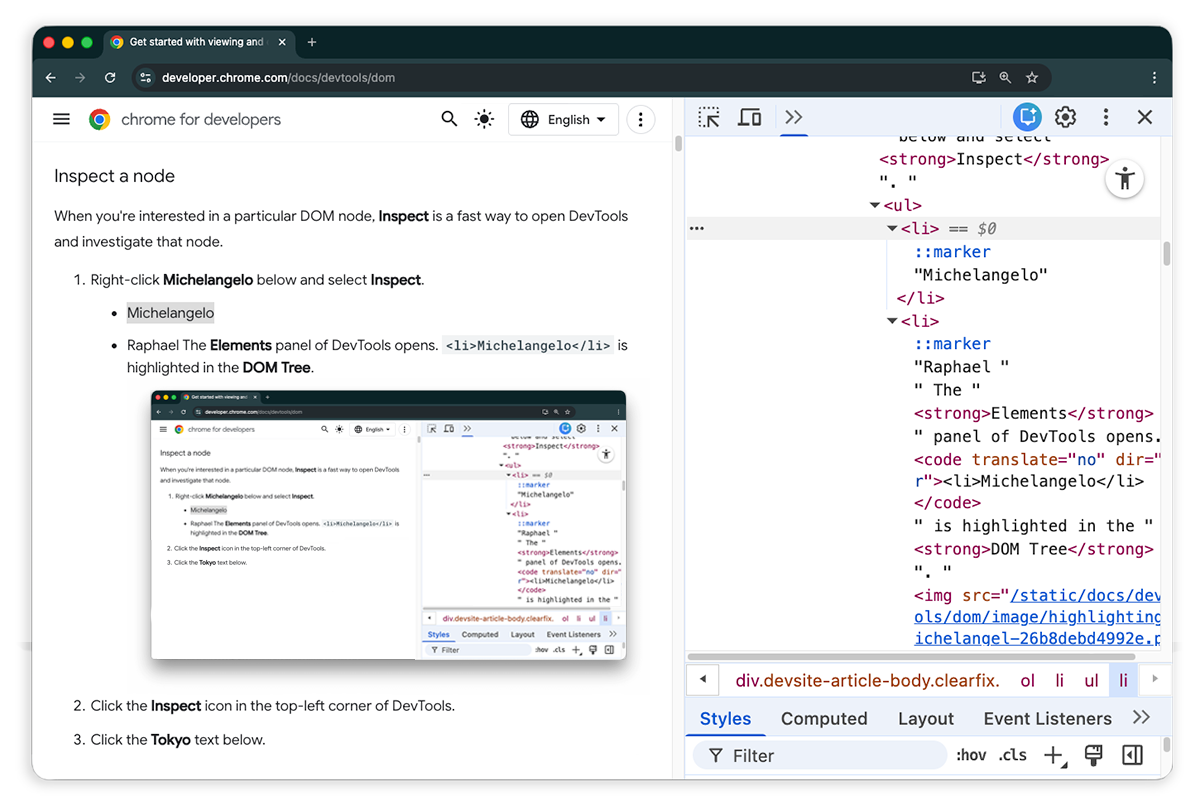
Click Select an element.
Select the Tokyo from the following list.
- Tokyo
- Beirut
<li>Tokyo</li>is highlighted in the DOM Tree.
Inspecting a node is also the first step towards viewing and changing a node's styles and CSS.
Navigate the DOM Tree with a keyboard
Once you've selected a node in the DOM Tree, you can navigate the DOM Tree with your keyboard.
From the following list, right-click Ringo and select Inspect.
<li>Ringo</li>is selected in the DOM Tree.- George
- Ringo
- Paul
John

Press the Up arrow key 2 times.
<ul>is selected.
Press the Left arrow key. The
<ul>list collapses.Press the Left arrow key again. The parent of the
<ul>node is selected. In this case, it's the<li>node containing the instructions for step 1.Press the Down arrow key 3 times so that you've re-selected the
<ul>list that you just collapsed. It should look like this:<ul>...</ul>Press the Right arrow key. The list expands.
Scroll into view
When viewing the DOM Tree, sometimes you'll find yourself in a DOM node that's
not in the viewport. For example, suppose that you scrolled to the bottom of the
page, and you're interested in the <h1> node at the top of the page.
Scroll into view lets you quickly reposition the viewport so that you can
see the node.
In the following list, right-click Magritte and select Inspect.
- Magritte
- Soutine
Scroll to the appendix section Scroll into view for additional instructions.
Once completed, you should jump back up to this section.
Show rulers
With rulers in your viewport, you can measure the width and height of an element when you hover over it in the Elements panel.

Enable the rulers in one of two ways:
- Press Control+Shift+P or
Command+Shift+P (macOS) to open the
Command menu, type
Show rulers on hover, and press Enter. - Check Settings > Preferences > Elements > Show rulers on hover.
The sizing unit of the rulers is pixels.
Search for nodes
You can search the DOM Tree by string, CSS selector, or XPath selector.
- Focus your cursor on the Elements panel.
- Press Control+F or Command+F (macOS). The Search bar opens at the bottom of the DOM Tree.
Type
The Moon is a Harsh Mistress. The last sentence is highlighted in the DOM Tree.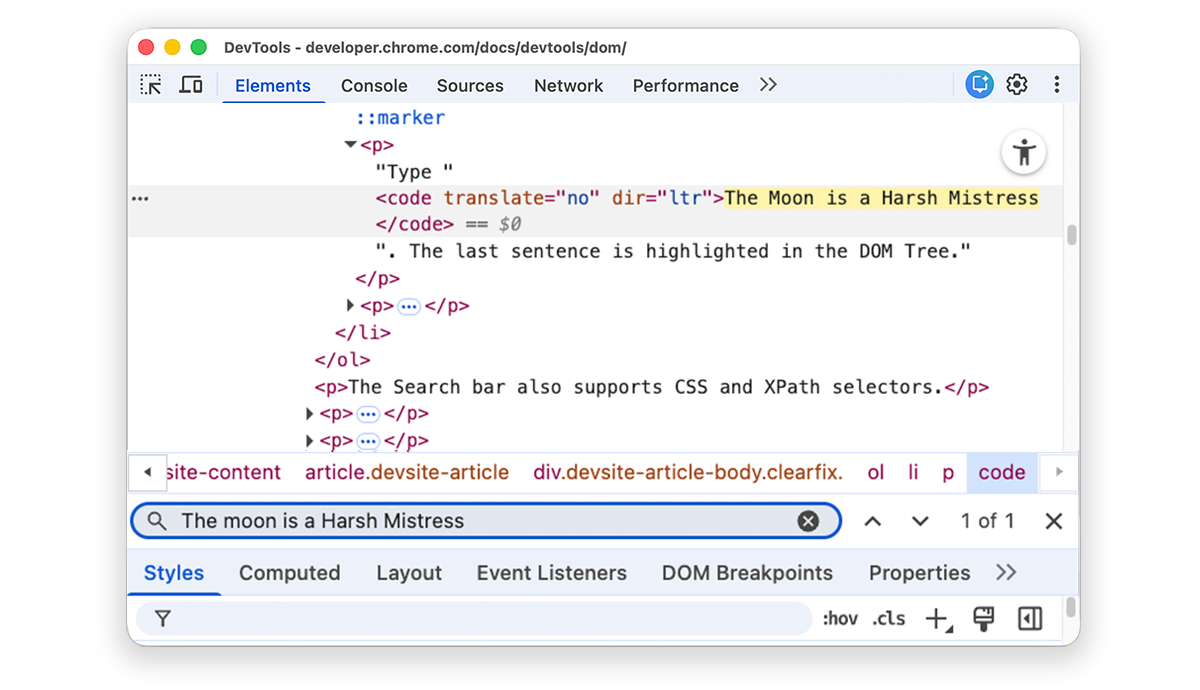
The Search bar also supports CSS and XPath selectors.
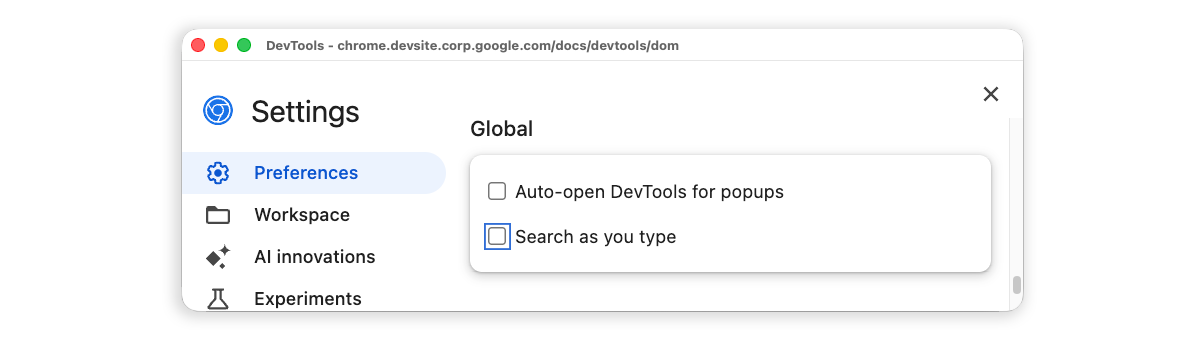
The Elements panel selects the first matching result in the DOM tree and rolls it into view in the viewport. By default, this happens as you type. If you always work with long search queries, you can make DevTools run search only when you press Enter.
To avoid unnecessary jumps between nodes, clear the Settings > Preferences > Global > Search as you type checkbox.
Edit the DOM
You can edit the DOM on the fly and see how those changes affect the page.
Edit content
To edit a node's content, double-click the content in the DOM Tree.
In the following list, right-click Michelle and select Inspect.
- Fry
- Michelle
In the DOM Tree, double-click
Michelle. In other words, double-click the text between<li>and</li>. The text is highlighted blue to indicate that it's selected.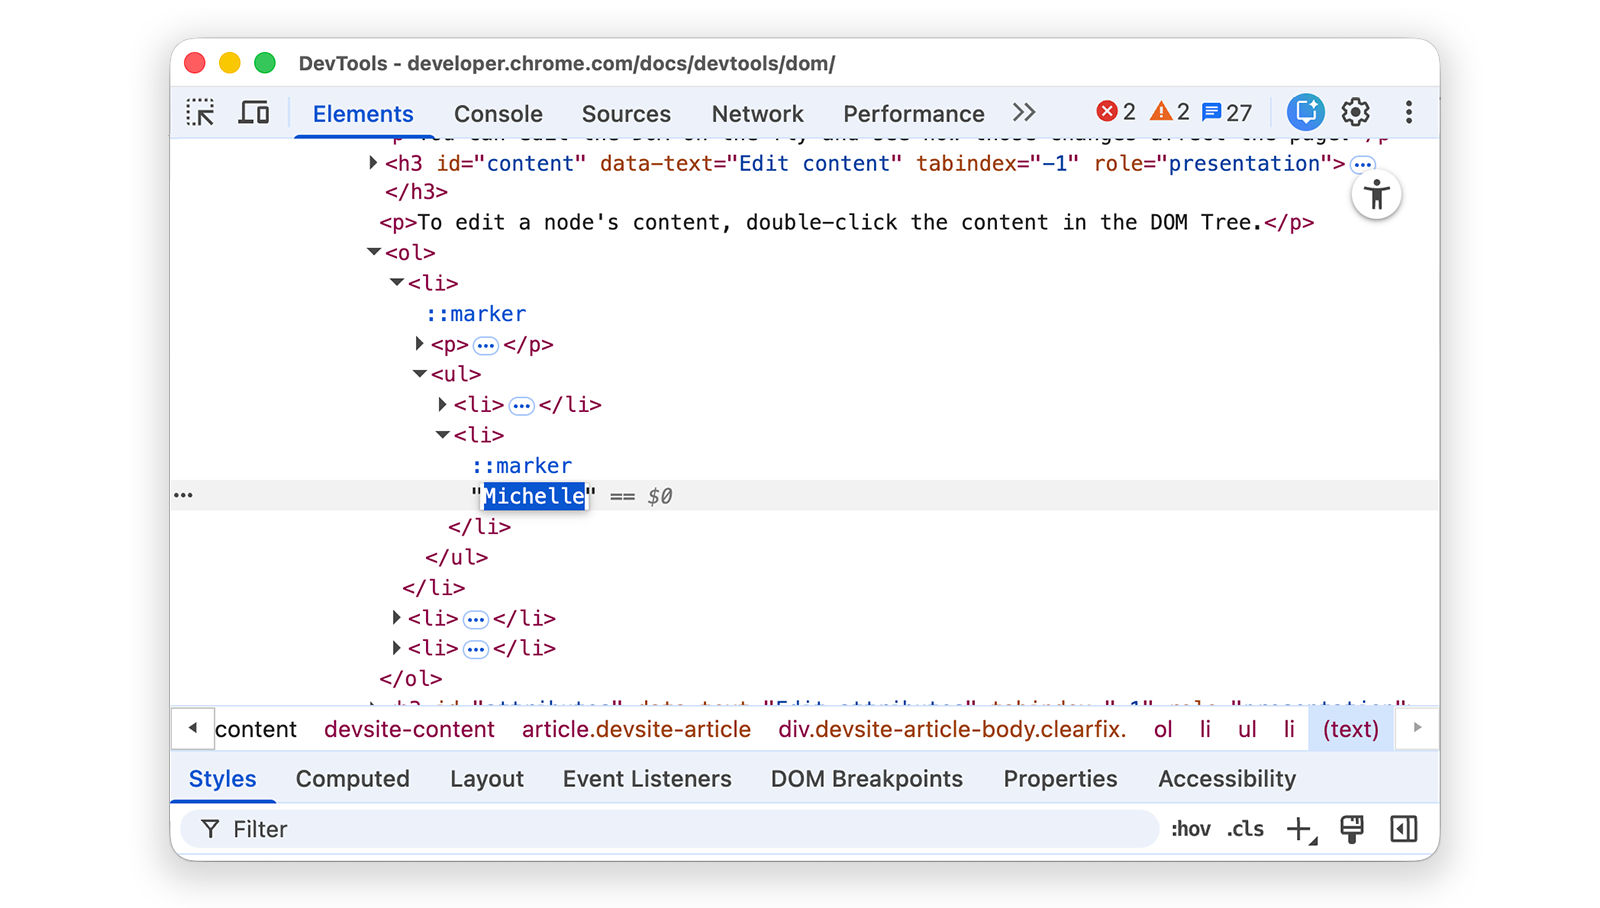
Delete
Michelle, typeLeela, then press Enter to confirm the change. The text changes from Michelle to Leela.
Edit attributes
To edit attributes, double-click the attribute name or value. Follow these instructions to learn how to add attributes to a node.
In the following list, right-click Howard and select Inspect.
- Howard
- Vince
Expand
<ul>, then double-click on<li>to edit. The text is highlighted to indicate that the node is selected.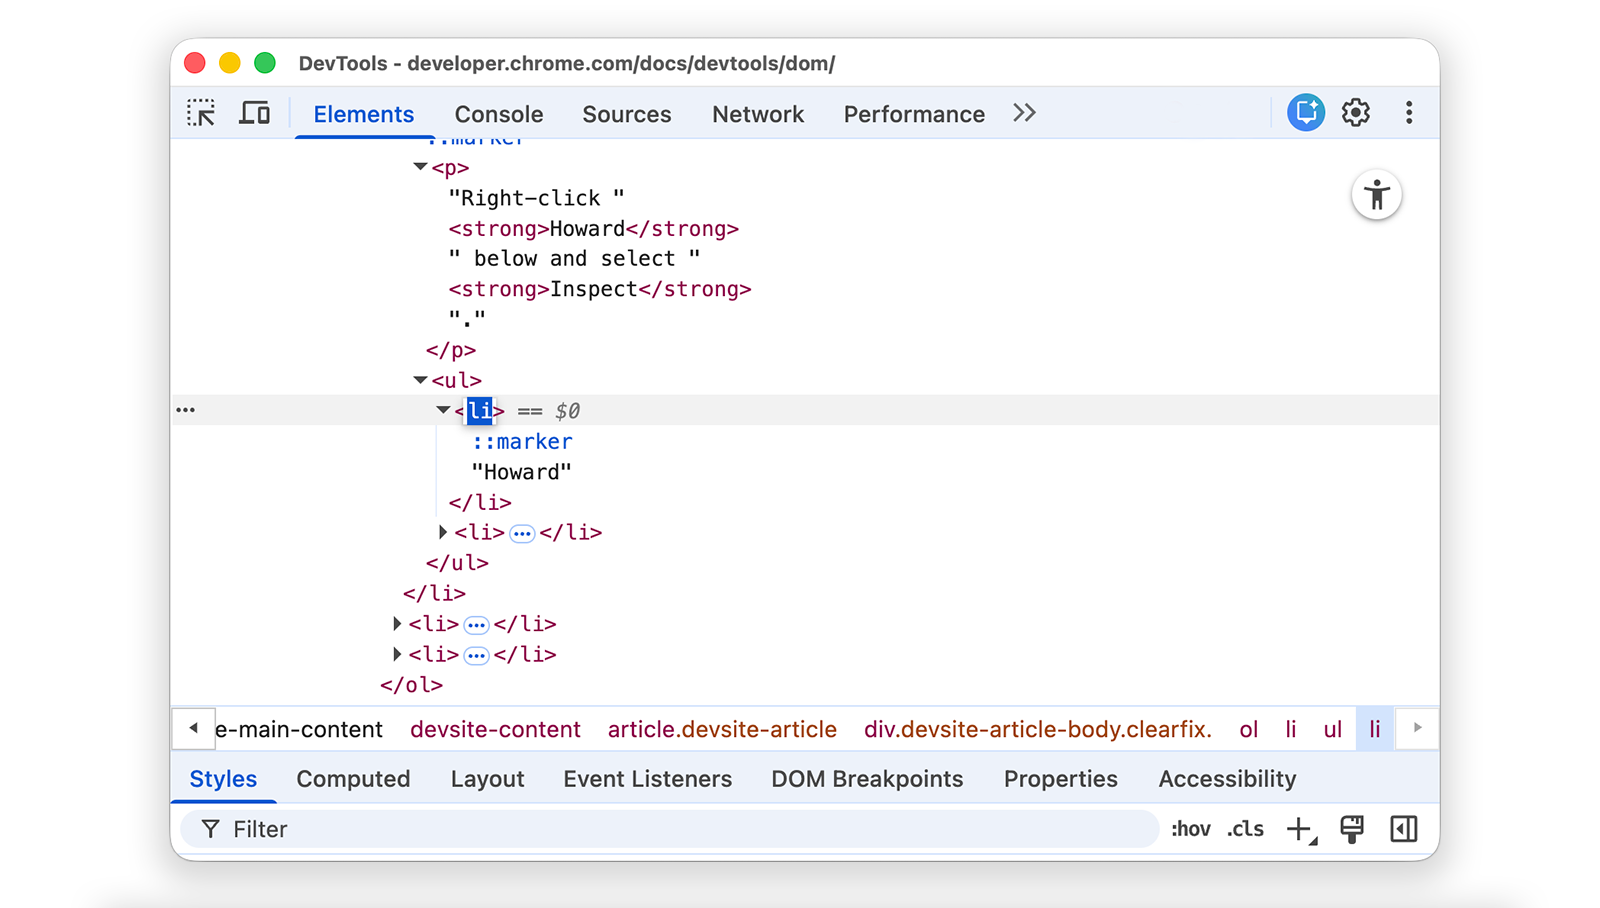
Press the Right arrow key, add a space, type
style="background-color:gold", and then press Enter. The background color of the node changes to gold.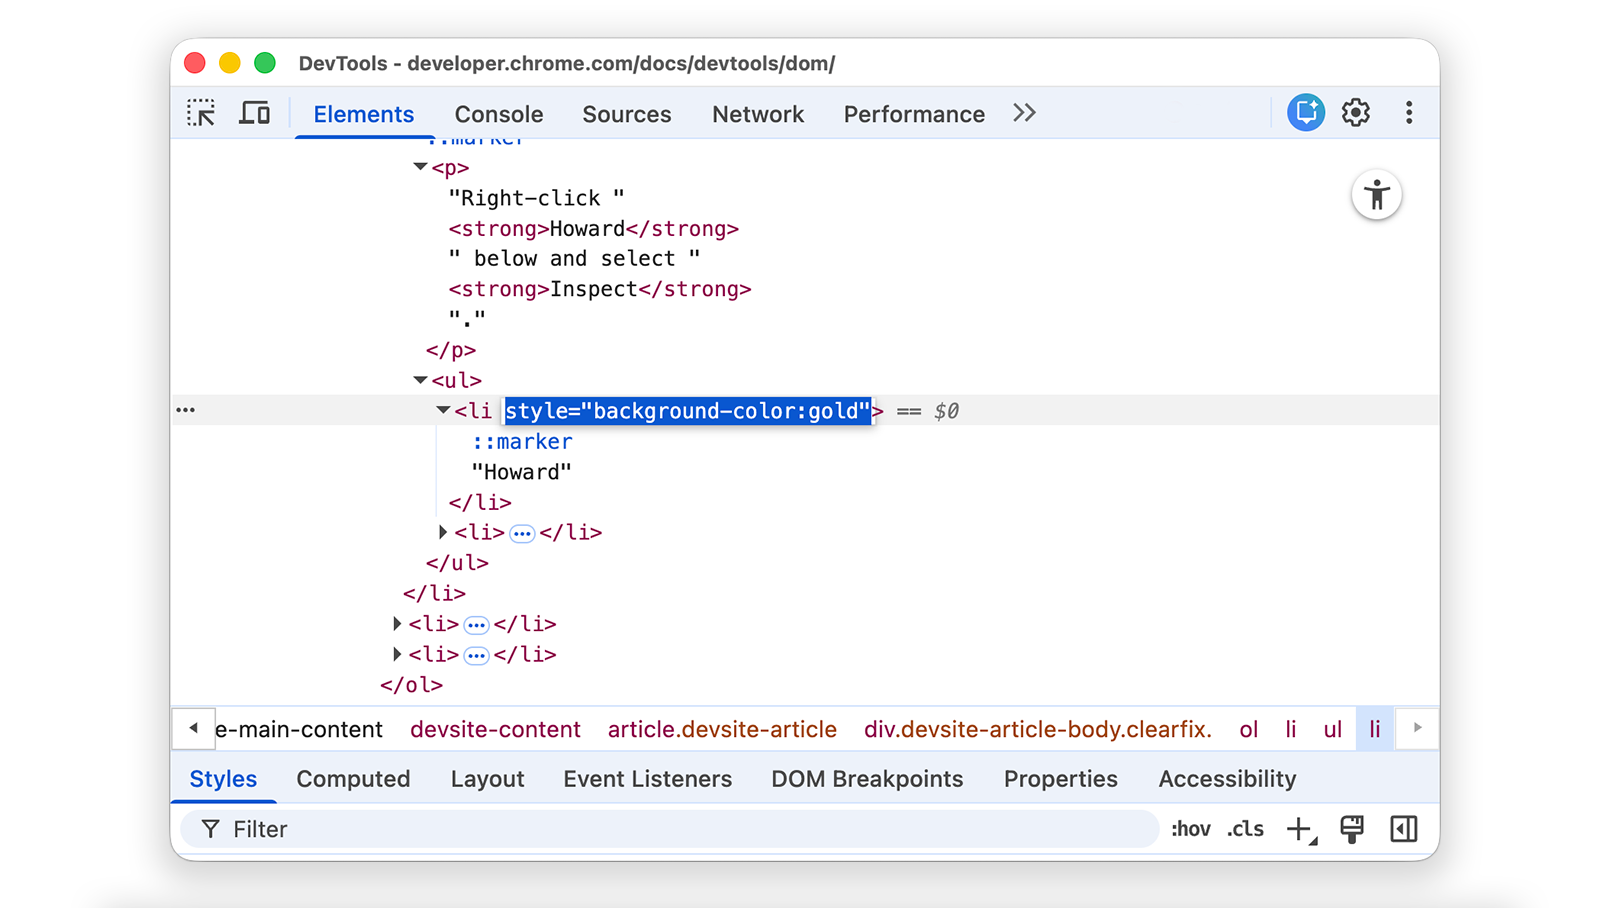
Edit node type
To edit a node's type, double-click the type and then type in the new type.
In the following list, right-click Hank and select Inspect.
- Dean
- Hank
- Thaddeus
- Brock
Double-click
<li>. The textliis highlighted.Delete
li, typebutton, then press Enter. The<li>node changes to a<button>node.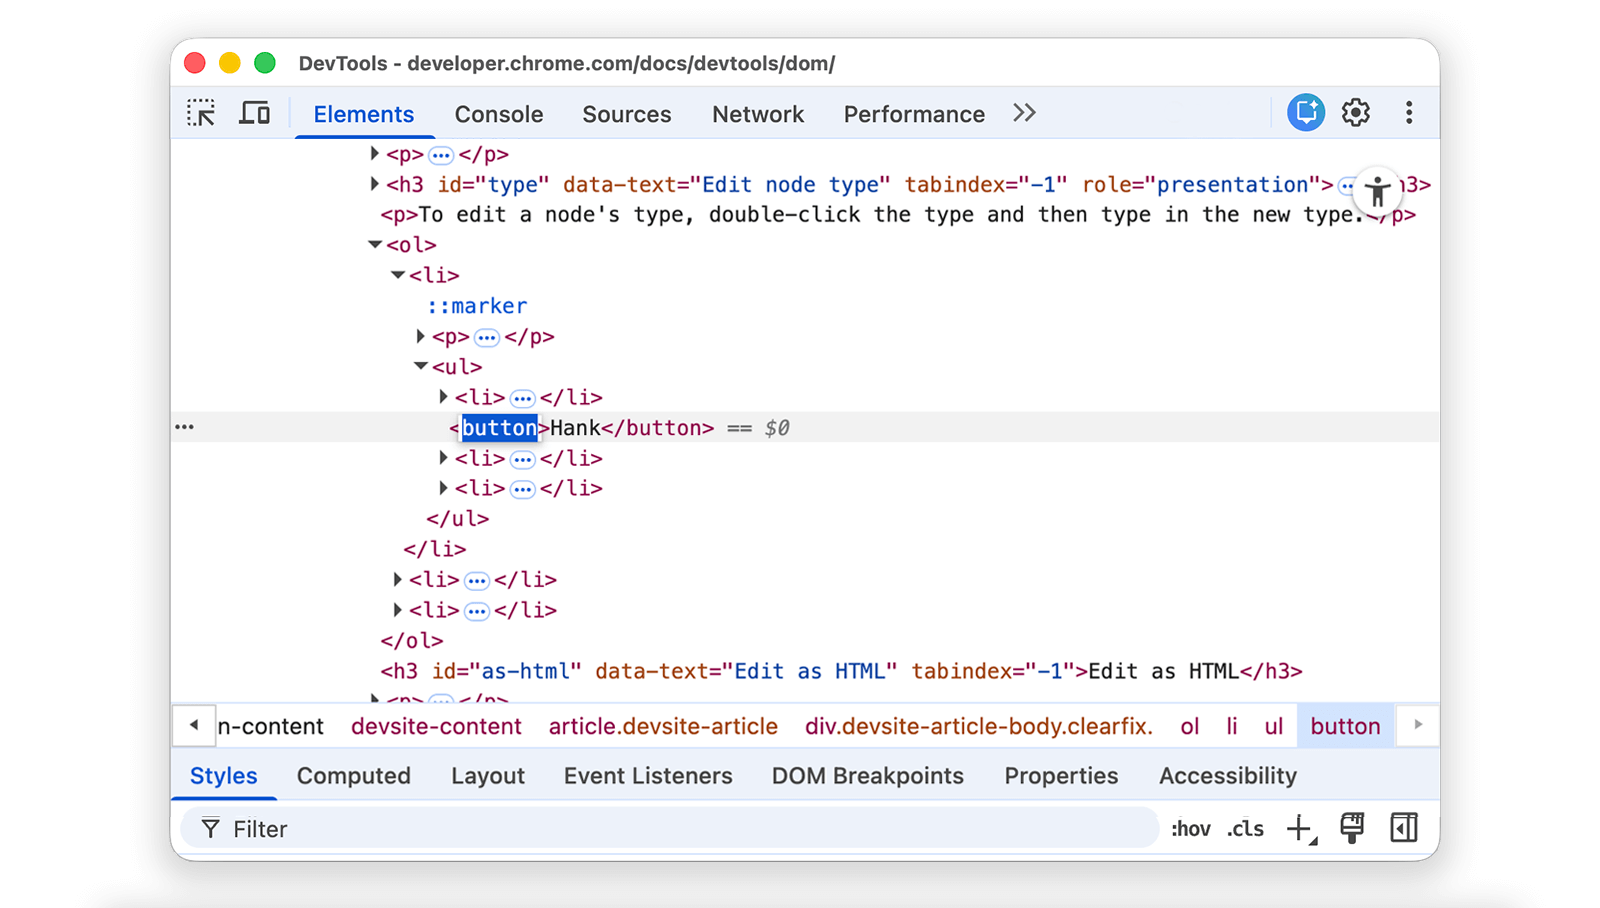
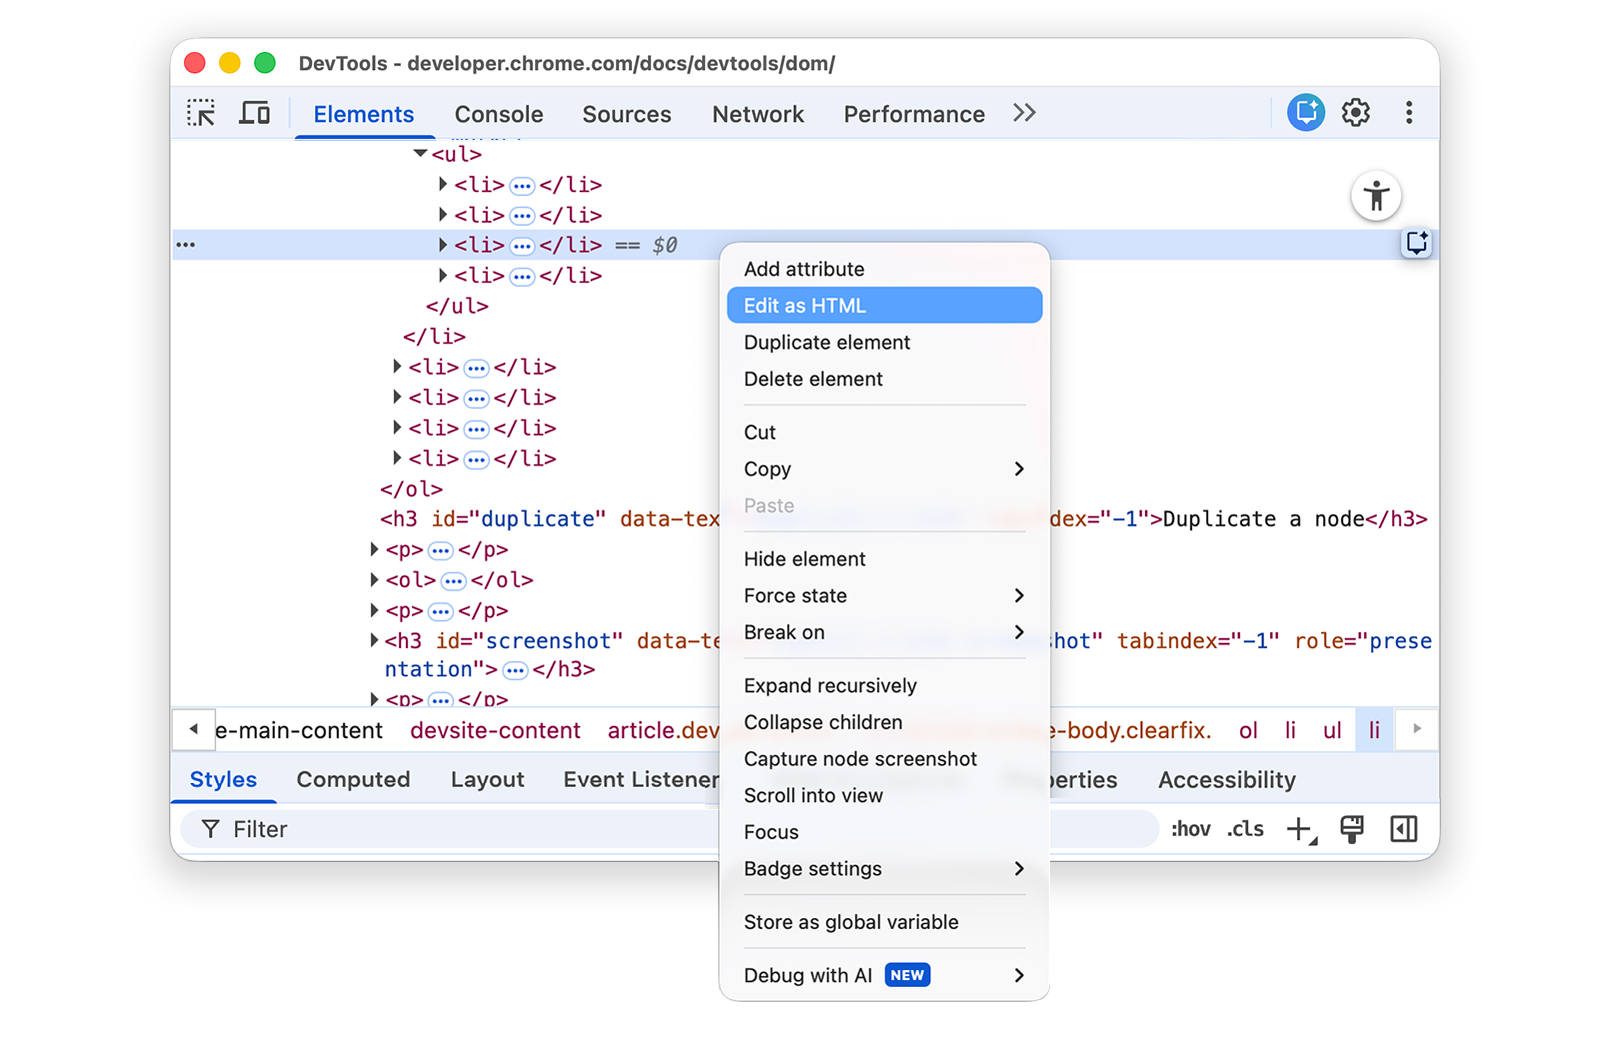
Edit as HTML
To edit nodes as HTML with syntax highlighting and autocomplete, select Edit as HTML from the node's drop-down menu.
Right-click Leonard below and select Inspect.
- Penny
- Howard
- Rajesh
- Leonard
In the Elements panel, right-click the current node and select Edit as HTML from the drop-down menu.
Press Enter to start a new line and start typing
<l. DevTool highlights HTML syntax and suggests tags to autocomplete.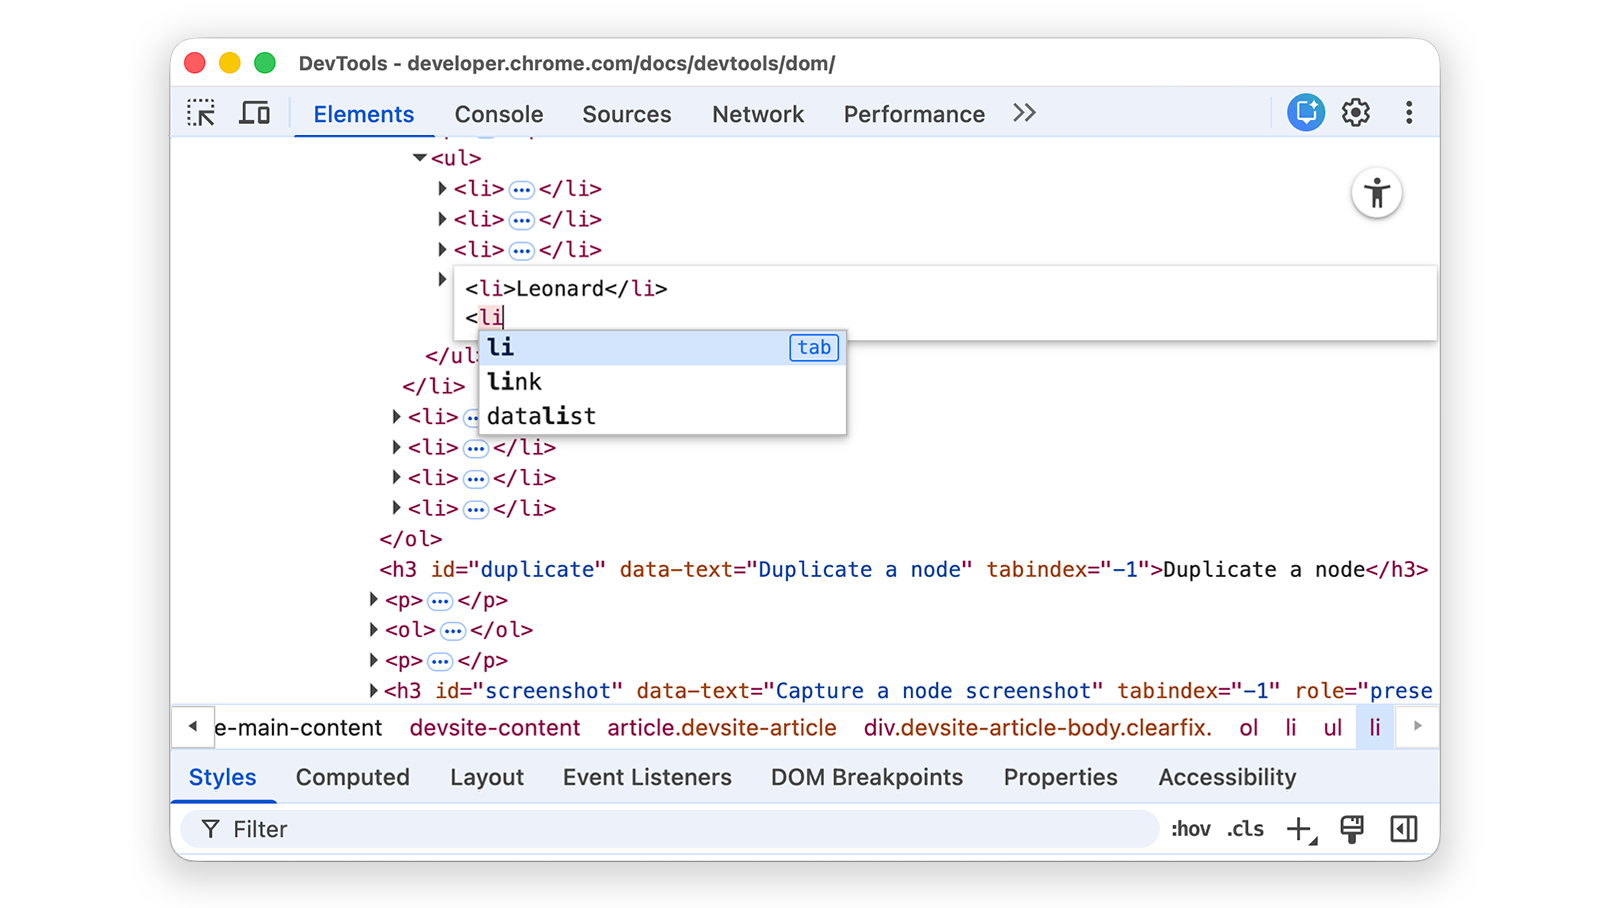
Select the
lielement from the autocomplete menu and type>. DevTools automatically adds the closing</li>tag after the cursor.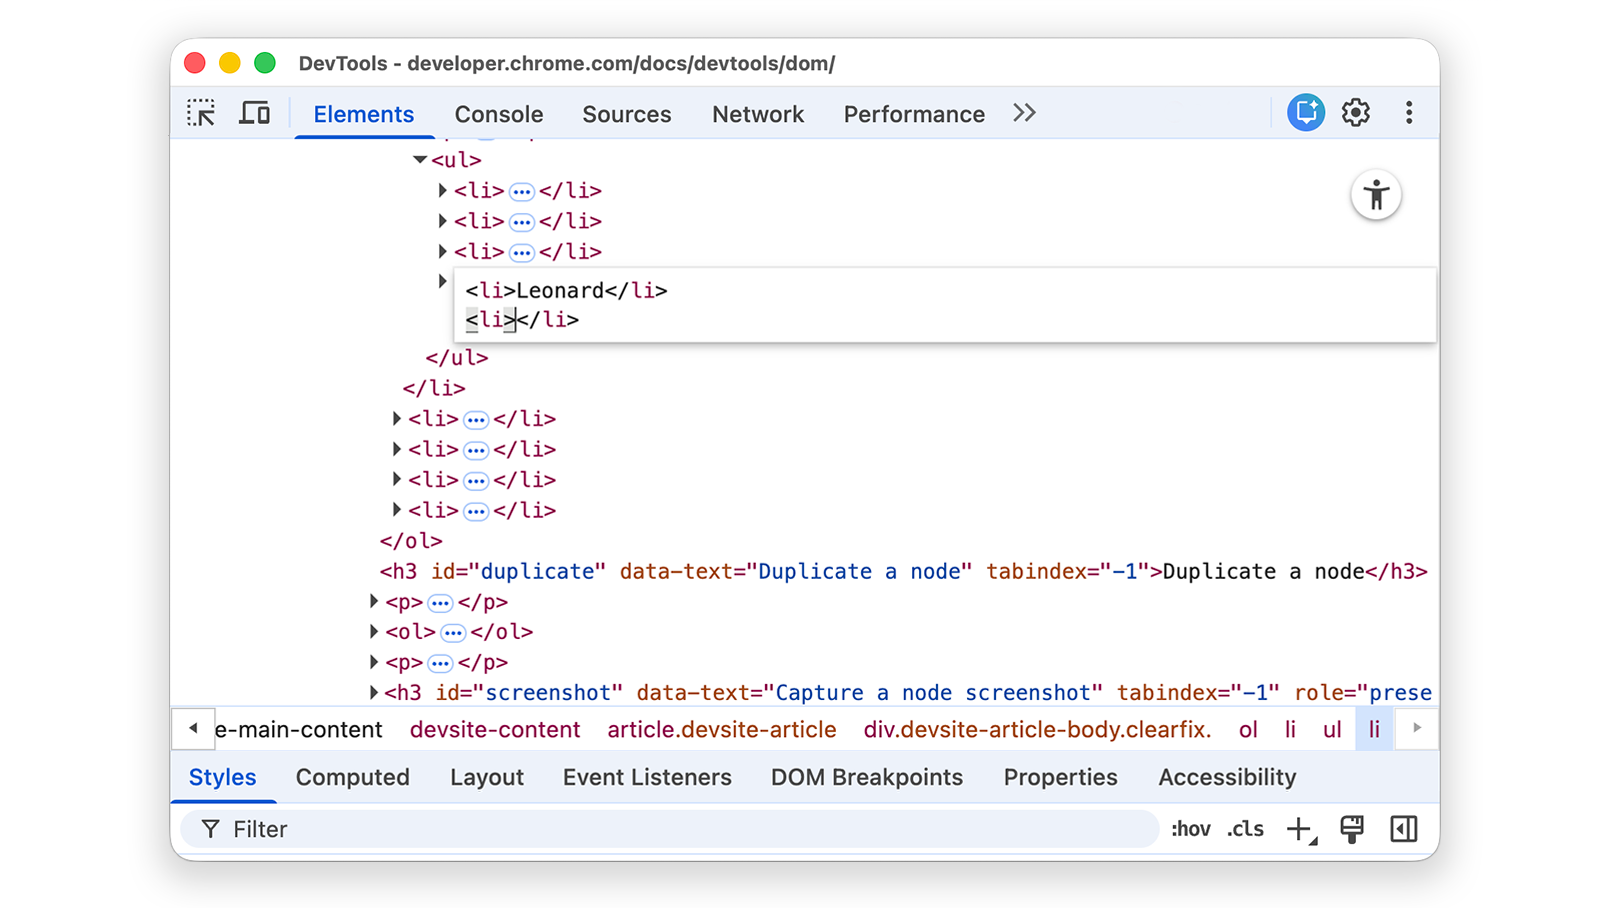
Type
Sheldoninside the tag and press Control or Command + Enter to apply changes.
Duplicate a node
You can duplicate an element using the Duplicate element right-click option.
Right-click Nana in the following list and select Inspect.
- Bonfire of the Vanities
- Nana
- Orlando
- White Noise
In the Elements panel, right-click
<li>Nana</li>and select Duplicate element from the drop-down menu.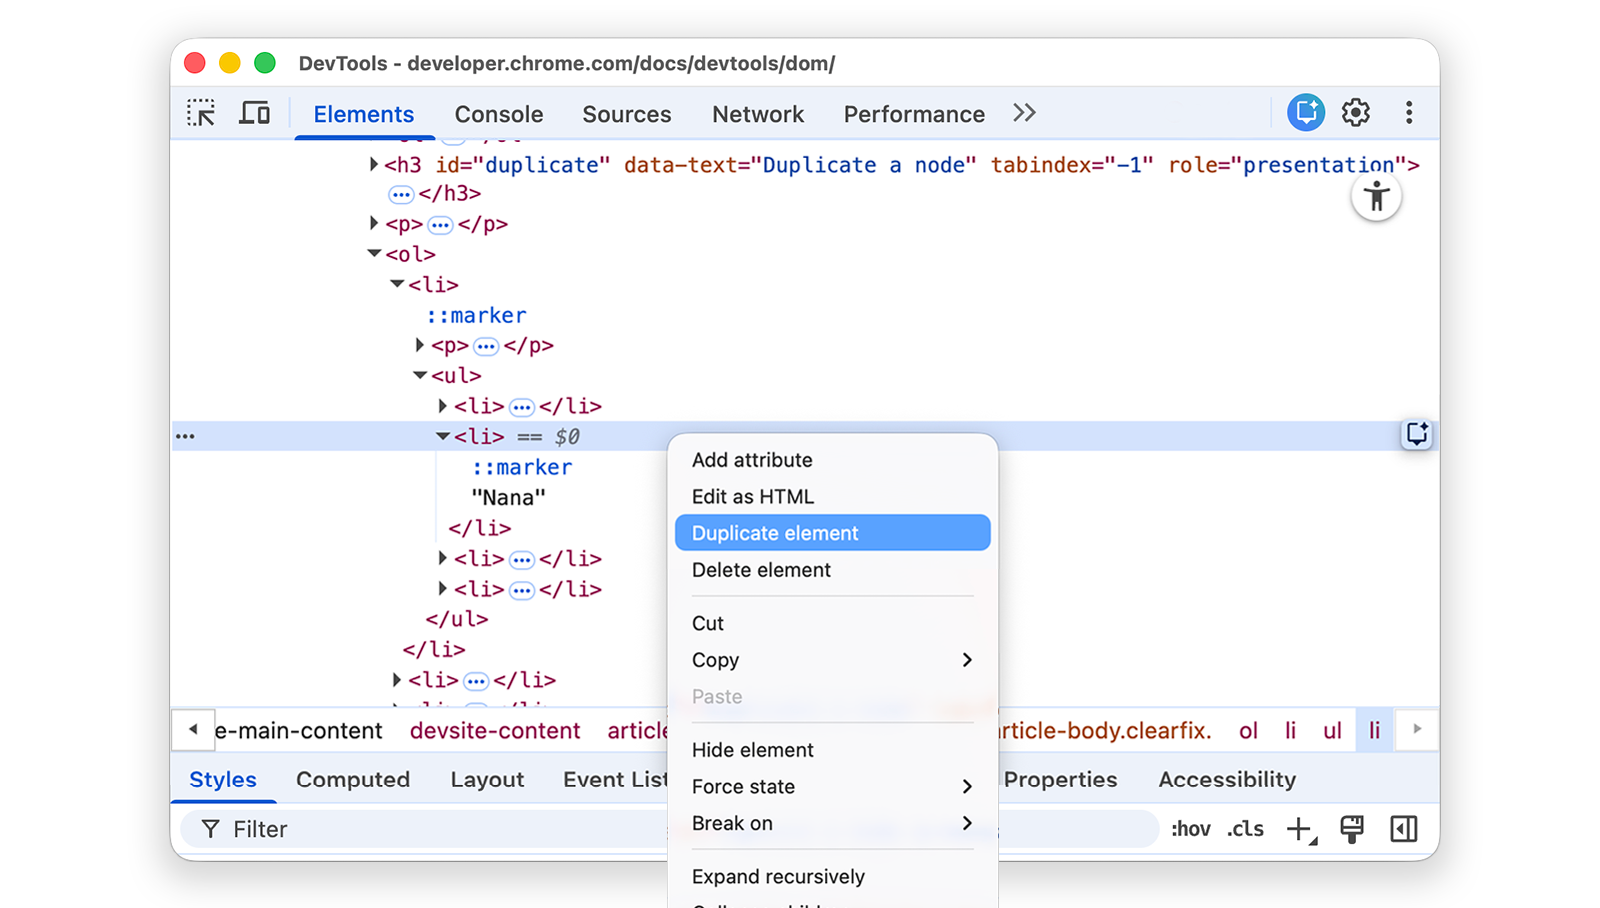
Return to the page. The list item has been duplicated.
You can also use the keyboard shortcuts: Shift + Alt + Down arrow (Windows and Linux) and Shift + Option + Down arrow (macOS).
Capture a node screenshot
You can screenshot any individual node in the DOM Tree.
Right-click any image on this page and select Inspect.
In the Elements panel, right-click the image URL and select Capture node screenshot from the drop-down menu.
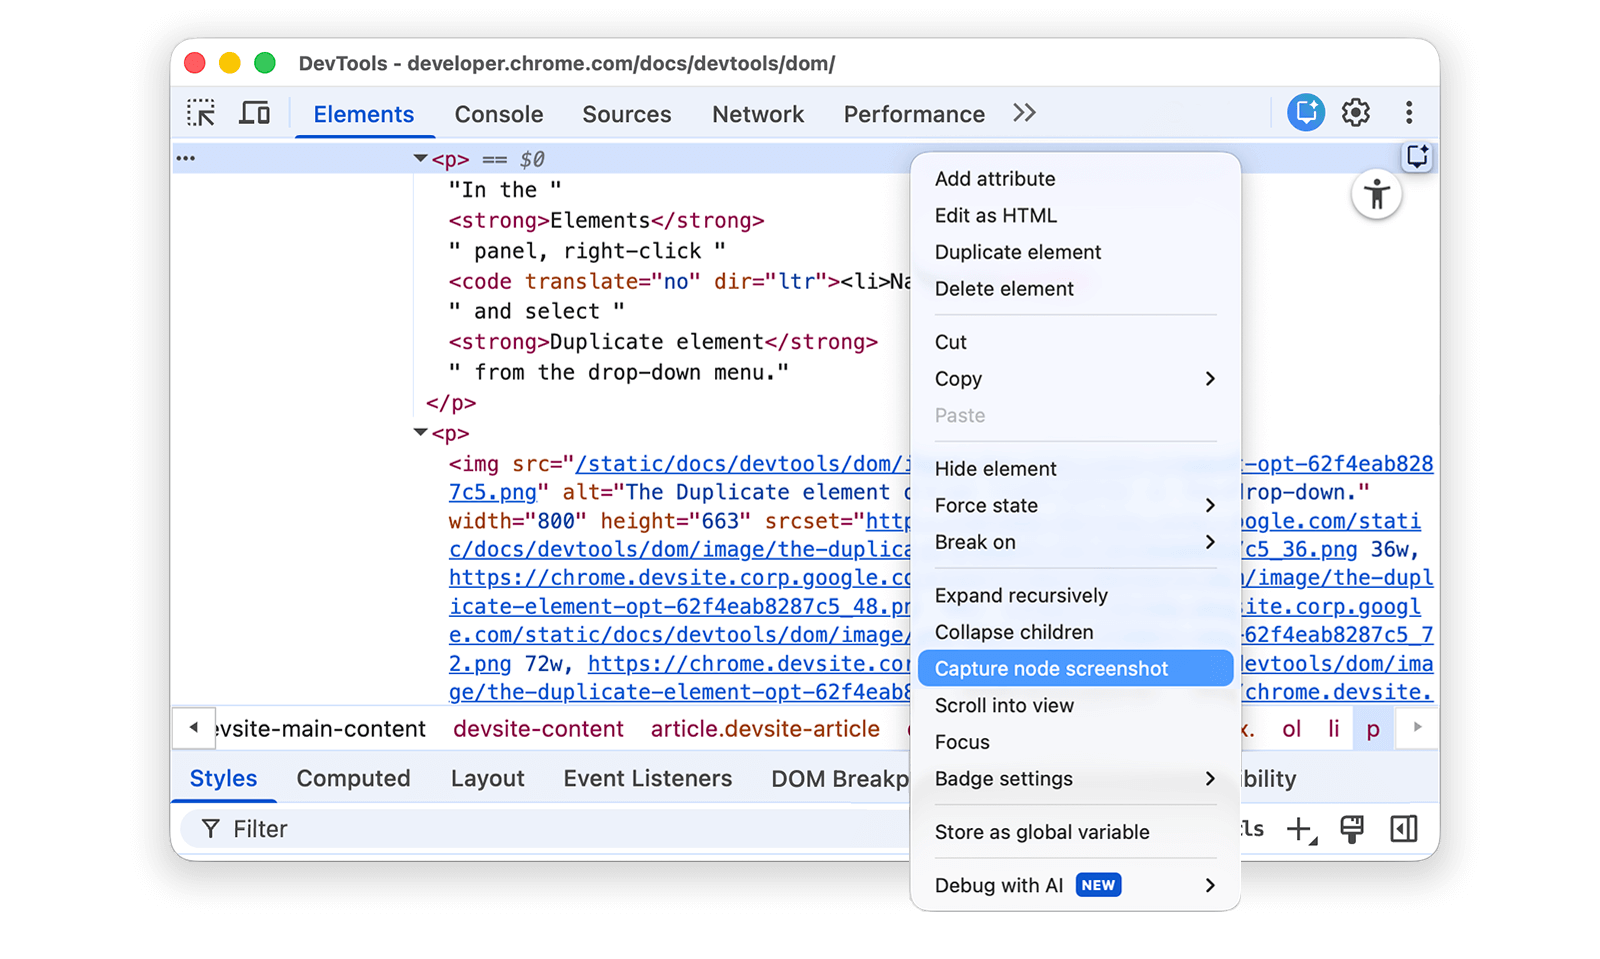
The screenshot is saved to your downloads (Windows and macOS).
Learn more in 4 ways to capture screenshots with DevTools.
Reorder DOM nodes
Drag nodes to reorder them.
In the following list, right-click Elvis Presley and select Inspect. It's the last item in the list.
- Stevie Wonder
- Tom Waits
- Chris Thile
- Elvis Presley
In the DOM Tree, drag
<li>Elvis Presley</li>to the top of the list.
Force state
You can force nodes to remain in states like :active, :hover, :focus,
:visited, and :focus-within.
Hover over the The Lord of the Flies list item. The background color becomes orange.
- The Lord of the Flies
- Crime and Punishment
- Moby Dick
Right-click on the The Lord of the Flies list item, and select Inspect.
Right-click
<li class="demo--hover">The Lord of the Flies</li>and select Force State > :hover. Read the appendix on missing options, if you don't see this option.The background color remains orange, even though you're not actually hovering over the node.
Hide a node
Press H to hide a node.
From the following list, right-click The Stars My Destination and select Inspect.
- The Count of Monte Cristo
- The Stars My Destination
Press the H key. The node is hidden. You can also right-click the node and use the Hide element option.
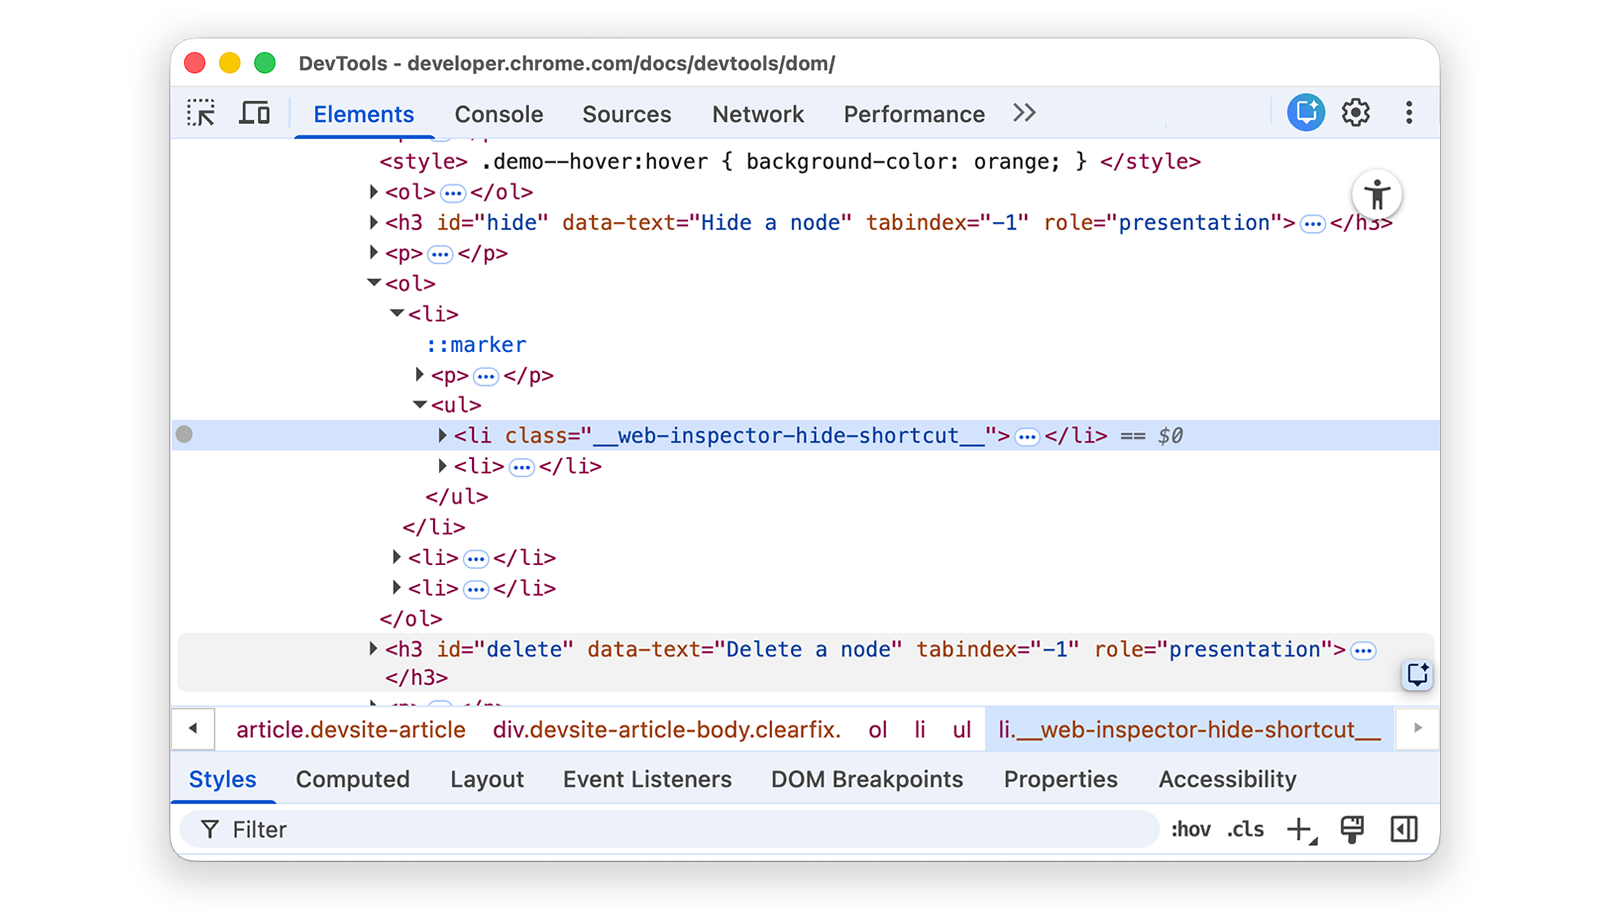
Press the H key again. The node is shown again.
Delete a node
Press Delete to delete a node.
From the following list, right-click Foundation and select Inspect.
- The Illustrated Man
- Through the Looking-Glass
- Foundation
Press the Delete key. The node is deleted. You can also right-click the node and use the Delete element option.
Press Control+Z or Command+Z (macOS). The last action is undone and the node reappears.
Access nodes in the Console
DevTools provides a few shortcuts for accessing DOM nodes from the Console, or getting JavaScript references to them.
Reference the currently-selected node with $0
When you inspect a node, the == $0 text next to the node means that you can
reference this node in the Console with the variable $0.
Right-click The Left Hand of Darkness list item and select Inspect.
- The Left Hand of Darkness
- Dune
Press the Escape key to open the Console Drawer. You may have to select Console to open it.
Type
$0and press the Enter key. The result of the expression is that$0evaluates to<li>The Left Hand of Darkness</li>.
Hover over the result. The node is highlighted in the viewport.
Click
<li>Dune</li>in the DOM Tree, type$0in the Console again, and then press Enter again. Now,$0evaluates to<li>Dune</li>.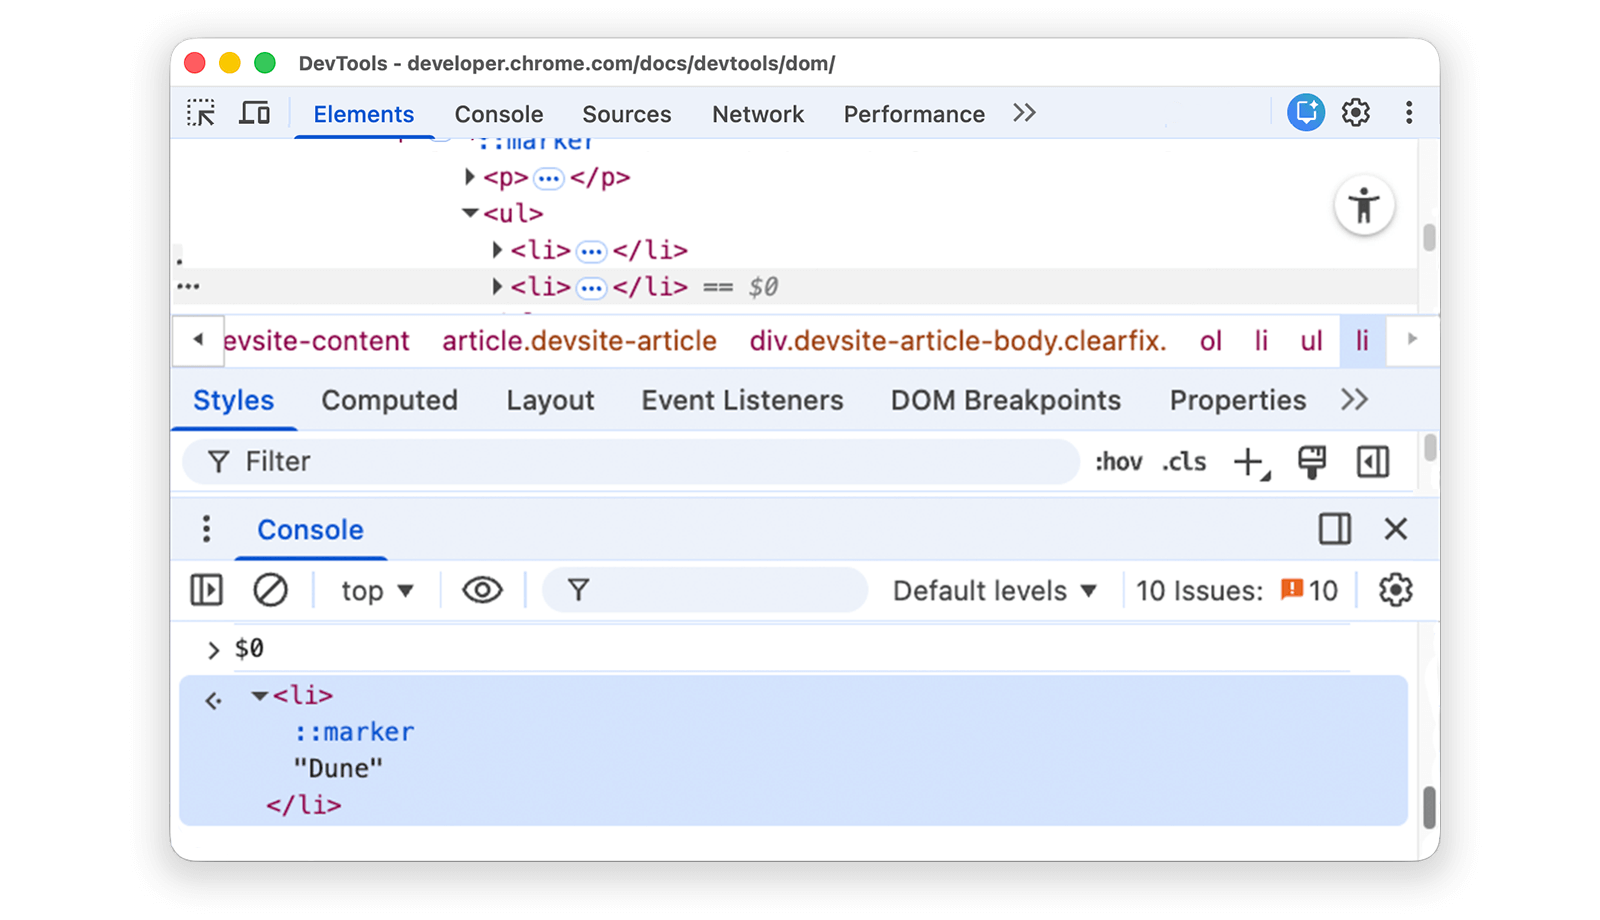
Store as global variable
If you need to refer back to a node many times, store it as a global variable.
In the following list, right-click The Big Sleep and select Inspect.
- The Big Sleep
- The Long Goodbye
Right-click
<li>The Big Sleep</li>in the DOM Tree and select Store as global variable. If you can't find this option, read about missing options.Type
temp1in the Console and then press Enter. The result of the expression shows that the variable evaluates to the node. Click the node to expand the list item.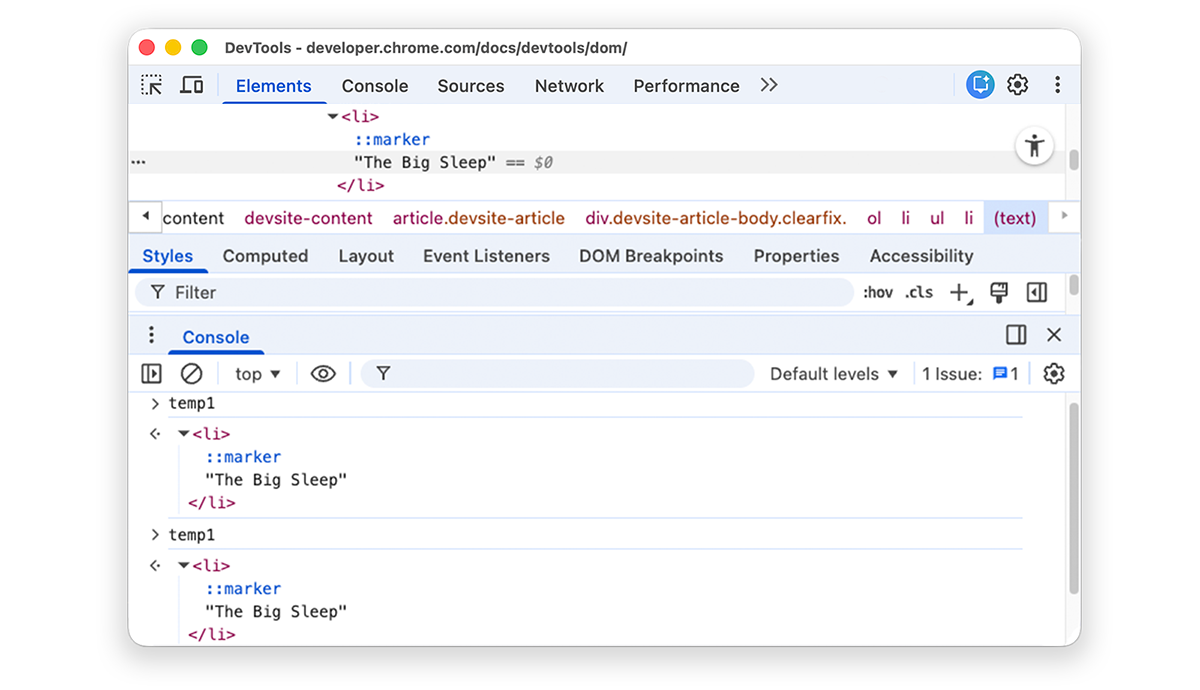
Copy JS path
Copy the JavaScript path to a node to reference it in an automated test.
In the following list, right-click The Brothers Karamazov, and select Inspect.
- The Brothers Karamazov
- Crime and Punishment
Right-click
<li>The Brothers Karamazov</li>in the DOM Tree and select Copy > Copy JS Path. Adocument.querySelector()expression that resolves to the node has been copied to your clipboard.Press Control+V or Command+V (macOS) to paste the expression into the Console.
Press Enter to evaluate the expression.

Break on DOM changes
DevTools lets you pause a page's JavaScript when the JavaScript modifies the DOM. Read about DOM change breakpoints.
Next steps
That covers most of the DOM-related features in DevTools. You can discover the rest of them by right-clicking nodes in the DOM Tree and experimenting with the options that weren't covered in this tutorial.
Keep reading:
- Read about Elements panel keyboard shortcuts.
- Read more DevTools documentation to discover everything else you can do with DevTools.
Participate in the DevTools community to contact the DevTools team or get help from other developers.
Appendix
Learn more about specific topics.
HTML versus the DOM
This section quickly explains the difference between HTML and the DOM.
When you use a web browser to request a page like https://example.com, the
server returns an HTML document:
<!doctype html>
<html>
  <head>
    <title>Hello, world!</title>
  </head>
  <body>
    <h1>Hello, world!</h1>
    <p>This is a hypertext document on the World Wide Web.</p>
    <script src="/script.js" async></script>
  </body>
</html>
The browser parses the HTML and creates a tree of objects:
html
  head
    title
  body
    h1
    p
    script
This tree of objects, or nodes, represent the page's content. This is called the document object model, or the DOM for short. Right now, the objects are the same in both the DOM and the HTML.
Suppose that the script.js file at the bottom of the HTML included the
following functions:
const h1 = document.querySelector('h1');
h1.parentElement.removeChild(h1);
const p = document.createElement('p');
p.textContent = 'Wildcard!';
document.body.appendChild(p);
That script removes the h1 node and adds another p node to the DOM. The
DOM now looks like this:
html
  head
    title
  body
    p
    script
    p
The page's HTML is now different than its DOM.
HTML represents initial page content and the DOM represents active, current page content. When JavaScript adds, removes, or edits nodes, the DOM becomes different than the HTML.
Learn more in MDN's Introduction to the DOM.
Scroll into view
This is a continuation of the Scroll into view section. Follow the instructions to complete the section.
- The
<li>Magritte</li>node should still be selected in your DOM Tree. If not, go back to Scroll into view and start over. Right-click the
<li>Magritte</li>node and select Scroll into view. Your viewport scrolls back up so that you can see the Magritte node. If Scroll into view is missing, read about missing options.
Missing options
Many instructions in this tutorial instruct you to right-click a node in the DOM Tree and then select an option from the context menu that pops up. If you don't see the specified option in the context menu, try right-clicking away from the node text.
