


Discover ways to share user flows, edit them and their steps in this comprehensive features reference of the Chrome DevTools Recorder panel.
To learn the basics of working with the Recorder panel, see Record, replay, and measure user flows.
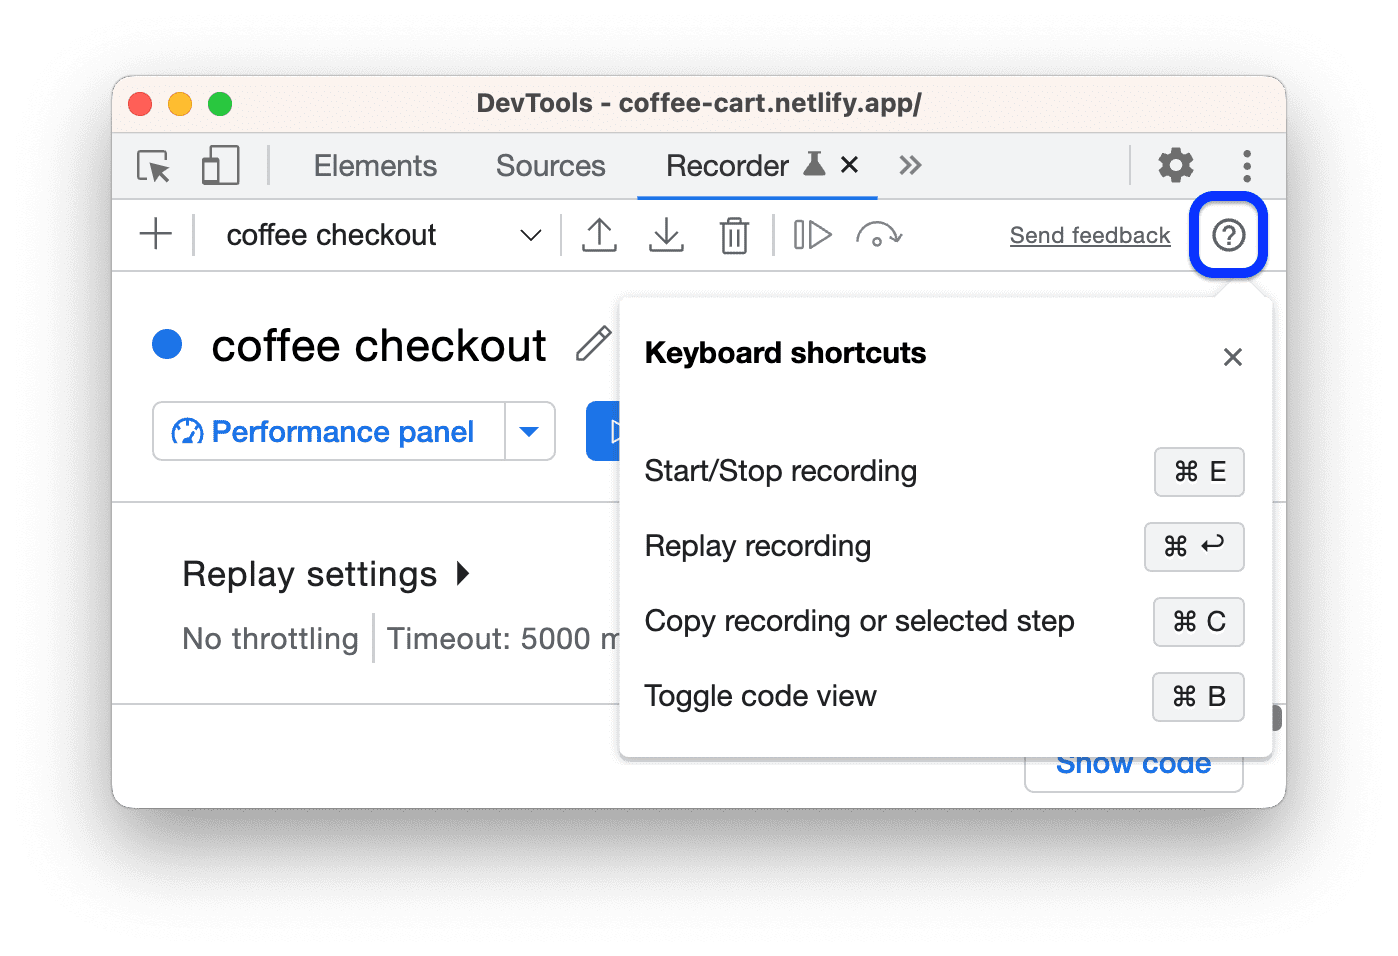
Learn and customize shortcuts
Use shortcuts to navigate the Recorder faster. For a list of default shortcuts, see Recorder panel keyboard shortcuts.
To open a hint that lists all the shortcuts right in the Recorder, click ![]() Show shortcuts in the top right corner.
Show shortcuts in the top right corner.
To customize Recorder shortcuts:
- Open
 Settings > Shortcuts.
 - Scroll down to the Recorder section.
- Follow the steps in Customize shortcuts.
Edit user flows

On the top of the Recorder panel, there are options for you to:
- Add a new recording
 . Click on the + icon to add a new recording.
 - View all recordings
 . The drop-down shows the list of saved recordings. Select the [number] recording(s) option to expand and manage the list of saved recordings.

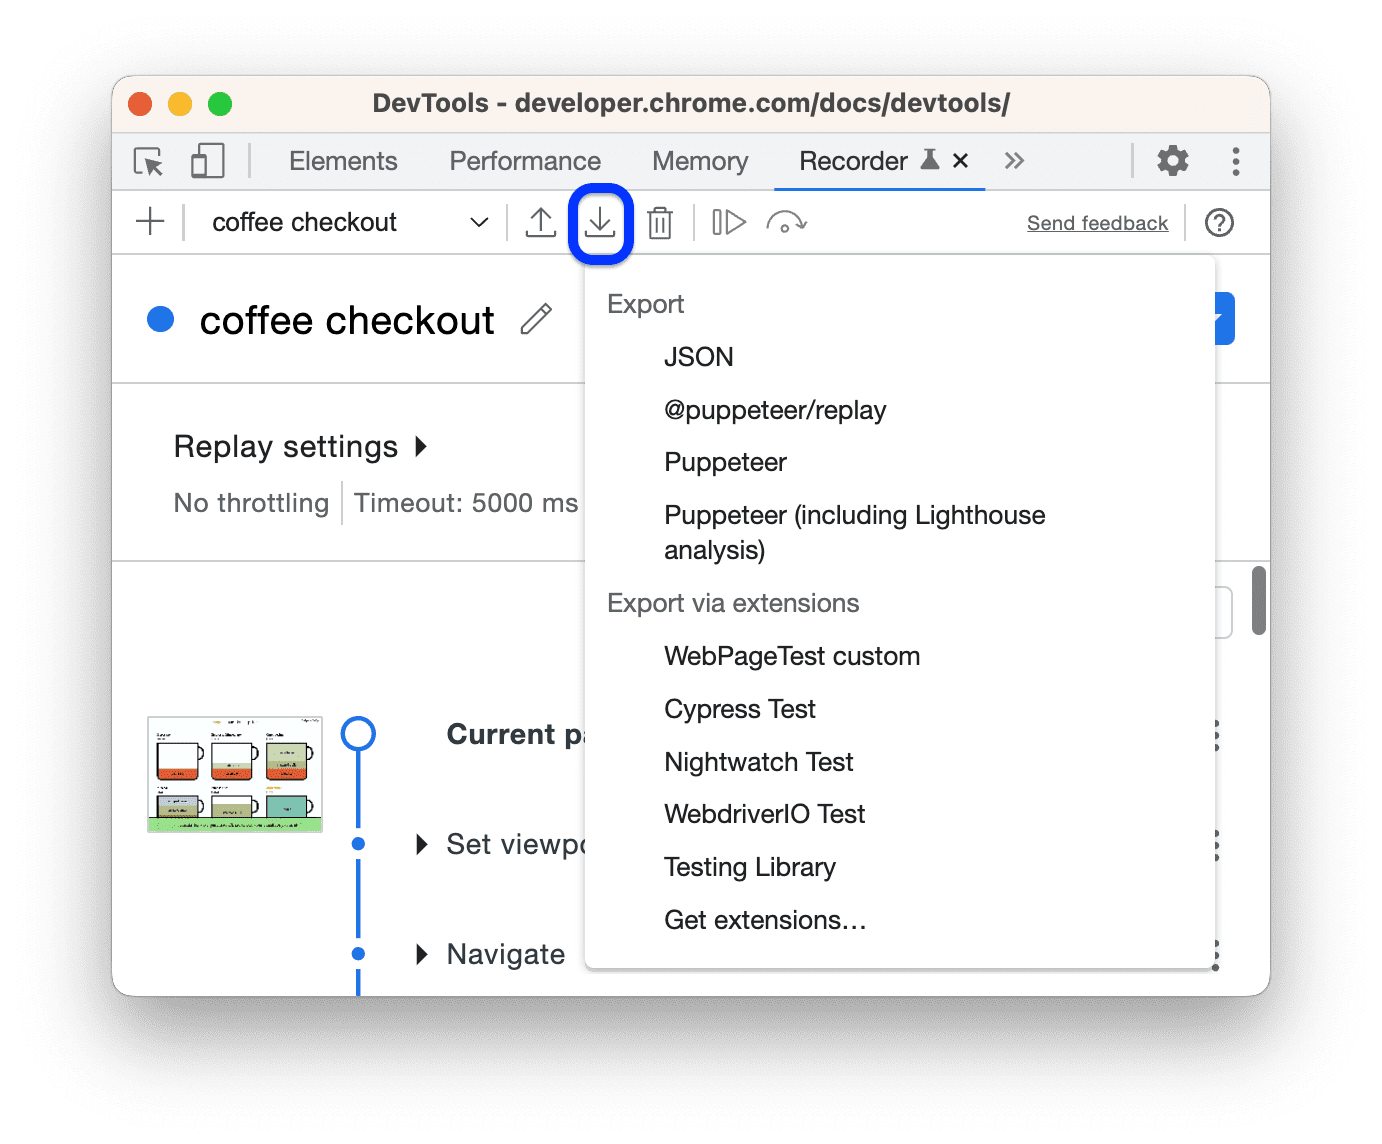
Export a recording
 . To further customize the script or share it for bug reporting purposes, you can export the user flow in one of the following formats:
- JSON file.
- @puppeteer/replay script.
- [Puppeteer](/docs/puppeteer/ script.
- Puppeteer (including Lighthouse analysis).
For more information on the formats, see Export a user flow.
Import a recording
 . Only in JSON format.
Delete a recording
 . Delete the selected recording.
You can also edit the recording's name by clicking the edit button ![]() next to it.
next to it.
Share user flows
You can export and import user flows in the Recorder. This is useful for bug reporting because you can share an exact record of the steps that reproduce a bug. You can also export and replay it with external libraries.
Export a user flow
To export a user flow:
- Open the user flow you want to export.
- Click
 Export at the top of the Recorder panel.
- Select one of the following formats from the drop-down list:
- JSON file. Download the recording as a JSON file.
- @puppeteer/replay. Download the recording as a Puppeteer Replay script.
- Puppeteer. Download the recording as a Puppeteer script.
- Puppeteer (including Lighthouse analysis). Download the recording as a Puppeteer script with an embedded Lighthouse analysis.
- One or more options provided by the Recorder's Export extensions.
- Save the file.
You can do the following with each default export option:
- JSON. Edit the human-readable JSON object and import the JSON file back to the Recorder.
- @puppeteer/replay. Replay the script with the Puppeteer Replay library. When exporting as a @puppeteer/replay script, the steps remain a JSON object. This option is perfect if you want to integrate with your CI/CD pipeline but still have the flexibility to edit the steps as JSON, later convert and import them back into the Recorder.
- Puppeteer script. Replay the script with Puppeteer. Because the steps are converted into JavaScript, you can have more fine-grained customization, for example, looping the steps. One caveat, you can't import this script back into the Recorder.
Puppeteer (including Lighthouse analysis). This export option is the same as the previous one but it includes code that generates a Lighthouse analysis.
Run the script and check out the output in a
flow.report.htmlfile:# npm i puppeteer lighthouse node your_export.js
Export in a custom format by installing an extension
See Recorder extensions.
Import a user flow
To import a user flow:
- Click the Import
 button at the top of the Recorder panel.

- Select the JSON file with the recorded user flow.
- Click the
 Replay button to run the imported user flow.
Replay with external libraries
The Puppeteer Replay is an open source library maintained by the Chrome DevTools team. It is built on top of Puppeteer. It is a command line tool, you can replay JSON files with it.
Apart from that, you can transform and replay JSON files with the following 3rd party libraries.
Transform JSON user flows to custom scripts:
- Cypress Chrome Recorder. You can use it to convert user flow JSON files to Cypress test scripts. Watch this demo to see it in action.
- Nightwatch Chrome Recorder. You can use it to convert user flow JSON files to Nightwatch test scripts.
- CodeceptJS Chrome Recorder. You can use it to convert user flow JSON files to CodeceptJS test scripts.
Replay JSON user flows:
- Replay with Testcafe. You can use TestCafe to replay user flow JSON files and generate test reports for these recordings.
- Replay with Sauce Labs. You can replay the JSON files on Sauce Labs using saucectl.
Debug user flows
Like any code, sometimes you have to debug the recorded user flows.
To help you debug, the Recorder panel lets you slow down the replays, set breakpoints, step through the execution, and inspect code in various formats in parallel with steps.
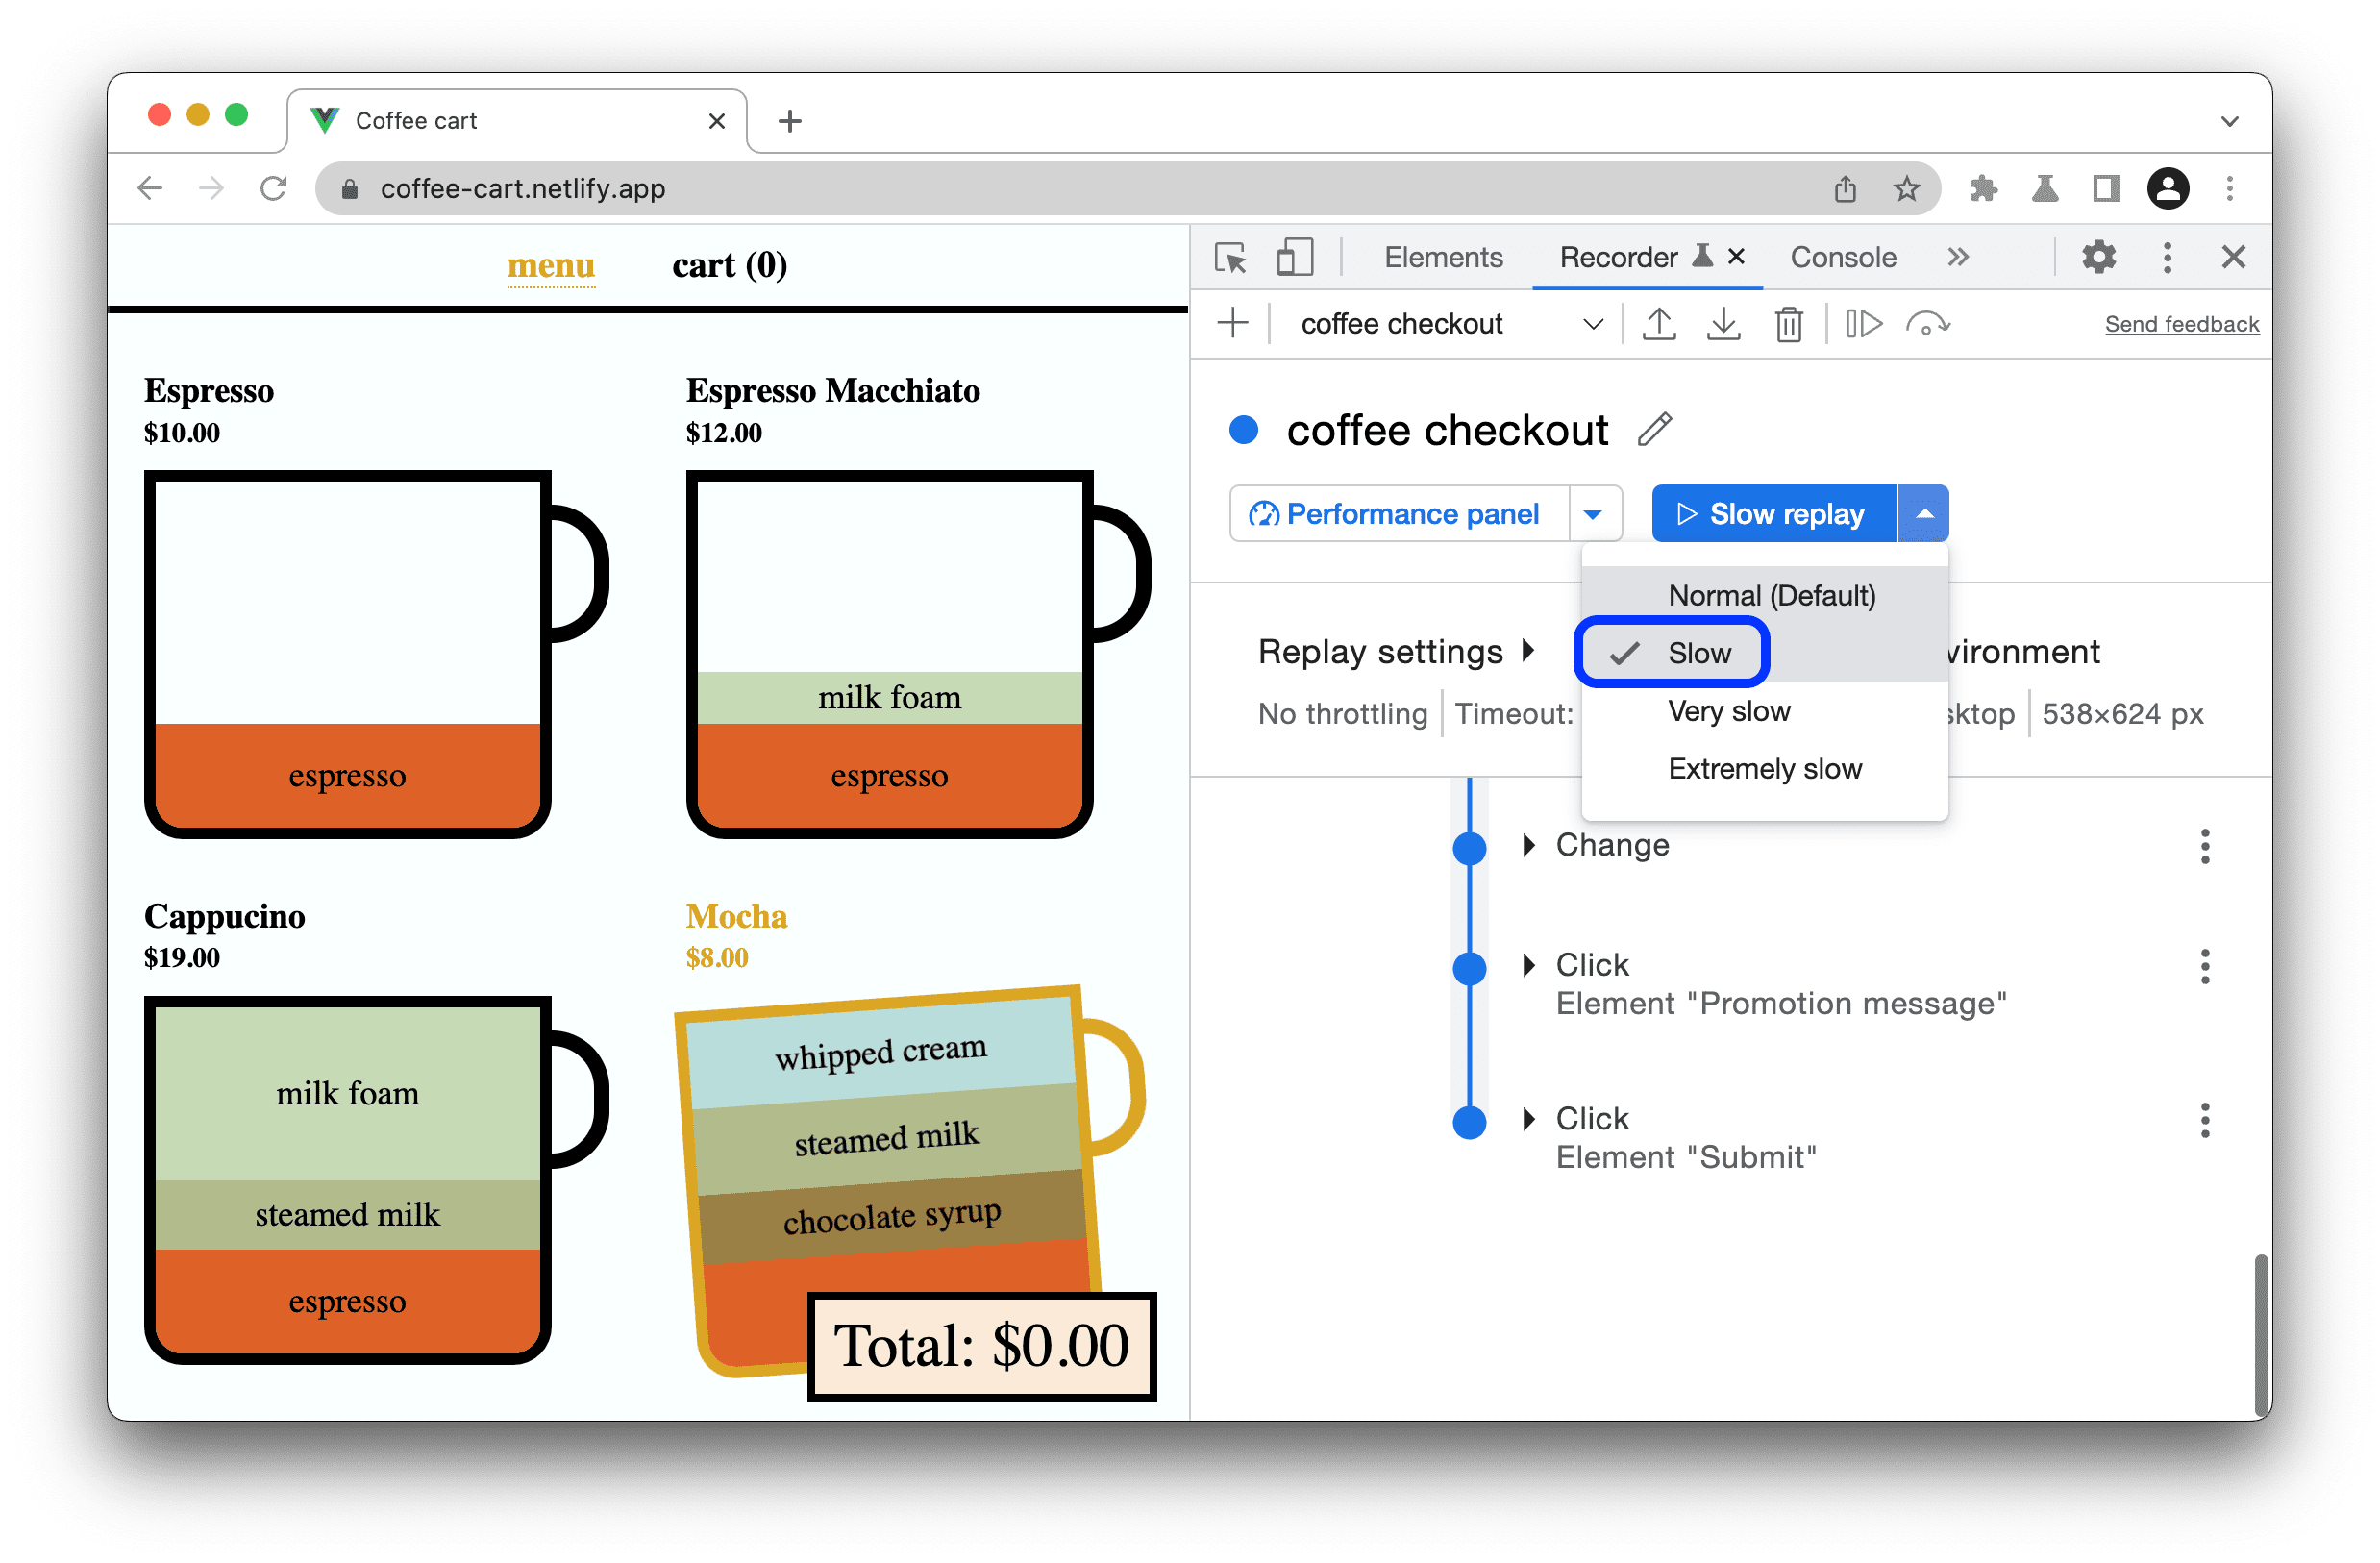
Slow down the replay
By default, the Recorder replays the user flow as fast as it can. To understand what happens in the recording, you can slow down the replay speed:
- Open the
 Replay drop-down menu.
 - Choose one of the replay speed options:
- Normal (Default)
- Slow
- Very slow
- Extremely slow
Inspect code
To inspect the code of a user flow in various formats:
- Open a recording in the Recorder panel.
- Click Show code in the top right corner of the steps list.

- The Recorder shows a side-by-side view of the steps and their code.

- As you hover over a step, the Recorder highlights its respective code in any format, including those provided by extensions.
Expand the format drop-down list to select a format that you use to export user flows.

It can be one of the three default formats (JSON, @puppeteer/replay, Puppeteer script or a format provided by an extension.
Proceed to debug your recording by editing step parameters and values. The code view isn't editable but it updates accordingly as you make changes to steps on the left.
Set breakpoints and execute step by step
To set a breakpoint and execute step by step:
- Hover over the
 circle next to any step in a recording. The circle turns into a
  breakpoint icon.
 - Click the
 breakpoint icon and replay the recording. The executions pauses at the breakpoint.

- To step through the execution, click the
 Execute one step button on the action bar at the top of the Recorder panel.
 - To stop the replay, click
 Cancel replay.
Edit steps
You can edit any step in the recording by clicking the ![]() button next to it, both during the recording and after.
button next to it, both during the recording and after.
You can also add missing steps and remove accidentally recorded ones.
Add steps
Sometimes, you may need to add steps manually. For example, the Recorder doesn't automatically capture hover events because this pollutes the recording and not all such events are useful. However, UI elements such as drop-down menus can appear only on hover. You can manually add hover steps to user flows that depend on such elements.
To manually add a step:
- Open this demo page and start a new recording.

- Hover over the element in the viewport. An action menu pops up.

- Pick an action from the menu and end the recording. The Recorder captures only the click event.

- Try to replay the recording by clicking
 Replay. The replay fails after a timeout because the Recorder can't access the element in the menu.

- Click the
 three-dot button next to the Click step and select Add step before.

- Expand the new step. By default, it has the
waitForElementtype. Click the value next totypeand selecthover.
- Next, set an appropriate selector for the new step. Click
 Select, then click an area on the
 Hover over me!element that's outside the pop-up menu. The selector is set to#clickable.
- Try replaying the recording again. With the added hover step, the Recorder successfully replays the flow.

Add assertions
During recording, you can assert, for example, HTML attributes and JavaScript properties. To add an assertion:
- Start a recording, for example, on this demo page.
Click Add assertion.
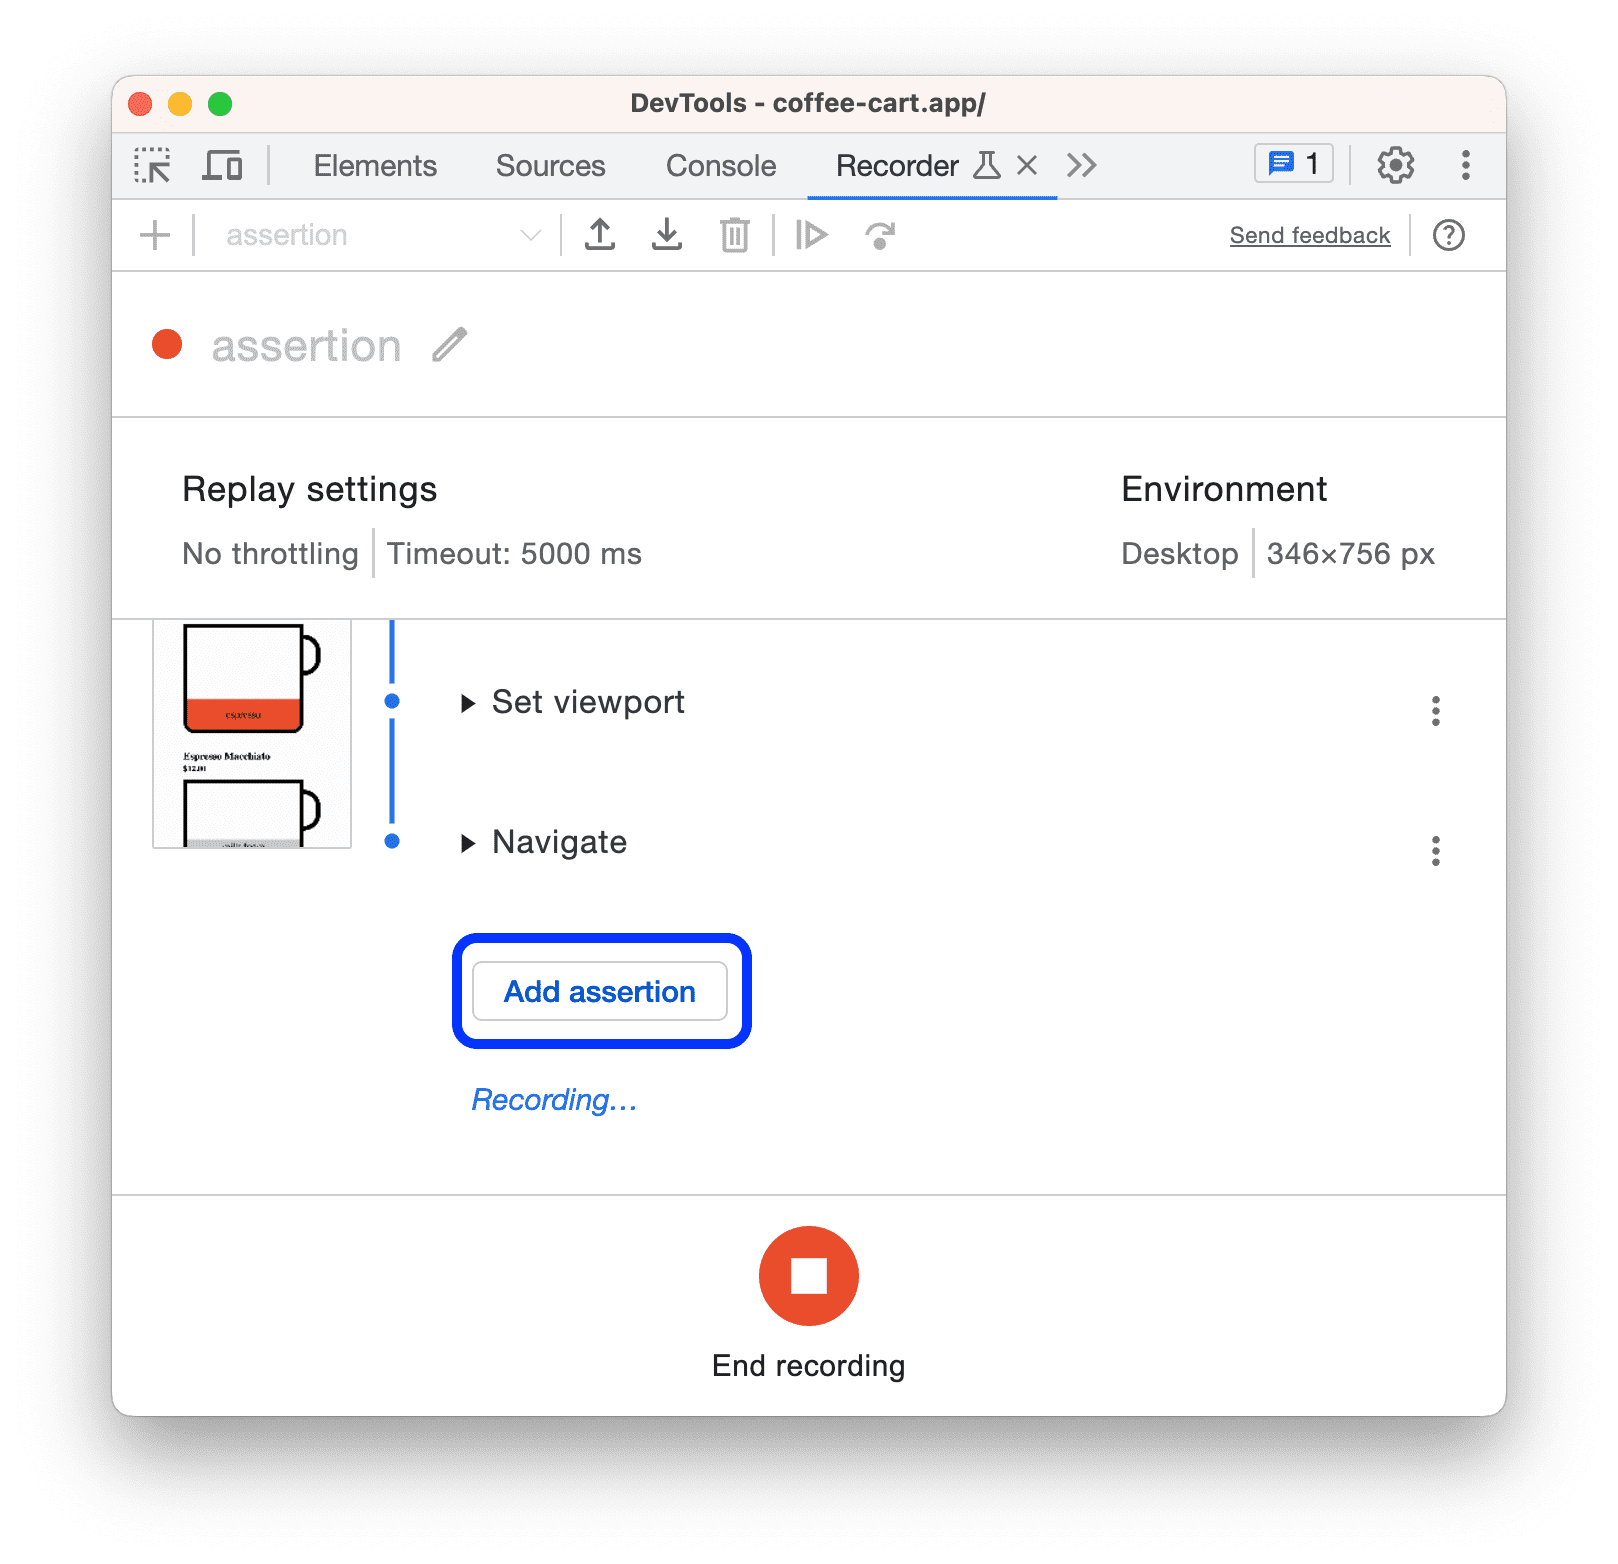
The Recorder creates a configurable
waitForElementstep.Specify selectors for this step.
Configure the step but don't change its
waitForElementtype. For example, you can specify:- HTML attribute. Click Add attributes and type the attribute's name and value that elements on this page use. For example,
data-test: <value>. - JavaScript property. Click Add properties and type the property's name and value in JSON format. For example,
{".innerText":"<text>"}. - Other step properties. For example,
visible: true.
- HTML attribute. Click Add attributes and type the attribute's name and value that elements on this page use. For example,
Proceed to record the rest of the user flow and then stop the recording.
Click
 Replay. If an assertion fails, the Recorder displays an error after a timeout.
Watch the following video to see this workflow in action.
Copy steps
Instead of exporting the entire user flow, you can copy a single step to the clipboard:
- Right-click the step you want to copy or click the
 three-dot icon next to it.
 - In the drop-down menu, select one of the Copy as ... options.
You can copy steps in various formats: JSON, Puppeteer, @puppeteer/replay, and those provided by extensions.
Remove steps
To remove an accidentally recorded step, right-click the step or click the ![]() three-dot icon next to it and select Remove step.
three-dot icon next to it and select Remove step.

Additionally, the Recorder automatically adds two separate steps to the start of every recording:

- Set viewport. Lets you control the viewport's dimensions, scaling, and other properties.
- Navigate. Sets the URL and automatically refreshes the page for every replay.
To perform in-page automation without reloading the page, remove the navigation step as described above.
Configure steps
To configure a step:
Specify its type:
click,doubleClick,hover, (input)change,keyUp,keyDown,scroll,close,navigate(to a page),waitForElement,waitForExpression, orsetViewport.Other properties depend on the
typevalue.Specify the required properties below the
type.
Click the corresponding buttons to add optional type-specific properties and specify them.
For a list of available properties, see Step properties.
To remove an optional property, click the ![]() Remove button next to it.
Remove button next to it.
To add or remove an element to or from an array property, click the + or - buttons next to the element.
Step properties
Each step can have the following optional properties:
target—a URL for the Chrome DevTools Protocol (CDP) target, the defaultmainkeyword refers to the current page.assertedEventsthat currently can only be a singlenavigationevent
Other common properties available for most of the step types are:
frame—an array of zero-based indexes that identify an iframe that can be nested. For example, you can identify the first (0) iframe inside a second (1) iframe of the main target as[1, 0].timeout—a number of milliseconds to wait before executing a step. For more information, see Adjust timeouts for steps.selectors—an array of selectors. For more information, see Understand selectors.
Type-specific properties are:
| Type | Property | Required | Description |
clickdoubleClick |
offsetXoffsetY |
Relative to the top-left of the element content box, in pixels | |
clickdoubleClick |
button |
Pointer button: primary | auxiliary | second | back | forward | |
change |
value |
Final value | |
keyDownkeyUp |
key |
Key name | |
scroll |
xy |
Absolute scroll x and y positions in pixels, default 0 | |
navigate |
url |
Target URL | |
waitForElement |
operator |
>= | == (default) | <= | |
waitForElement |
count |
Number of elements identified by a selector | |
waitForElement |
attributes |
HTML attribute and its value | |
waitForElement |
properties |
JavaScript property and its value in JSON | |
waitForElement |
visible |
Boolean. True if the element is in the DOM and visible (doesn't have display: none or visibility: hidden) |
|
waitForElementwaitForExpression |
asserted events |
Currently, only type: navigation but you can specify the title and URL |
|
waitForElementwaitForExpression |
timeout |
Maximum time to wait in milliseconds | |
waitForExpression |
expression |
JavaScript expression that resolves to true | |
setViewport |
widthheight |
Width and height of the viewport in pixels | |
setViewport |
deviceScaleFactor |
Similar to Device Pixel Ratio (DPR), default 1 | |
setViewport |
isMobilehasTouchisLandscape |
Boolean flags that specify whether to: |
There are two properties that make the replay pause:
The
waitForElementproperty makes the step wait for the presence (or absence) of a number of elements identified by a selector. For example, the following step waits for less than three elements to be on the page that match the selector.my-class."type": "waitForElement", "selectors": [".my-class"], "operator": "<=", "count": 2,The
waitForExpressionproperty makes the step wait for a JavaScript expression to resolve to true. For example, the following step pauses for two seconds and then resolves to true allowing the replay to continue."type": "waitForExpression", "expression": "new Promise(resolve => setTimeout(() => resolve(true), 2000))",
Adjust timeouts for steps
In case your page has slow network requests or lengthy animations, the replay can fail on steps that exceed the default timeout of 5000 milliseconds.
To avoid this problem, you can adjust the default timeout for each step at once or set separate timeouts for specific steps. Timeouts on specific steps overwrite the default.
To adjust the default timeout for each step at once:
Click on Replay settings to make the Timeout box editable.

In the Timeout box, set the timeout value in milliseconds.
Click
 Replay to see the adjusted default timeout in action.
To overwrite the default timeout on a specific step:
Expand the step and click Add timeout.

Click on the
timeout: <value>and set the value in milliseconds.
Click
 Replay to see the step with the timeout in action.
To remove a timeout overwrite on a step, click the Delete![]() button next to it.
button next to it.
Understand selectors
When you start a new recording, you can configure the following:

- In the Selector attribute textbox, enter a custom test attribute. The Recorder will use this attribute to detect selectors instead of a list of common test attributes.
In the Selector types to record set of checkboxes, choose the types of selectors to detect automatically:
 CSS. Syntactic selectors.
 ARIA. Semantic selectors.
 Text. Selectors with the shortest unique text if available.
 XPath. Selectors that use XML Path Language.
 Pierce. Selectors similar to the CSS ones but that can pierce shadow DOM.
Common test selectors
For simple webpages, id attributes and CSS class attributes are sufficient for the Recorder to detect the selectors. However, that might not always be the case because:
- Your webpages may use dynamic classes or IDs that change.
- Your selectors may break because of code or framework changes.
For example, the CSS class values might be auto-generated for applications developed with modern JavaScript frameworks (for example, React, Angular, Vue) and CSS frameworks.

In these cases, you can use data-* attributes to create more resilient tests. There are already some common data-* selectors that developers use for automation. The Recorder supports them as well.
If you have the following common test selectors defined on your website, the Recorder automatically detects and uses them first:
data-testiddata-testdata-qadata-cydata-test-iddata-qa-iddata-testing
For example, inspect the "Cappuccino" element on this demo page and see the test attributes:

Record a click on "Cappuccino", expand the corresponding step in the recording, and check the detected selectors:

Customize the recording's selector
You can customize the selector of a recording if the common test selectors don't work for you.
For example, this demo page uses the data-automate attribute as the selector. Start a new recording and enter the data-automate as the selector attribute.

Fill in an email address and observe the selector value ([data-automate=email-address]).

Selector priority
The Recorder looks for selectors in the following order depending on if you specified a custom CSS selector attribute:
- If specified:
- CSS selector with your custom CSS attribute.
- XPath selectors.
- ARIA selector if found.
- A selector with the shortest unique text if found.
- If not specified:
- ARIA selector if found.
- CSS selectors with the following priority:
- The most common attributes used for testing:
data-testiddata-testdata-qadata-cydata-test-iddata-qa-iddata-testing
- ID attributes, for example,
<div id="some_ID">. - Regular CSS selectors.
- The most common attributes used for testing:
- XPath selectors.
- Pierce selectors.
- A selector with the shortest unique text if found.
There can be multiple regular CSS, XPath, and Pierce selectors. The Recorder captures:
- Regular CSS and XPath selectors at every root level, that is, nested shadow hosts, if any.
- Pierce selectors that are unique among all elements within all shadow roots.